- Home
- FAQ
FAQ
| How do rebuild a Price Pfister 3 handle shower valve? |
|
How do rebuild a Price Pfister 3 handle shower valve? Let’s start! Here is a drawing of all parts of the Pfister Verve handle shower trim kits. You can find the name of each part in this drawing. The parts are drawn in sequence. This is how they are installed.  Step 1. Turn off the water supply to your shower valve. Step 2. Use a part of knife or something flat or maybe a flat-head screwdriver to take the index button off. Be careful not to hurt your finger.  Step 3. Once removing the index button, you can see a Phillips head screw. Grab a cross-screwdriver and screw it off. 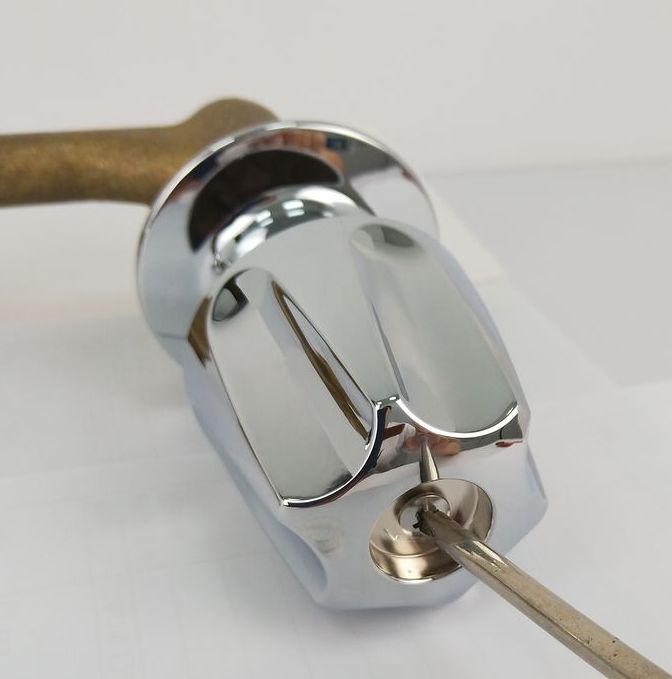 Step 4. Move the handle off by hand. 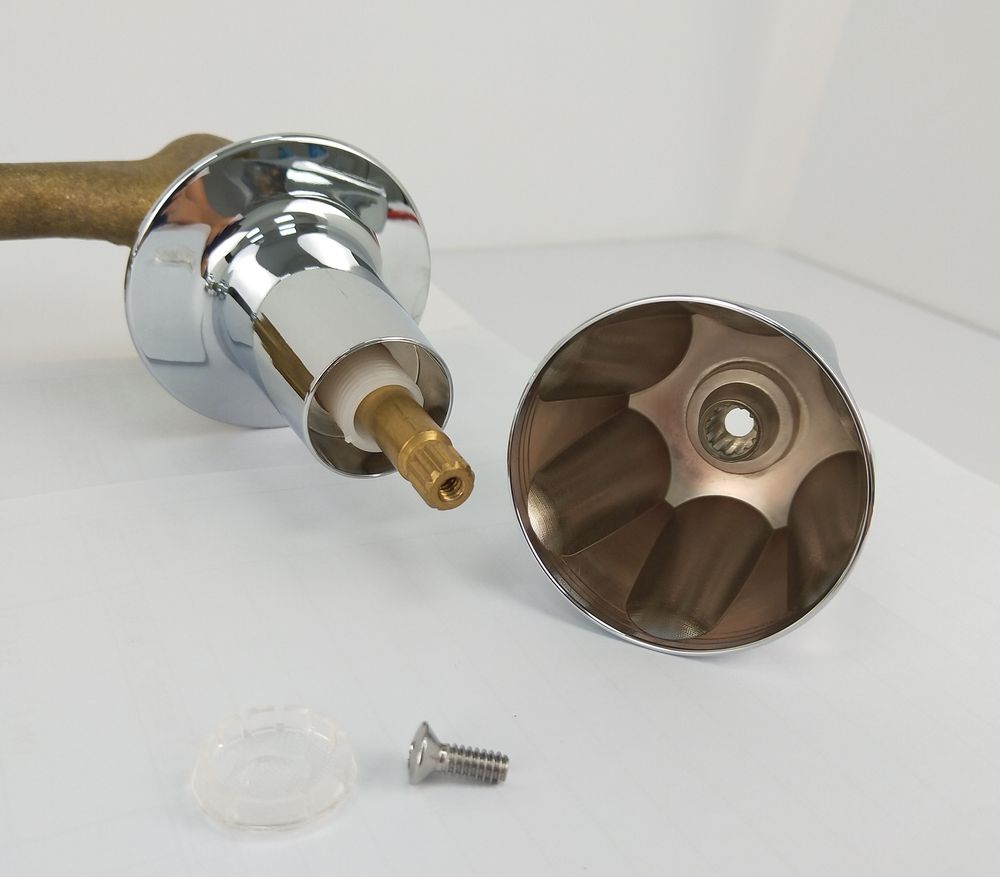 * The handle might stick on the stem firmly due to the rust or water stain. In this situation, you’d better to use a towel as a pad under the edge of the handle when removing it to avoid getting hurt. Step 5. Then, just screw off the escutcheon by hand. 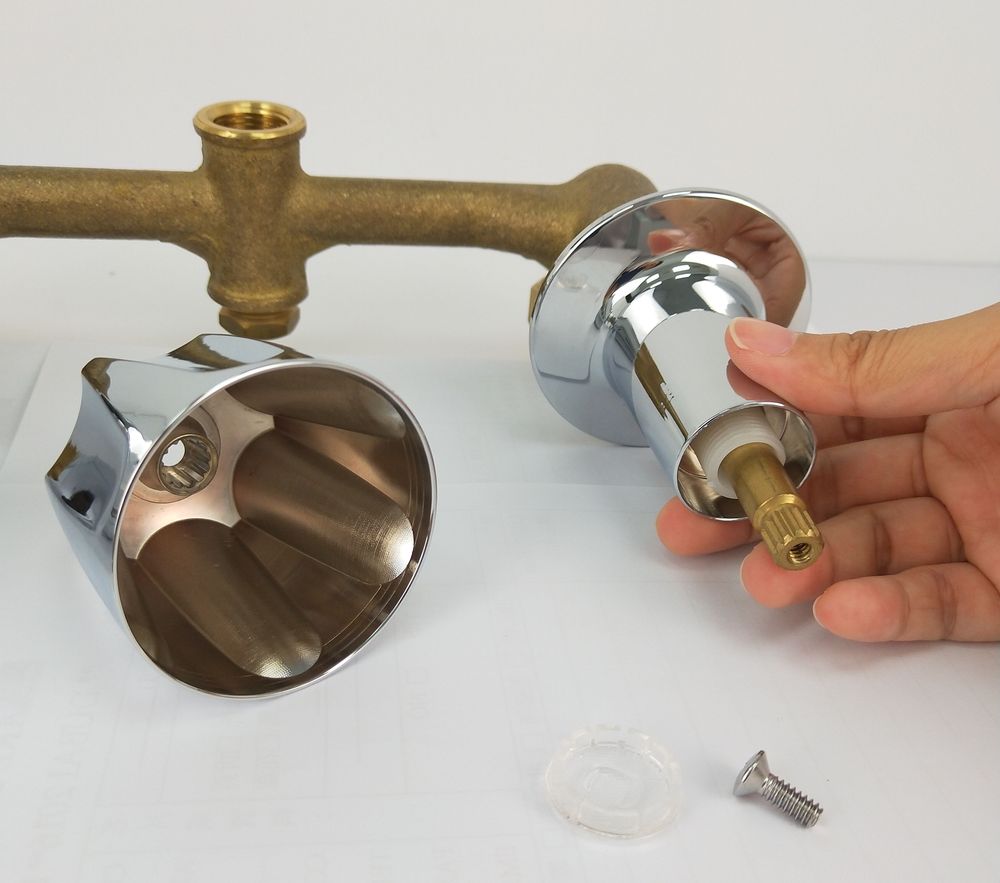 Step 6. Next, grab yourself a socket wrench, and push it through the stem. Usually, the socket wrench comes with a lever handle. Put the lever handle through the wrench and turn it to remove the stem.  * Or you can just use a wrench, but sometimes there is not enough space to use a wrench. So a socket wrench is really useful. * Don’t forget to take the bonnet washer off. It’s gonna have problem if you put two bonnet washers on the valve body. * Here you will find a worn out rubber washer beneath the stem. The surface is not flat at all. Since this is where the seal happens, if the washer is worn out, it leaks. Step 7. What you need to do next is to look at the condition of the seat. The seat is deep inside the valve body. If the face of the seat is corroded, it’s necessary to replace it. This is important because the bonnet washer and the seat make the seal. 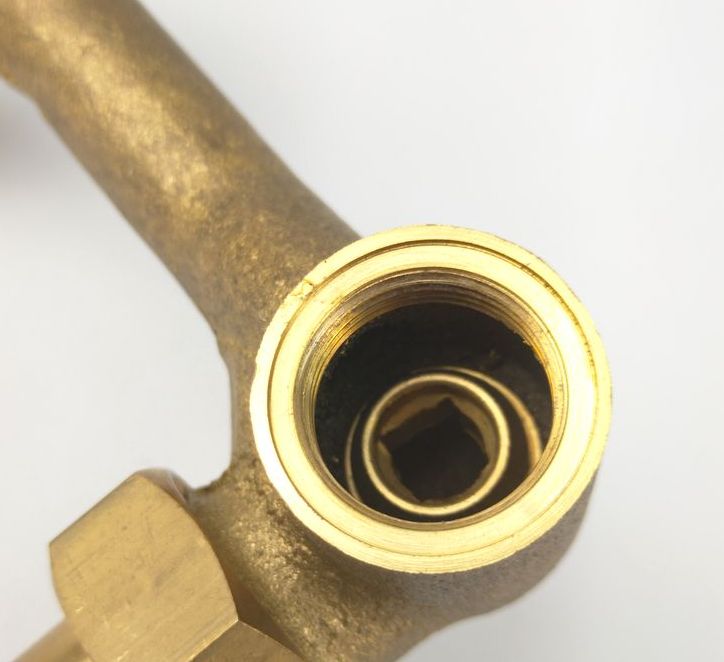 You can see a new seat here. The face is clean and super smooth. If the seat is etched, remove it with a seat wrench. 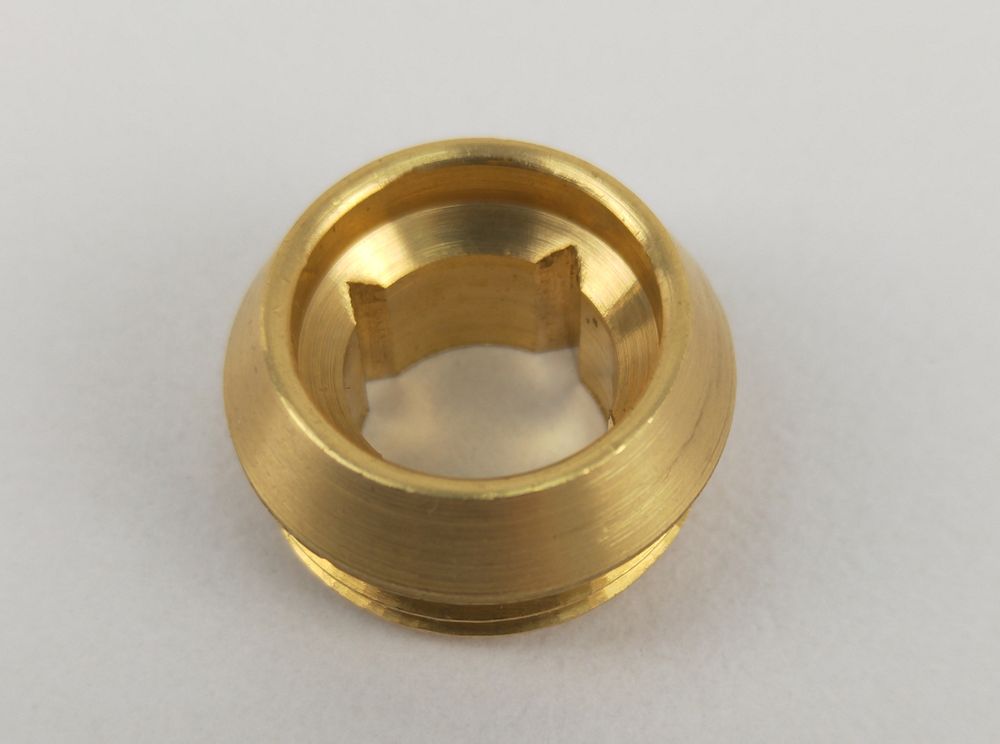 Step 8. Take a new seat and apply some thread sealant on the thread of the seat and screw it back to the valve body. *Better with the help of a seat wrench. 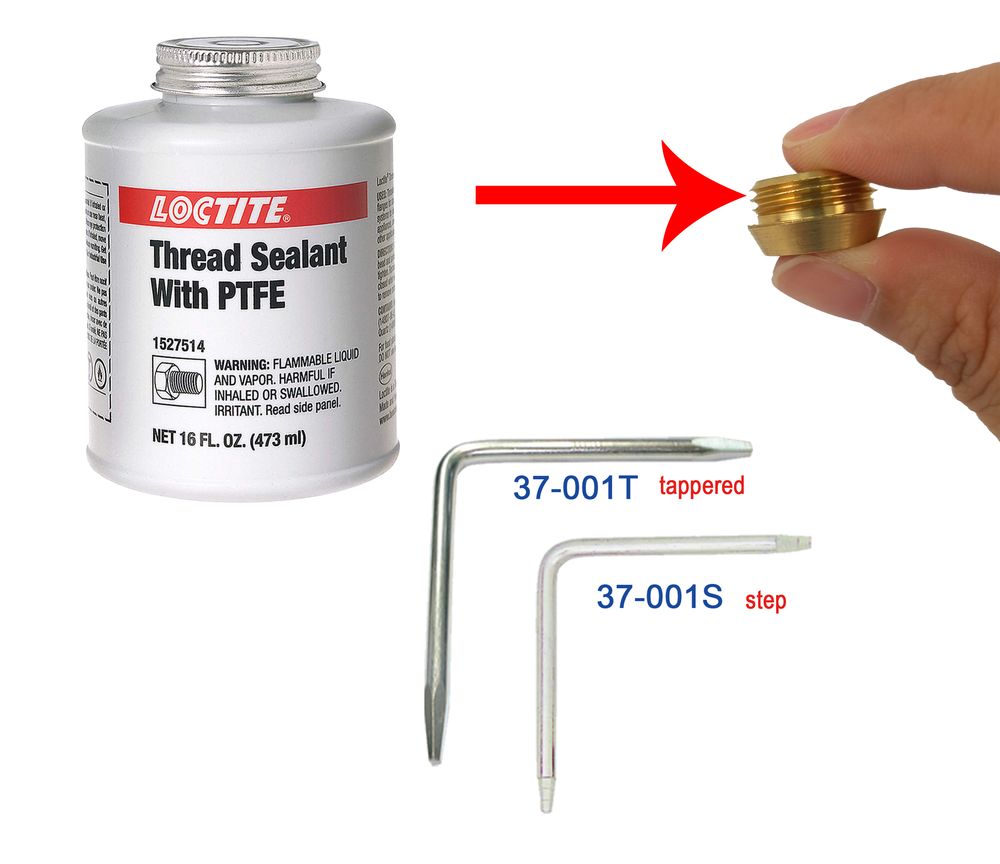 Step 9. Take a new stem. Make sure that the bonnet washer is put under the stem. Screw on the stem. Better to turn with a socket wrench firmly, but don’t over-do it. 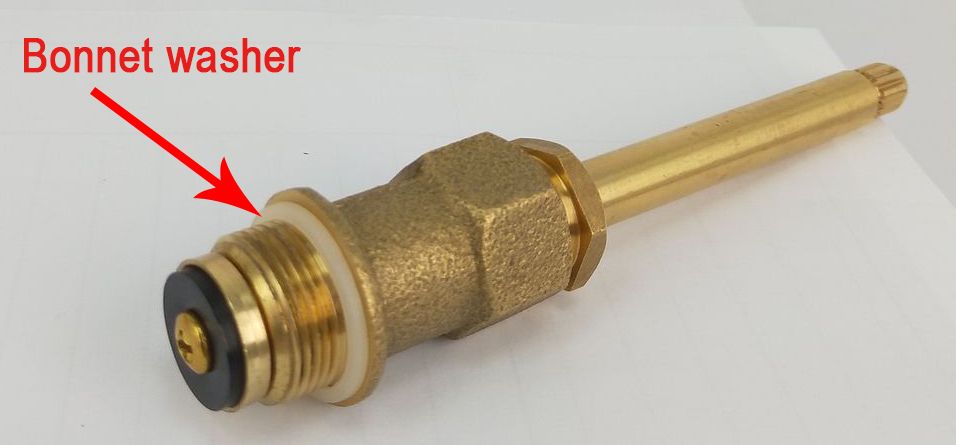 Step 10. Screw the nipple on the packing of the stem. The nipple is to keep the escutcheon in the position.  Step 11. Screw on the escutcheon. Just like how it was installed previously. Step 12. Slide the handle on the spline/broach of the stem. Step 13. Grab a screwdriver to screw the Phillips head screw on the handle. Now the handle is tightened on the stem. Step 14. Last, push the index button on the handle. All is done! Now turn on the water supply to make sure the leaking problem is solved! |
| So easy to install the sink strainer with one illustration | Tips from Are Sheng |
|
So easy to install the sink strainer with one illustration! Here we draw each part of a duo cup sink strainer in sequence as below. From top to bottom, they are basket, strainer body, plumber’s putty, rubber gasket, paper washer, cup, lock nut, PE flange, Tailpiece, and connection nut.  Here is the installation step. Step 1> Take some plumber’s putty and roll it a rope. Wrap the plumber’s putty on the sink’s drain opening. Step 2> Press the strainer basket firmly down into the putty. Wipe off the excess putty on the top. Step 3> Slide the rubber gasket and paper washer through the threaded shank. *Paper washer should be under the rubber gasket, so that the lock nut spins freely without getting stuck on the rubber gasket. This can also avoid deformation of the rubber washer. Step 4> Screw the lock nut on the threaded shank firmly. Take a wrench to screw if you need. *Note the direction of the PE flange, tailpiece, coupling nut, P-trap nut and the P-trap ferrule. We indicate the direction of all parts in the drawing above and the drawing below. Check the drawing as below.  Step 5> Slide the coupling nut on the tailpiece. Step 6> Put the PE flange on the top of the tailpiece, and screw the coupling nut on the strainer body until they fix firmly. Step 7> Slide the P-trap nut on the tailpiece. *Note the direction. Squeeze the P-trap ferrule on the tailpiece. Screw the P-trap nut to the P-trap firmly. Now, congratulations! You finish the installation! 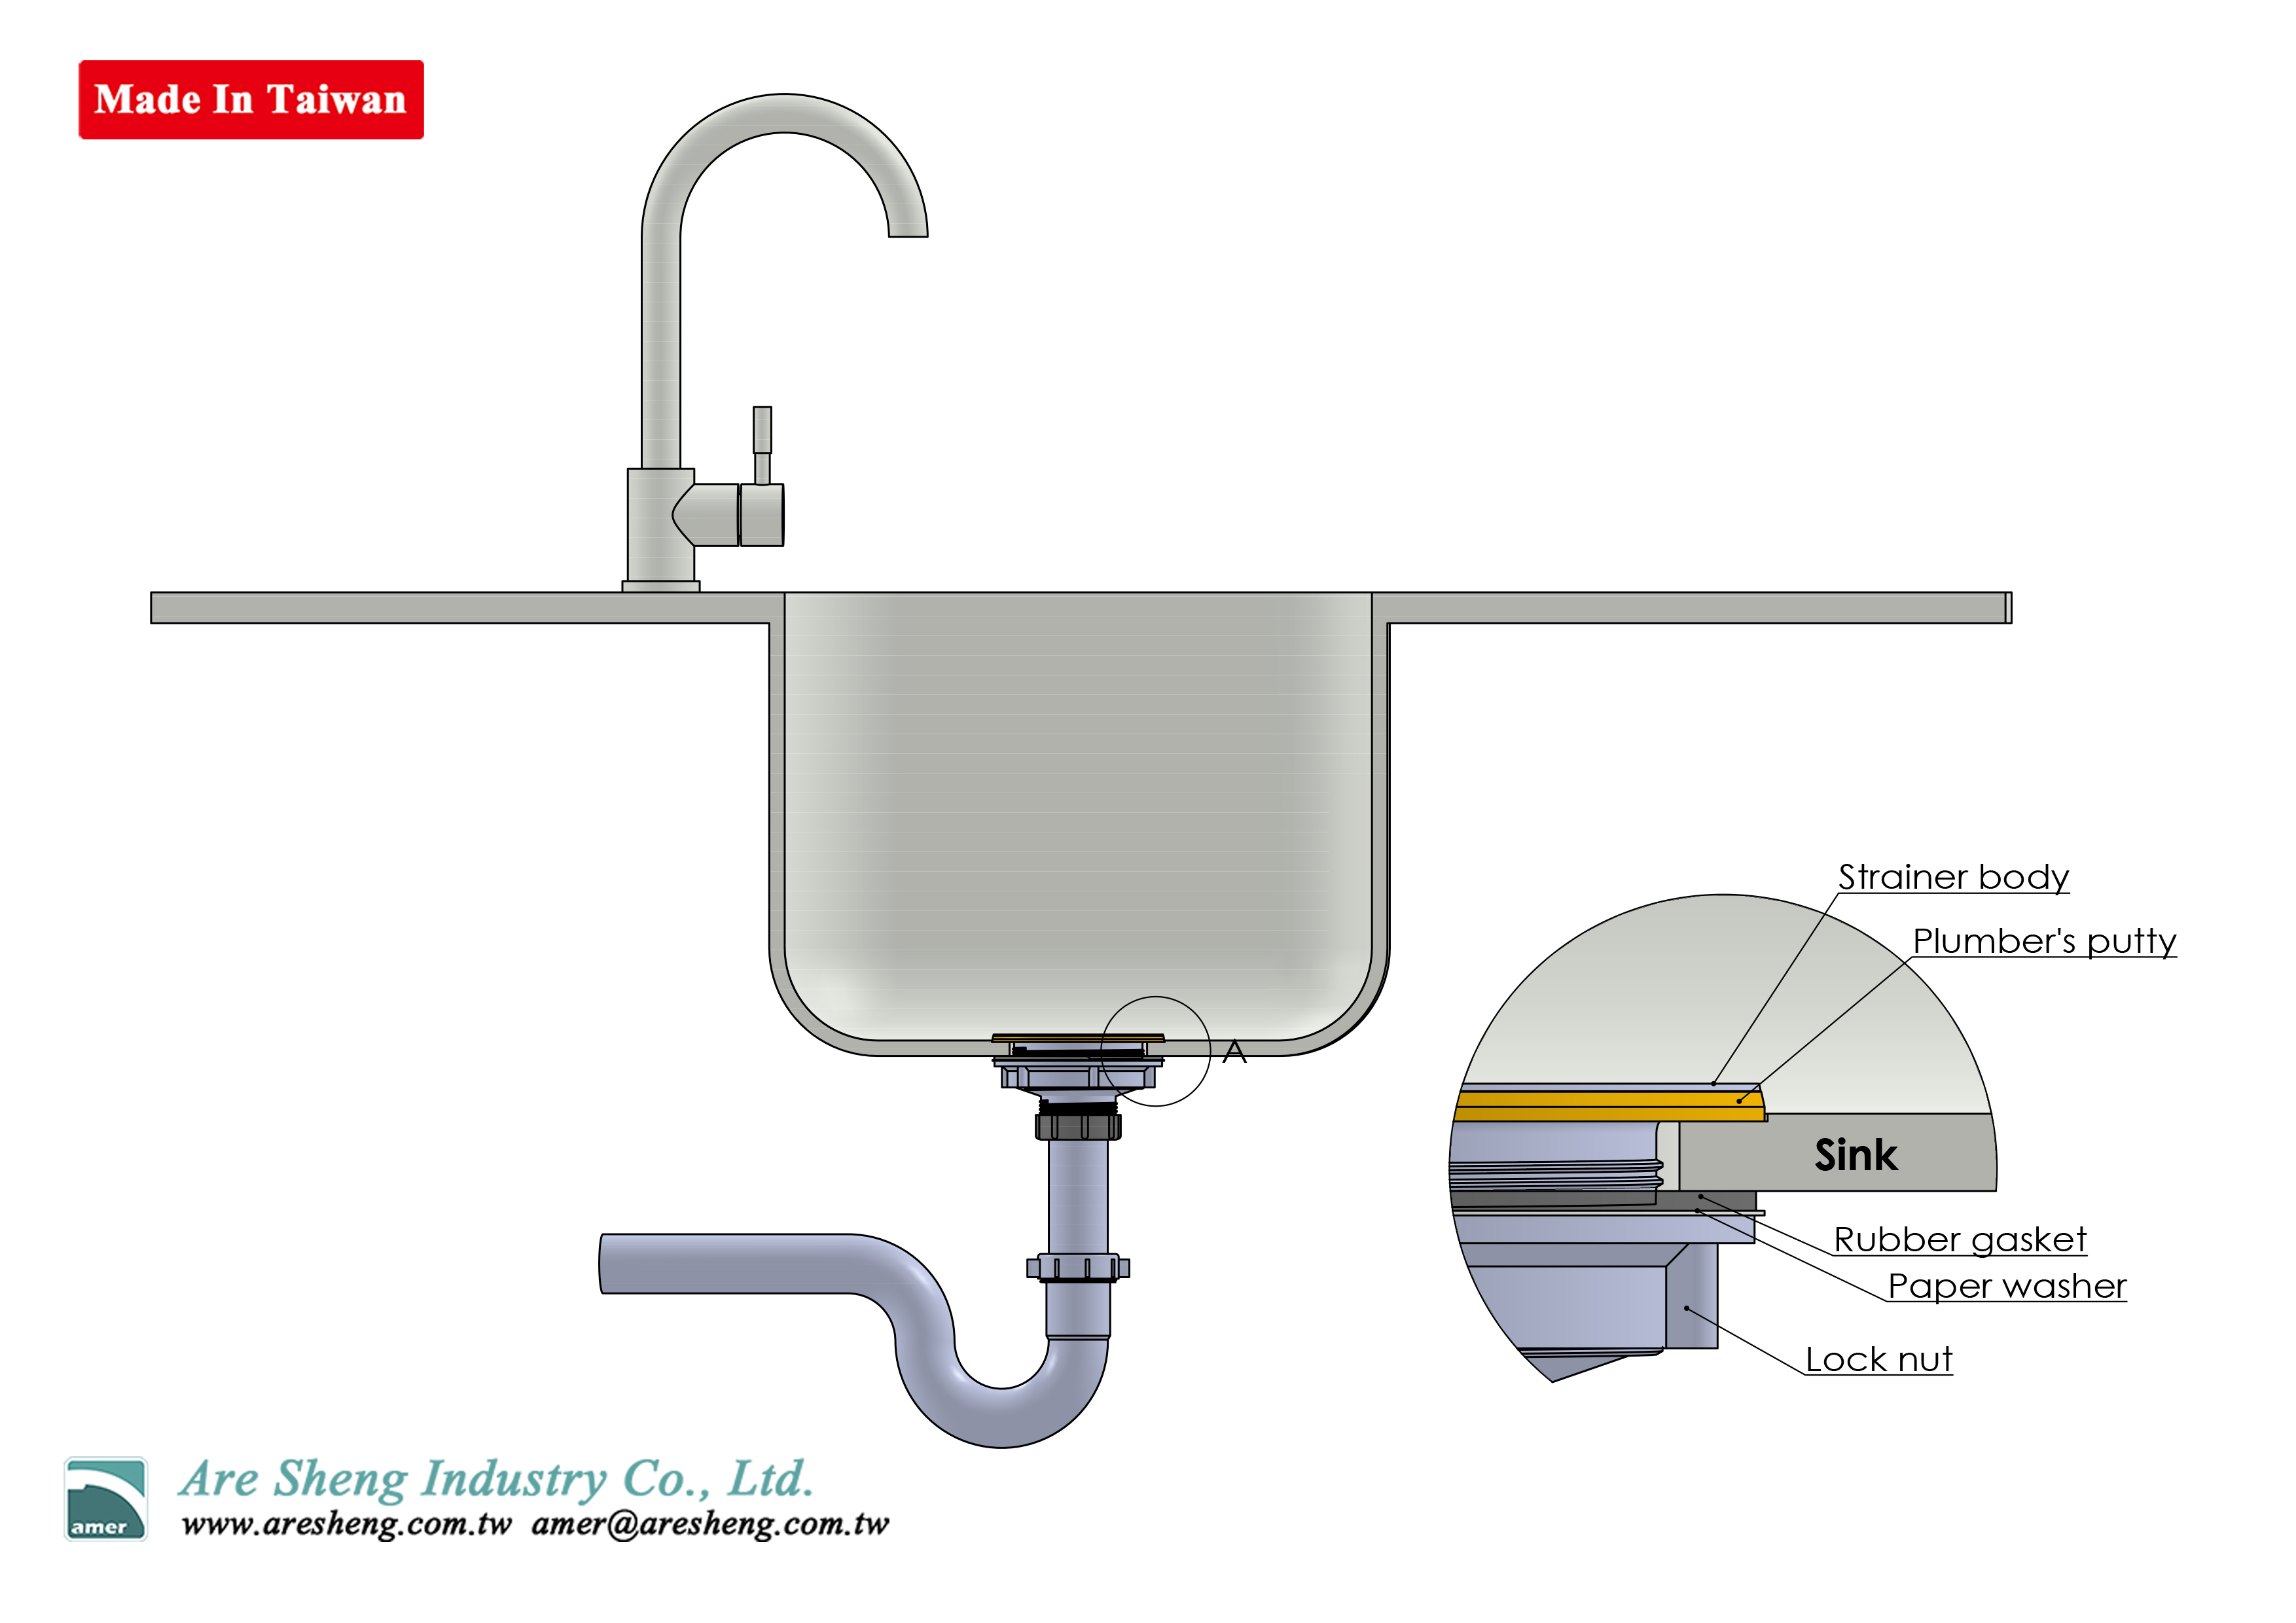 <back to the Top> |
| How to install the dishwasher air gap on my kitchen sink? |
|
How to install the dishwasher air gap on your sink? The funciton of a dishwasher air gap is to prevent the contaminants in the sink from flowing into the dishwasher and to prevent the back flow from the drain hose to your dishwasher. But how to install the air gap? Here are some tips for you to install the dishwasher air gap easily. When you get the dishwasher air gap from the hardware store or plumbing stoer, this is what it contains. Disassemble each part and you will get as bleow. (Usually, only one decorative cap). 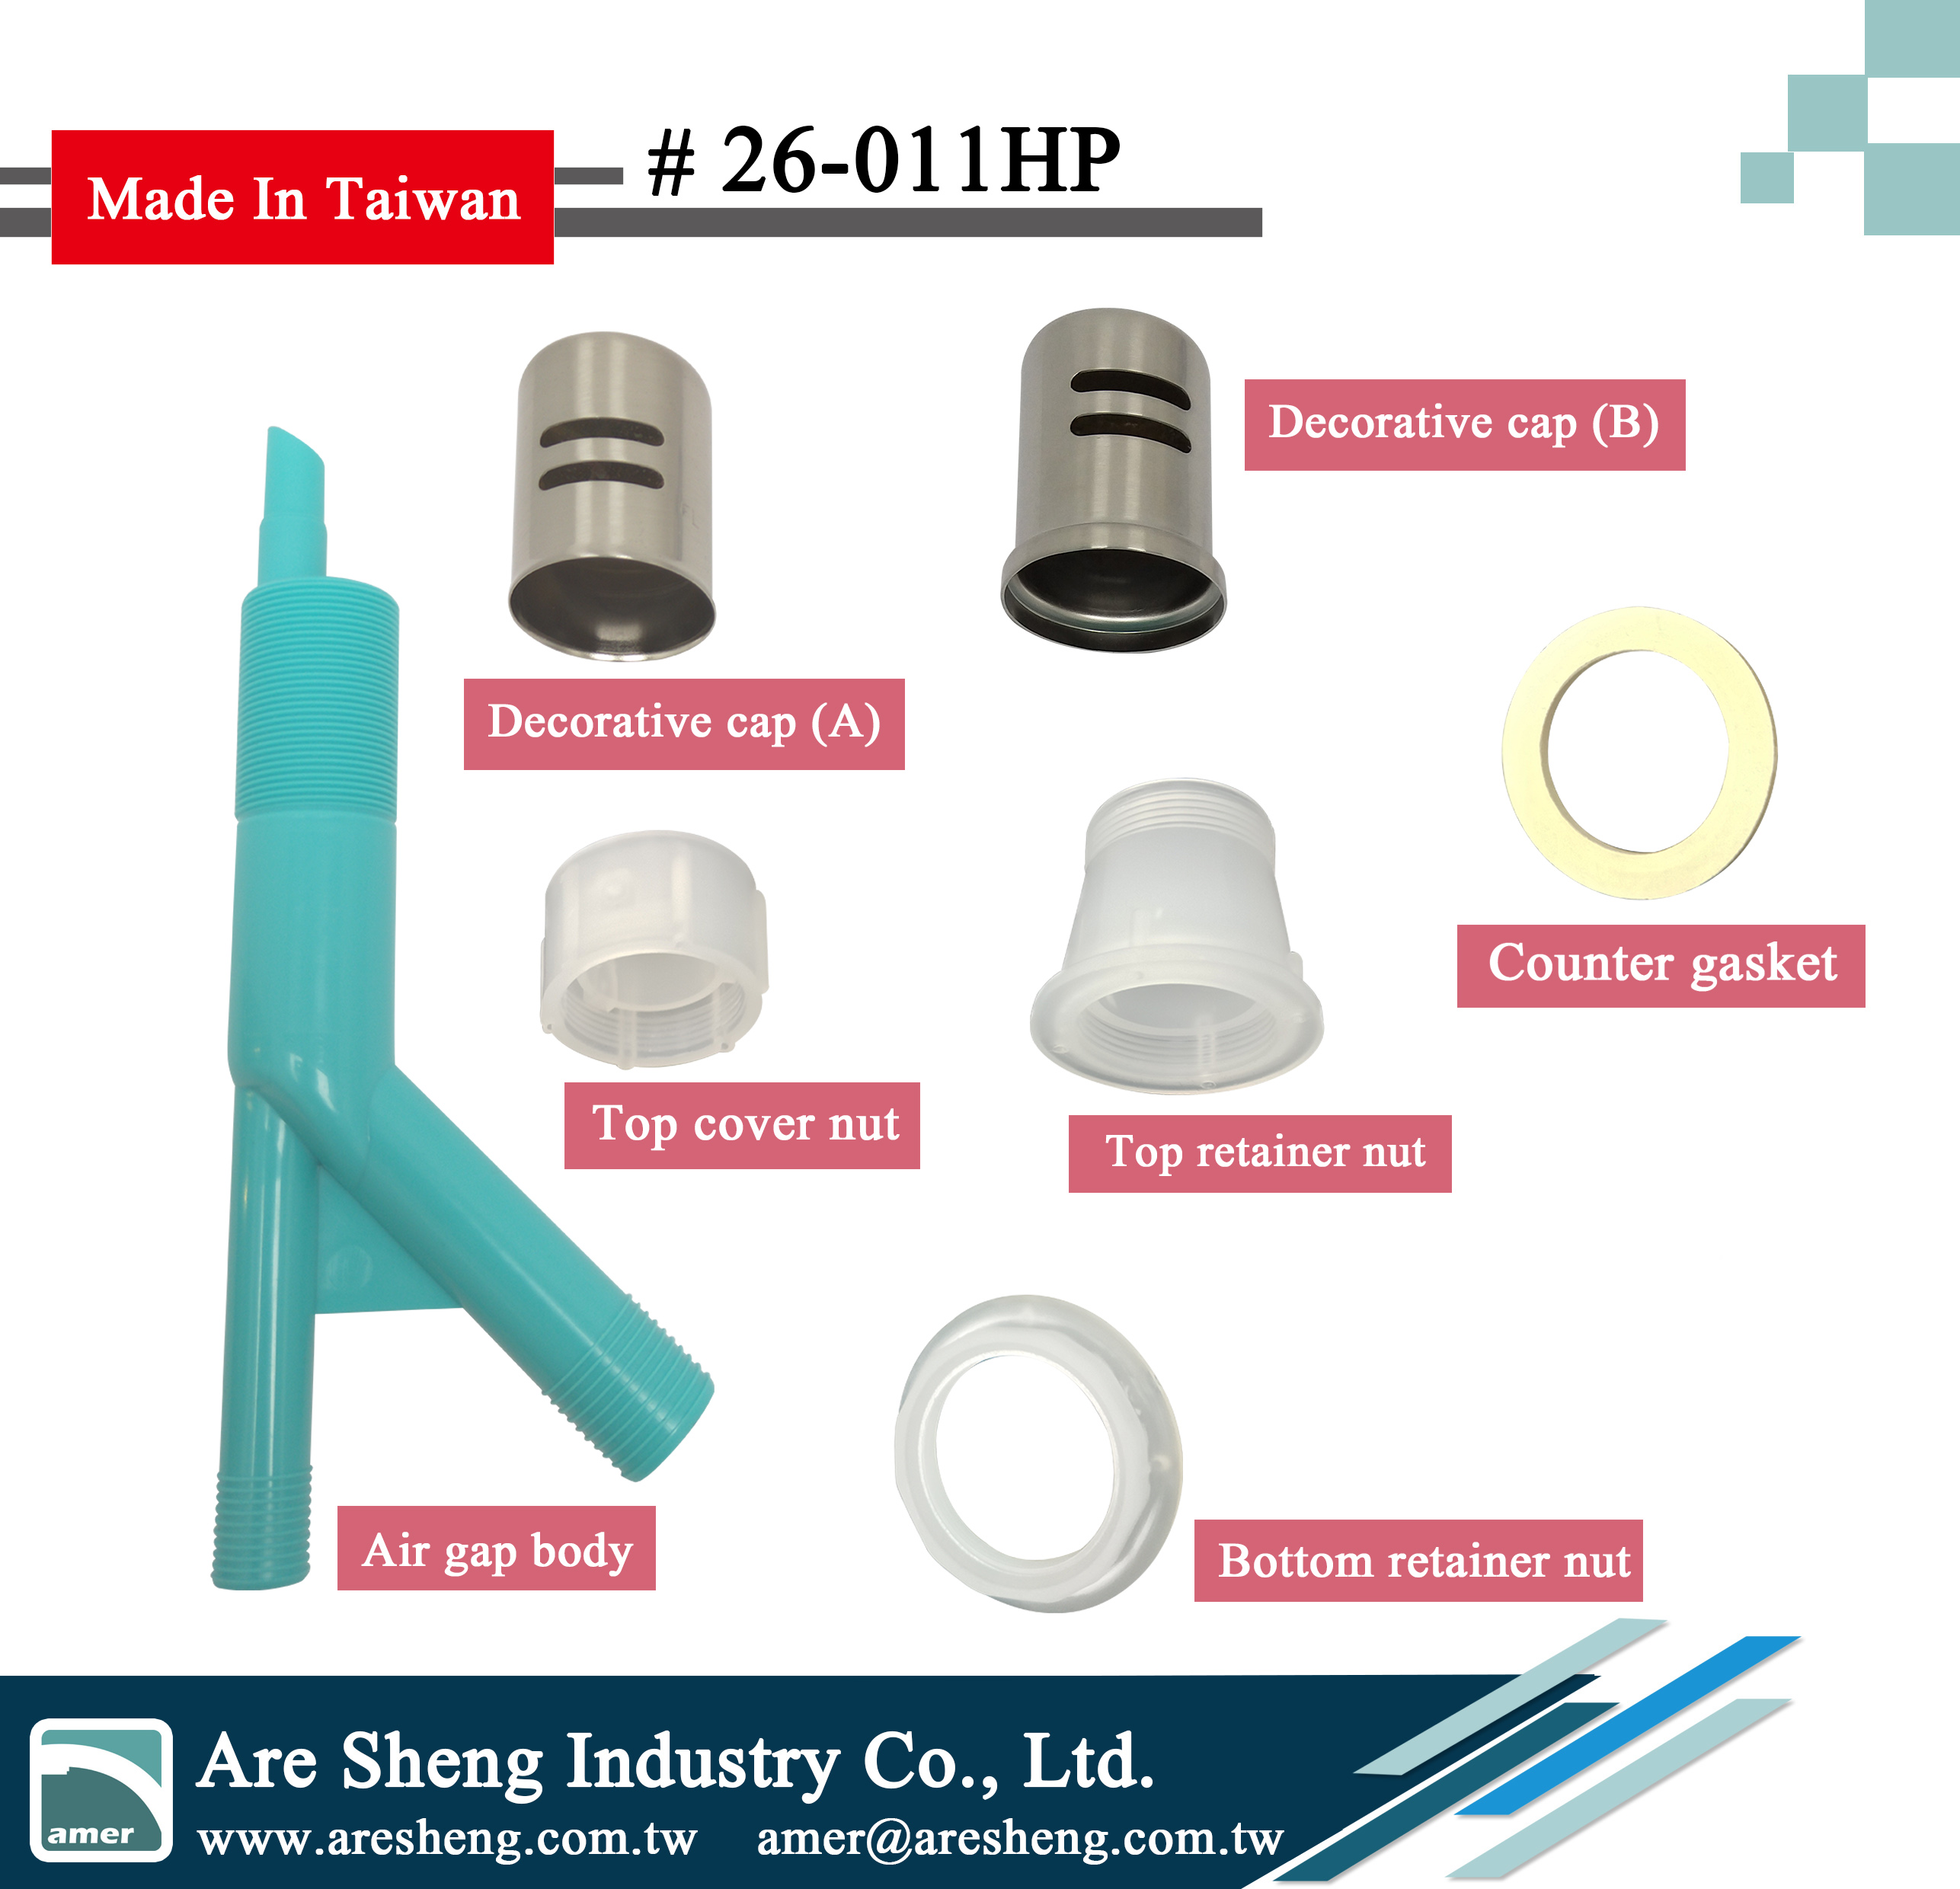 Here is a drawing to show the sequence of installation. 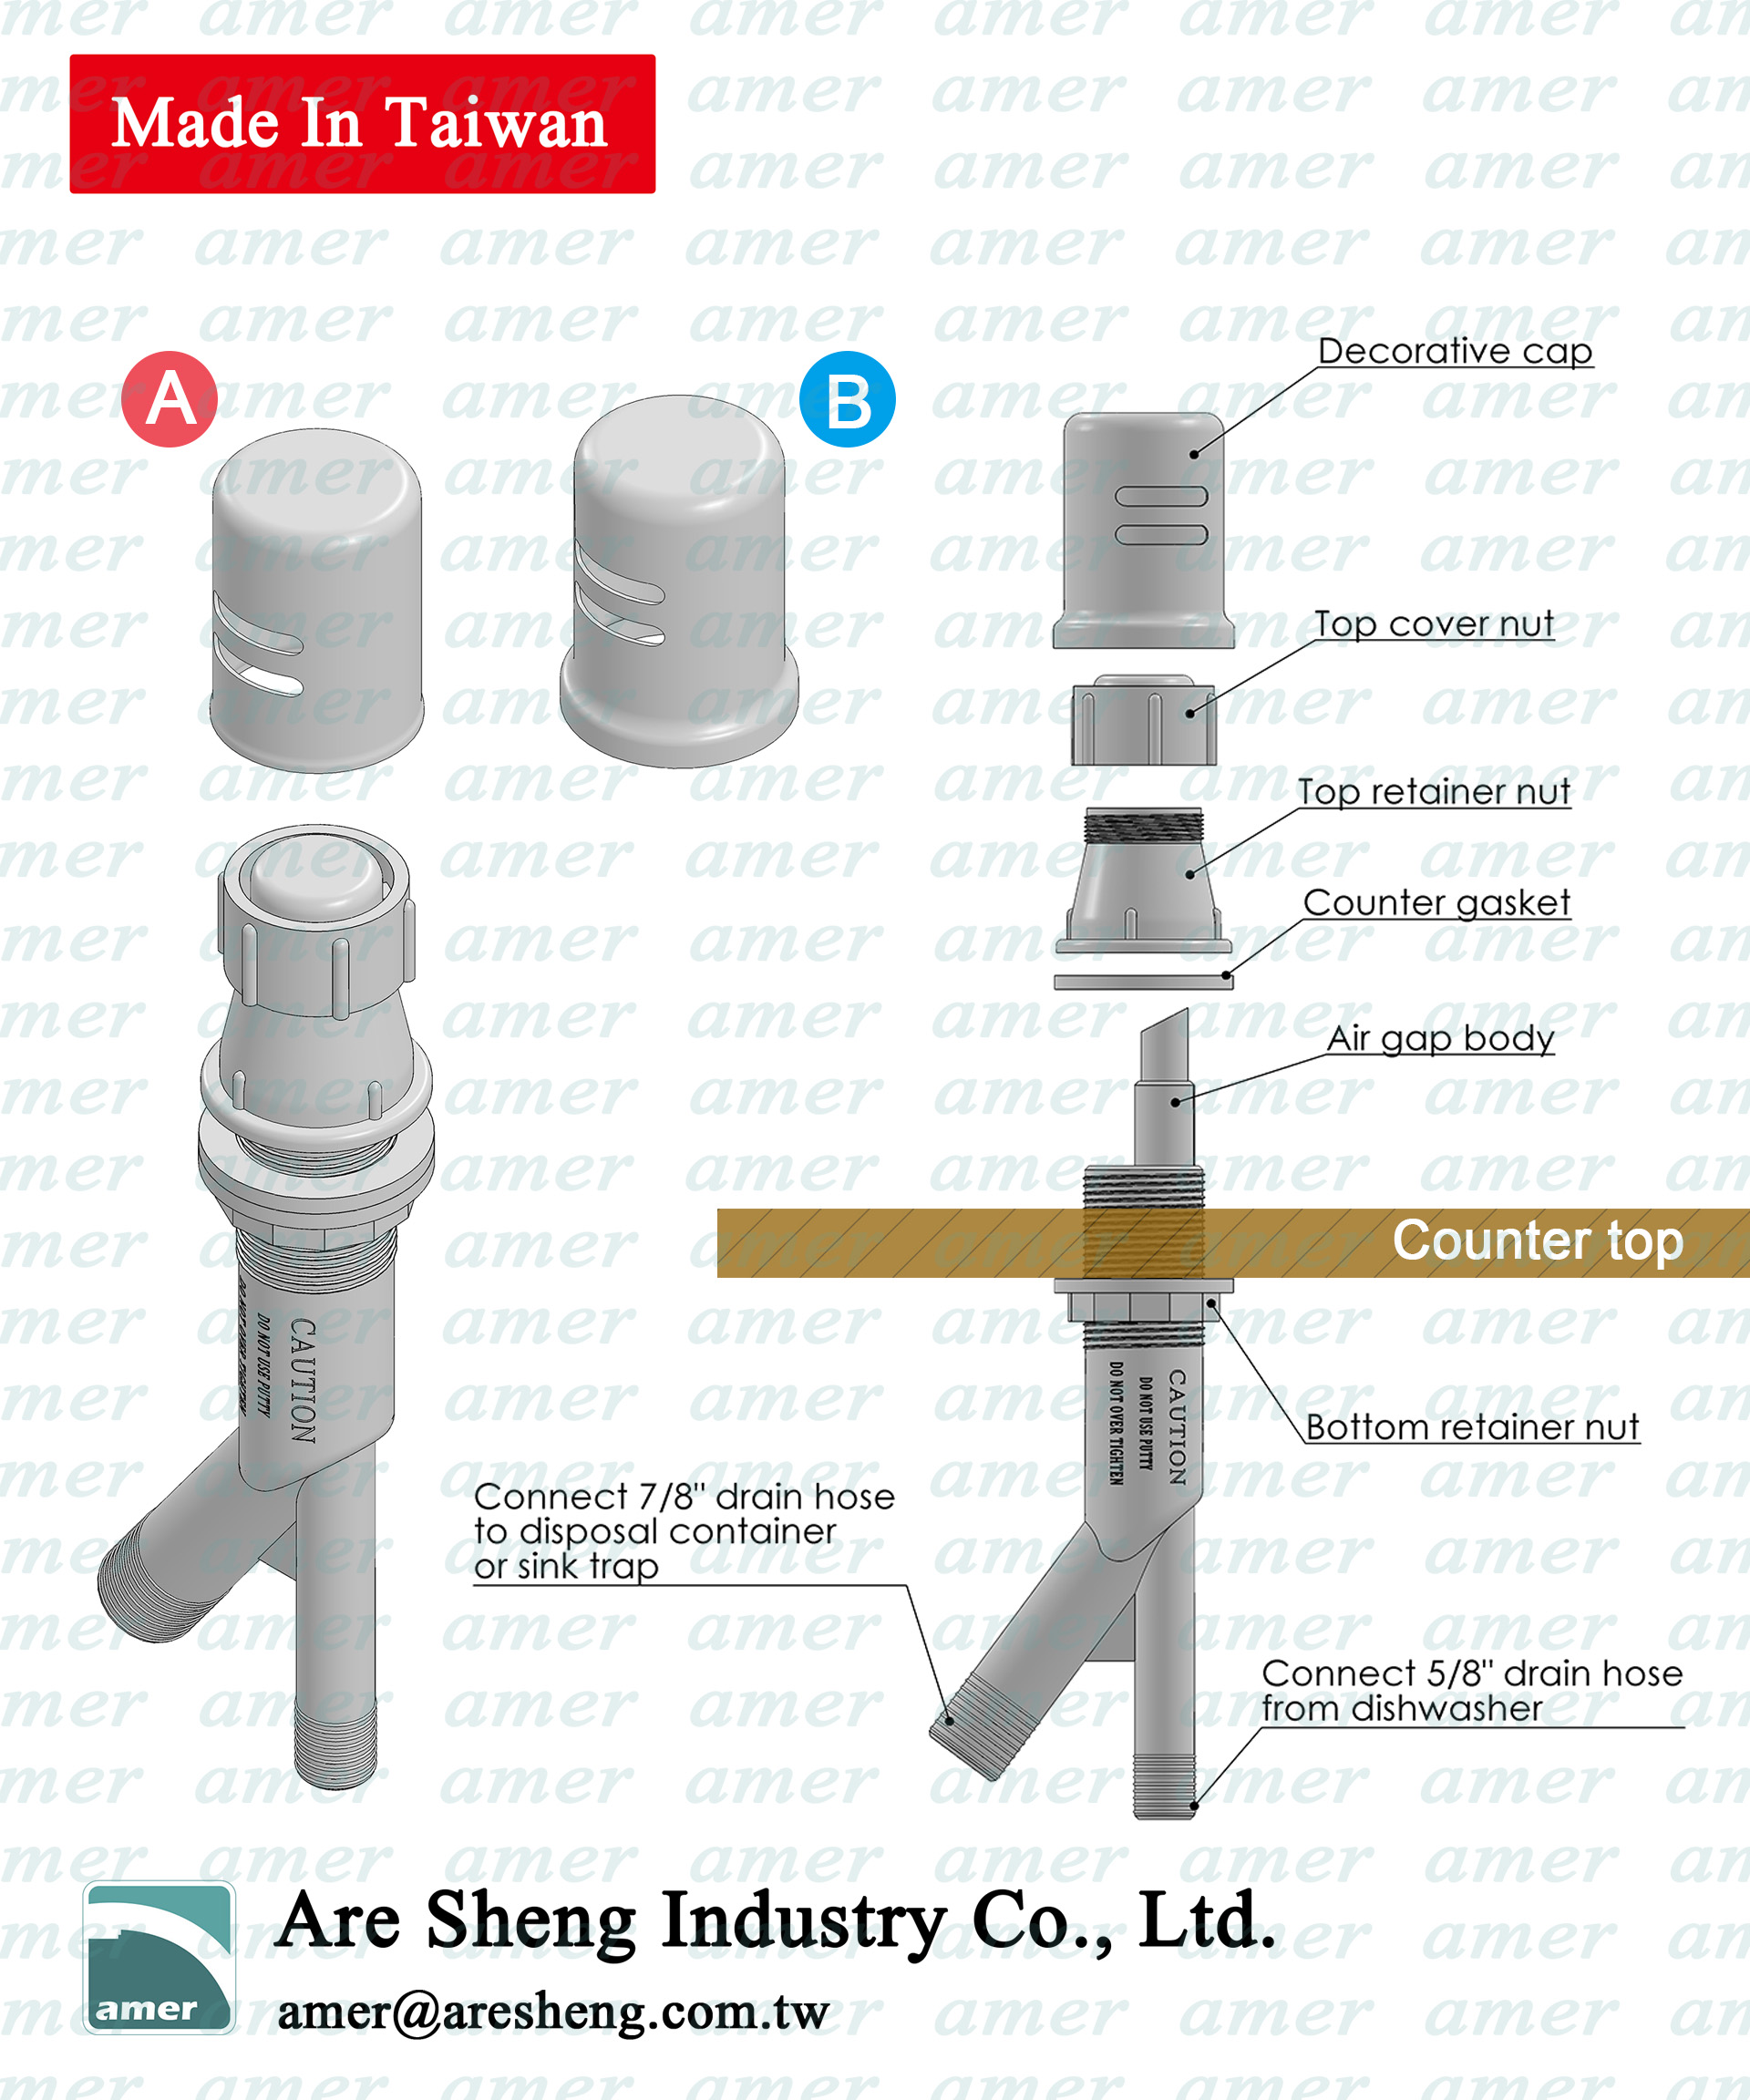 Installation Instructions Step 1: Preparation 1. Remove the kits from the air gap, including decorative cap (A), top cover nut (B), top retainer nut (C), and the counter gasket (D) while remain the bottom retainer nut (E) on the air gap. 2. Adjust the bottom retainer nut (E) for sink thickness. 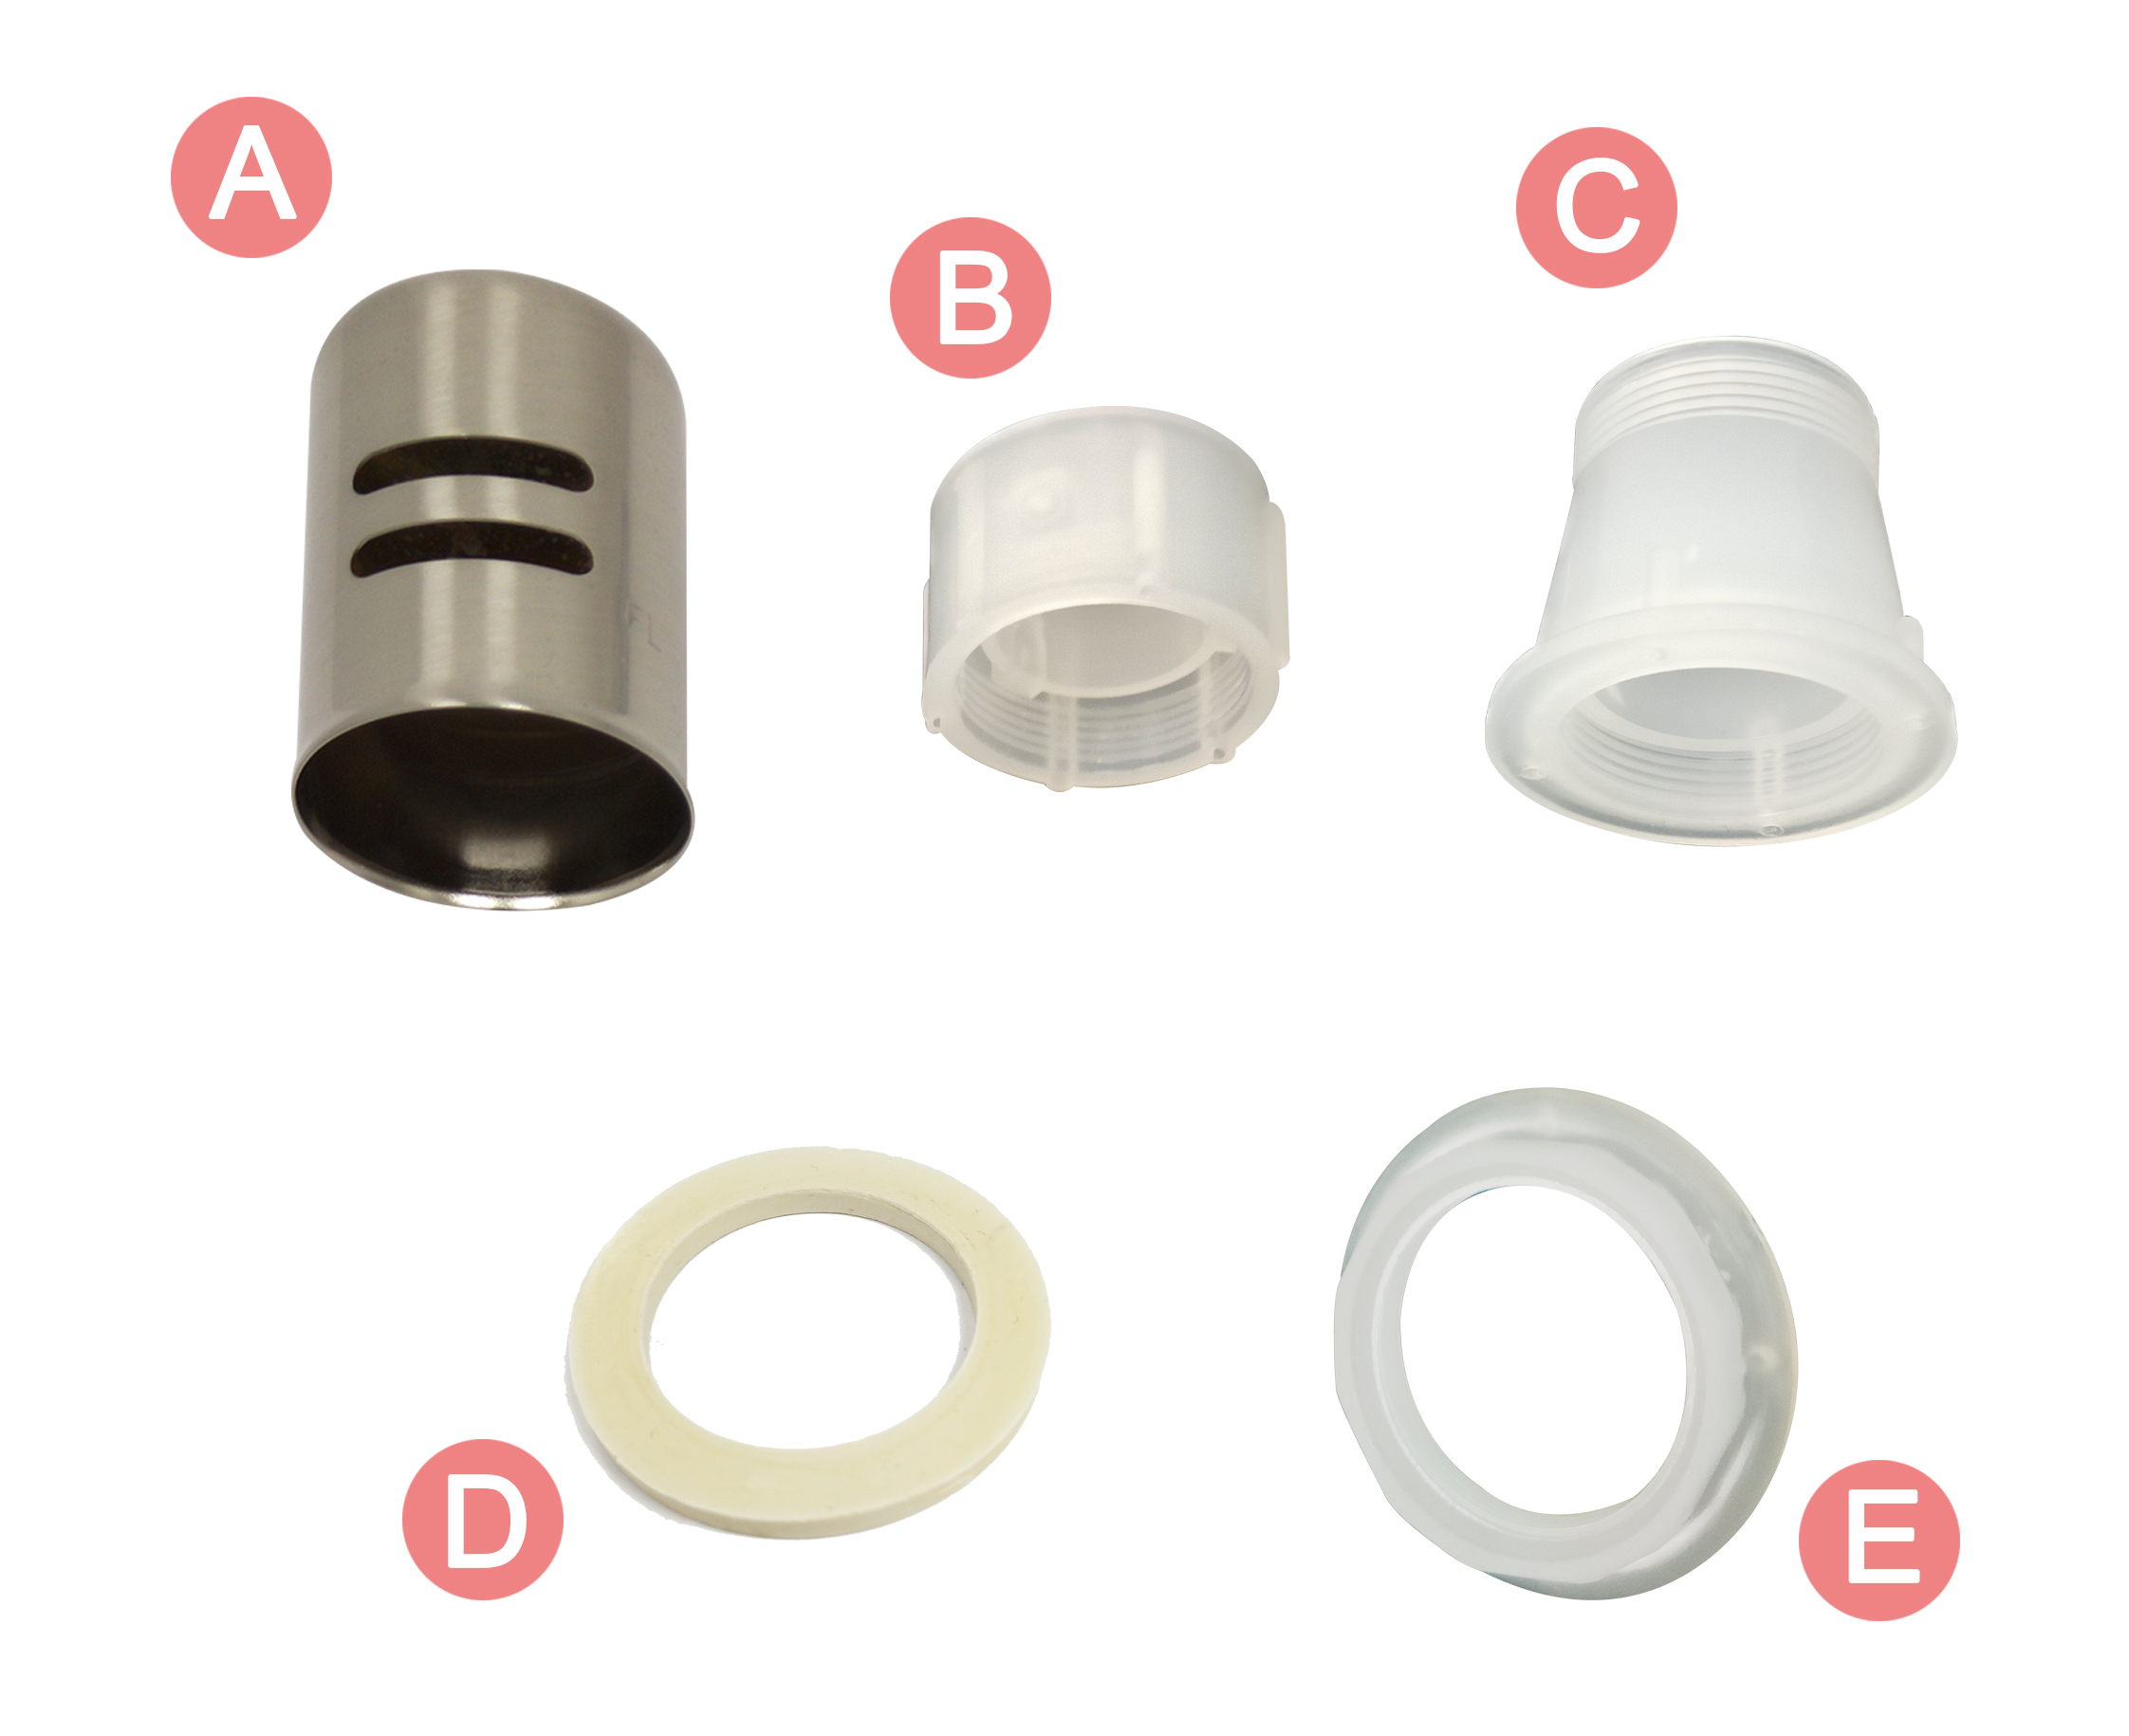 Step 2: Install the kits 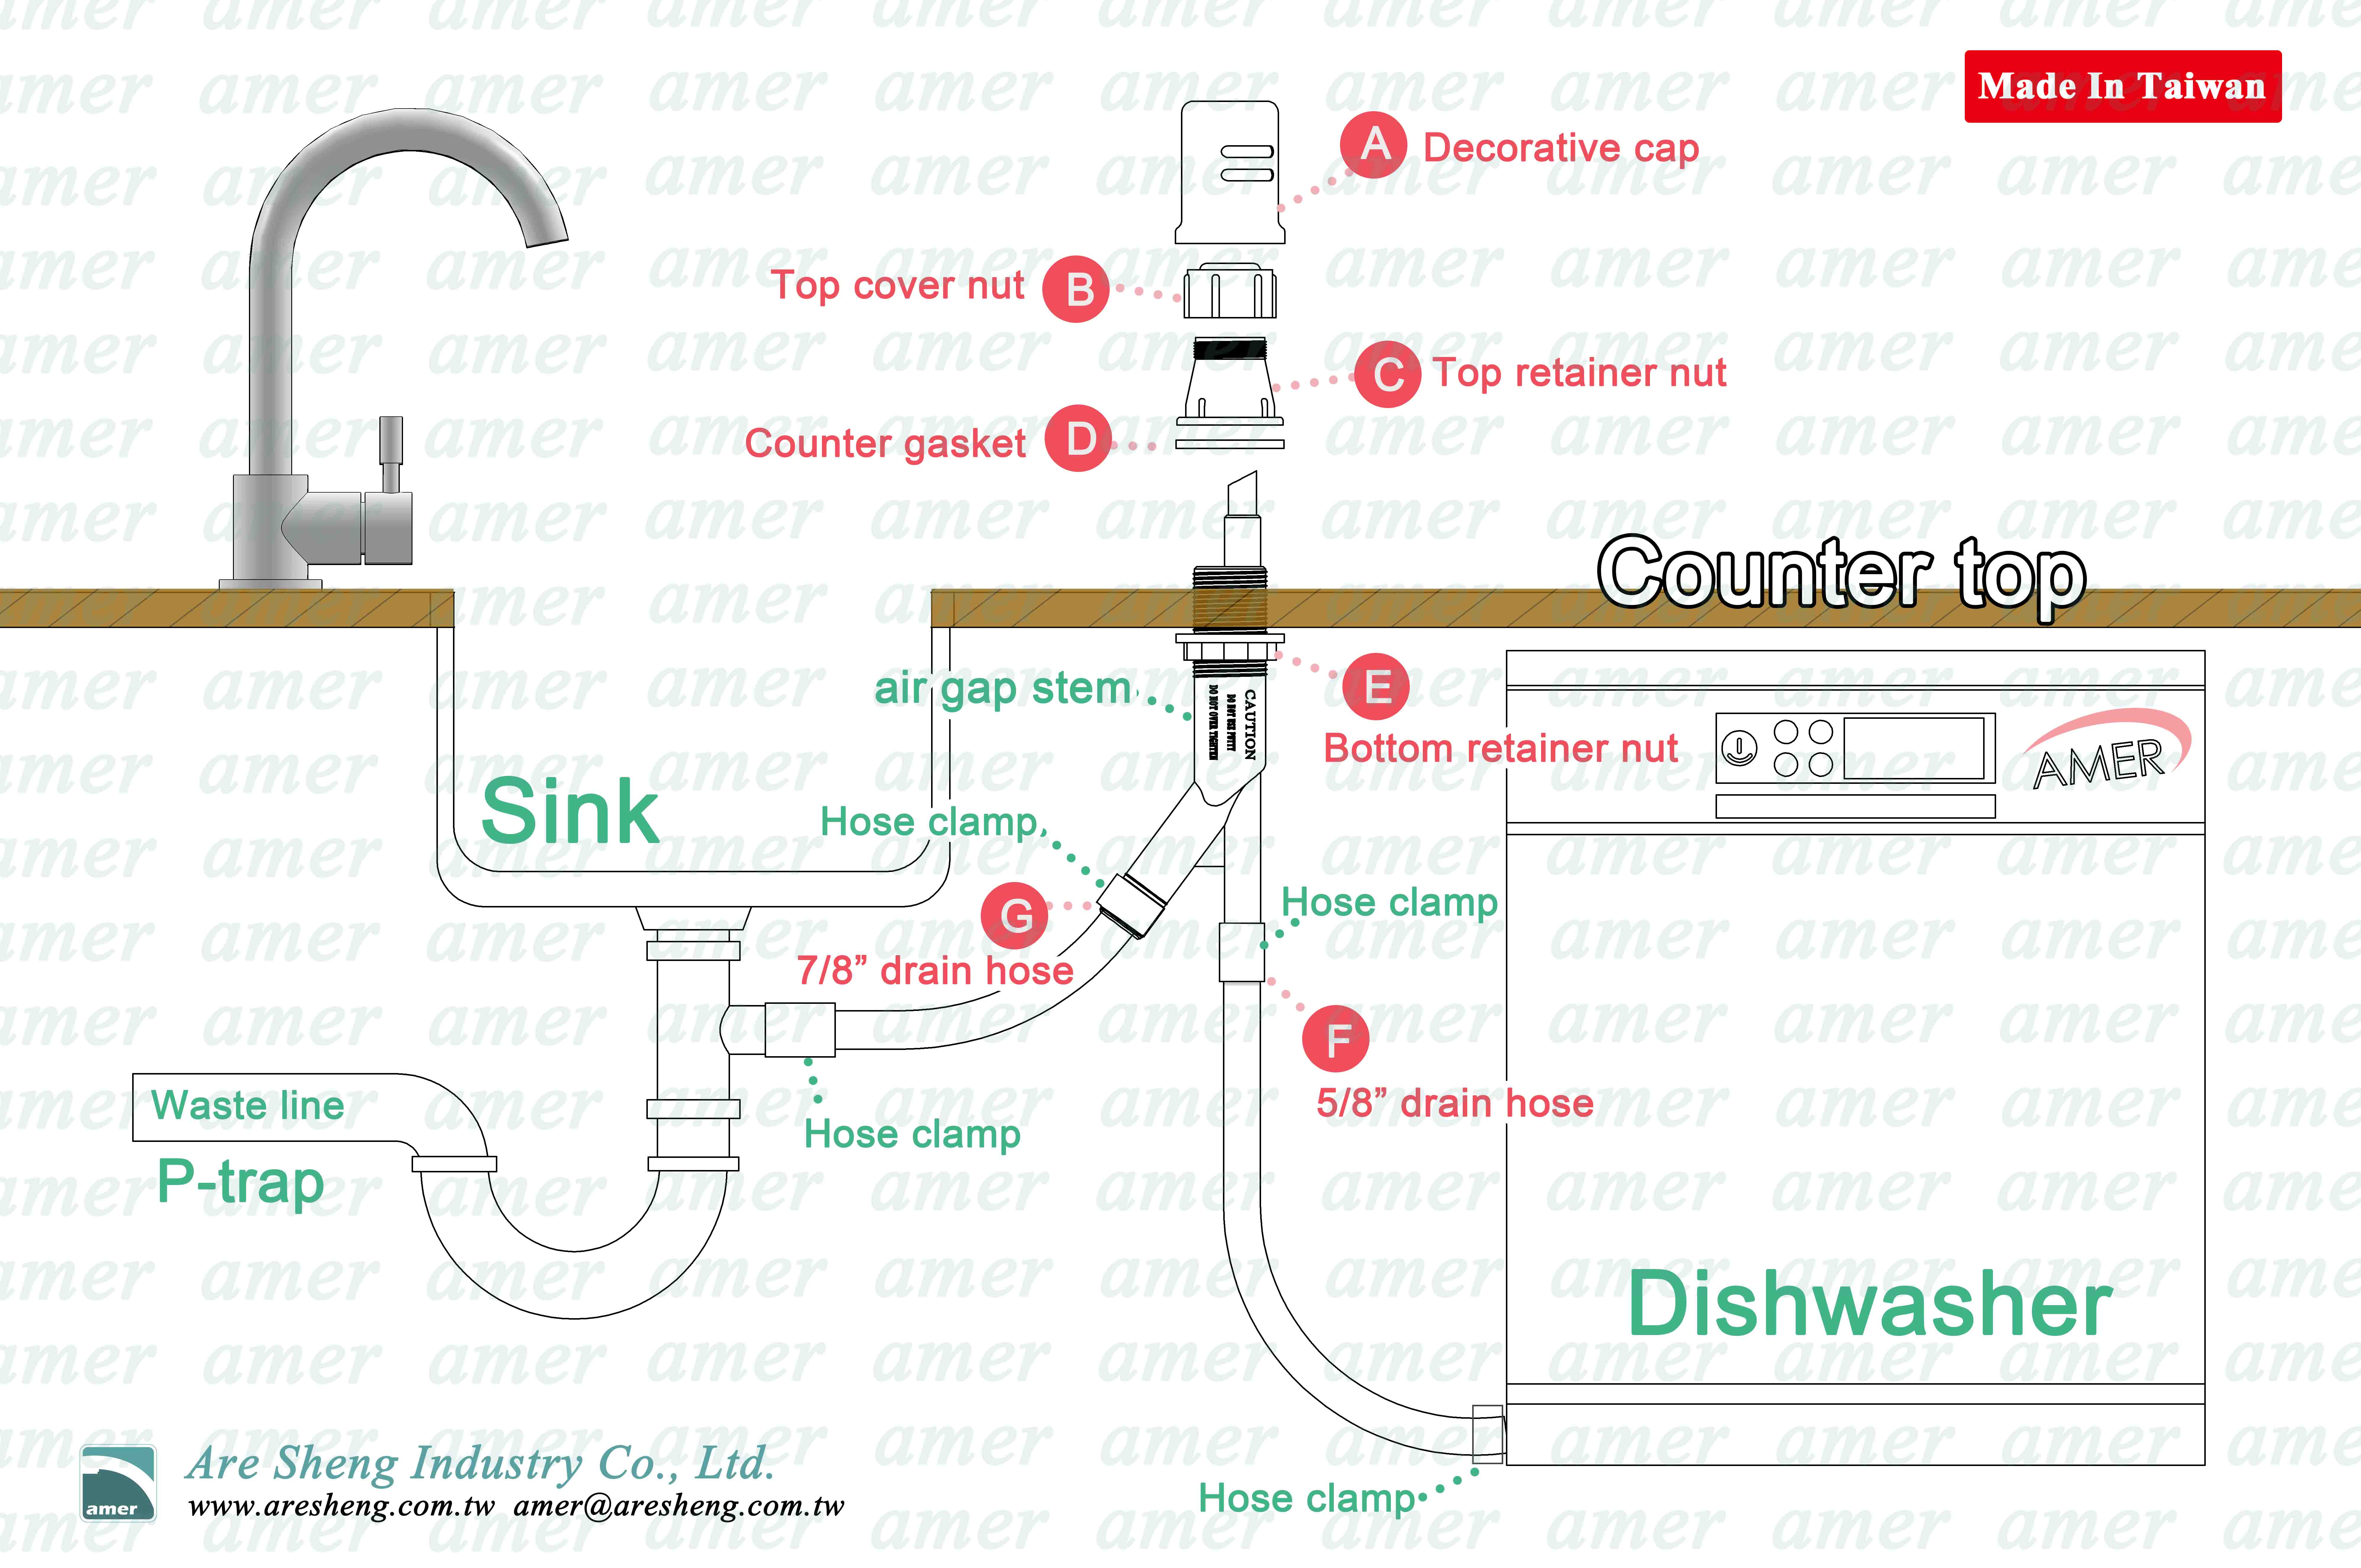 3. Install the air gap through the hole in your sink. 4. Place the counter gasket (D) into the air gap stem on the counter top. 5. Then, screw the top retainer nut (C) into the air gap stem above the counter gasket (D). 6. Hand-tighten the bottom retainer nut until all these kits are tight. 7. Connect the 5/8” inlet drain hose (F) to the dishwasher pump line. 8. Connect the 7/8” outlet drain hose (G) to either your garbage disposal or waste line. 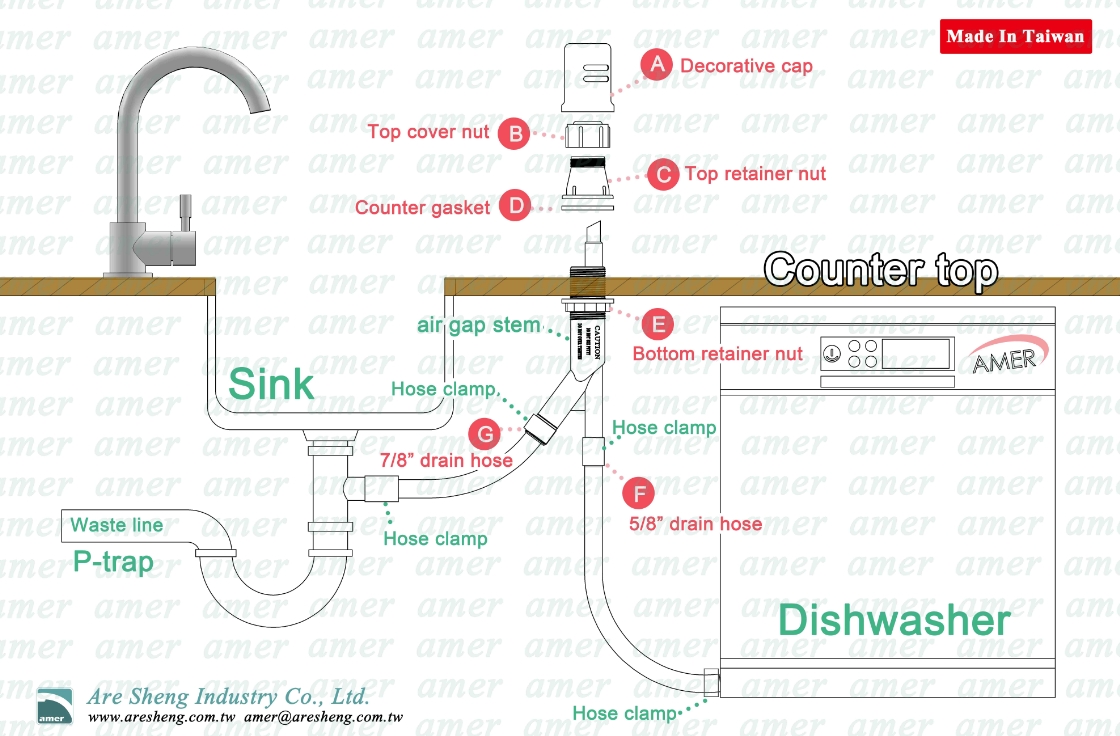 Step 3: Finishing up 9. Secure the hose ends with hose clamps. 10. Screw on the top cover nut (B) and press on the decorative cap (A) on the top of the air gap. 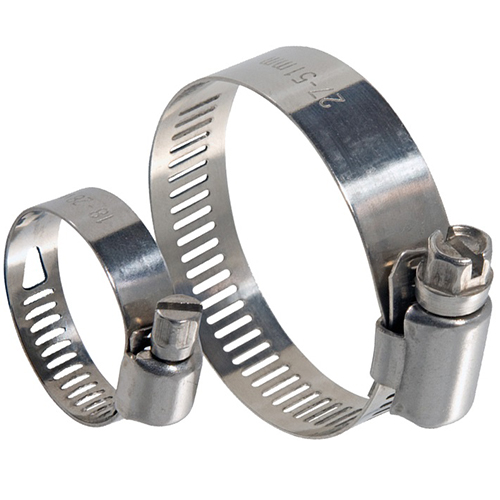 For the product specification of this dishwasher air gap, please link to the product page here. For any further product information, send me the inquiry at [email protected] (Attn: Emma) |
| How to install a duo cup sink strainer on my sink? |
|
How to install a duo cup sink strainer on my sink?  Here we draw each part of a duo cup sink strainer in sequence as below. From top to bottom, they are basket, strainer body, rubber gasket, paper washer, cup, lock nut, PE flange, Tailpiece, and connection nut. 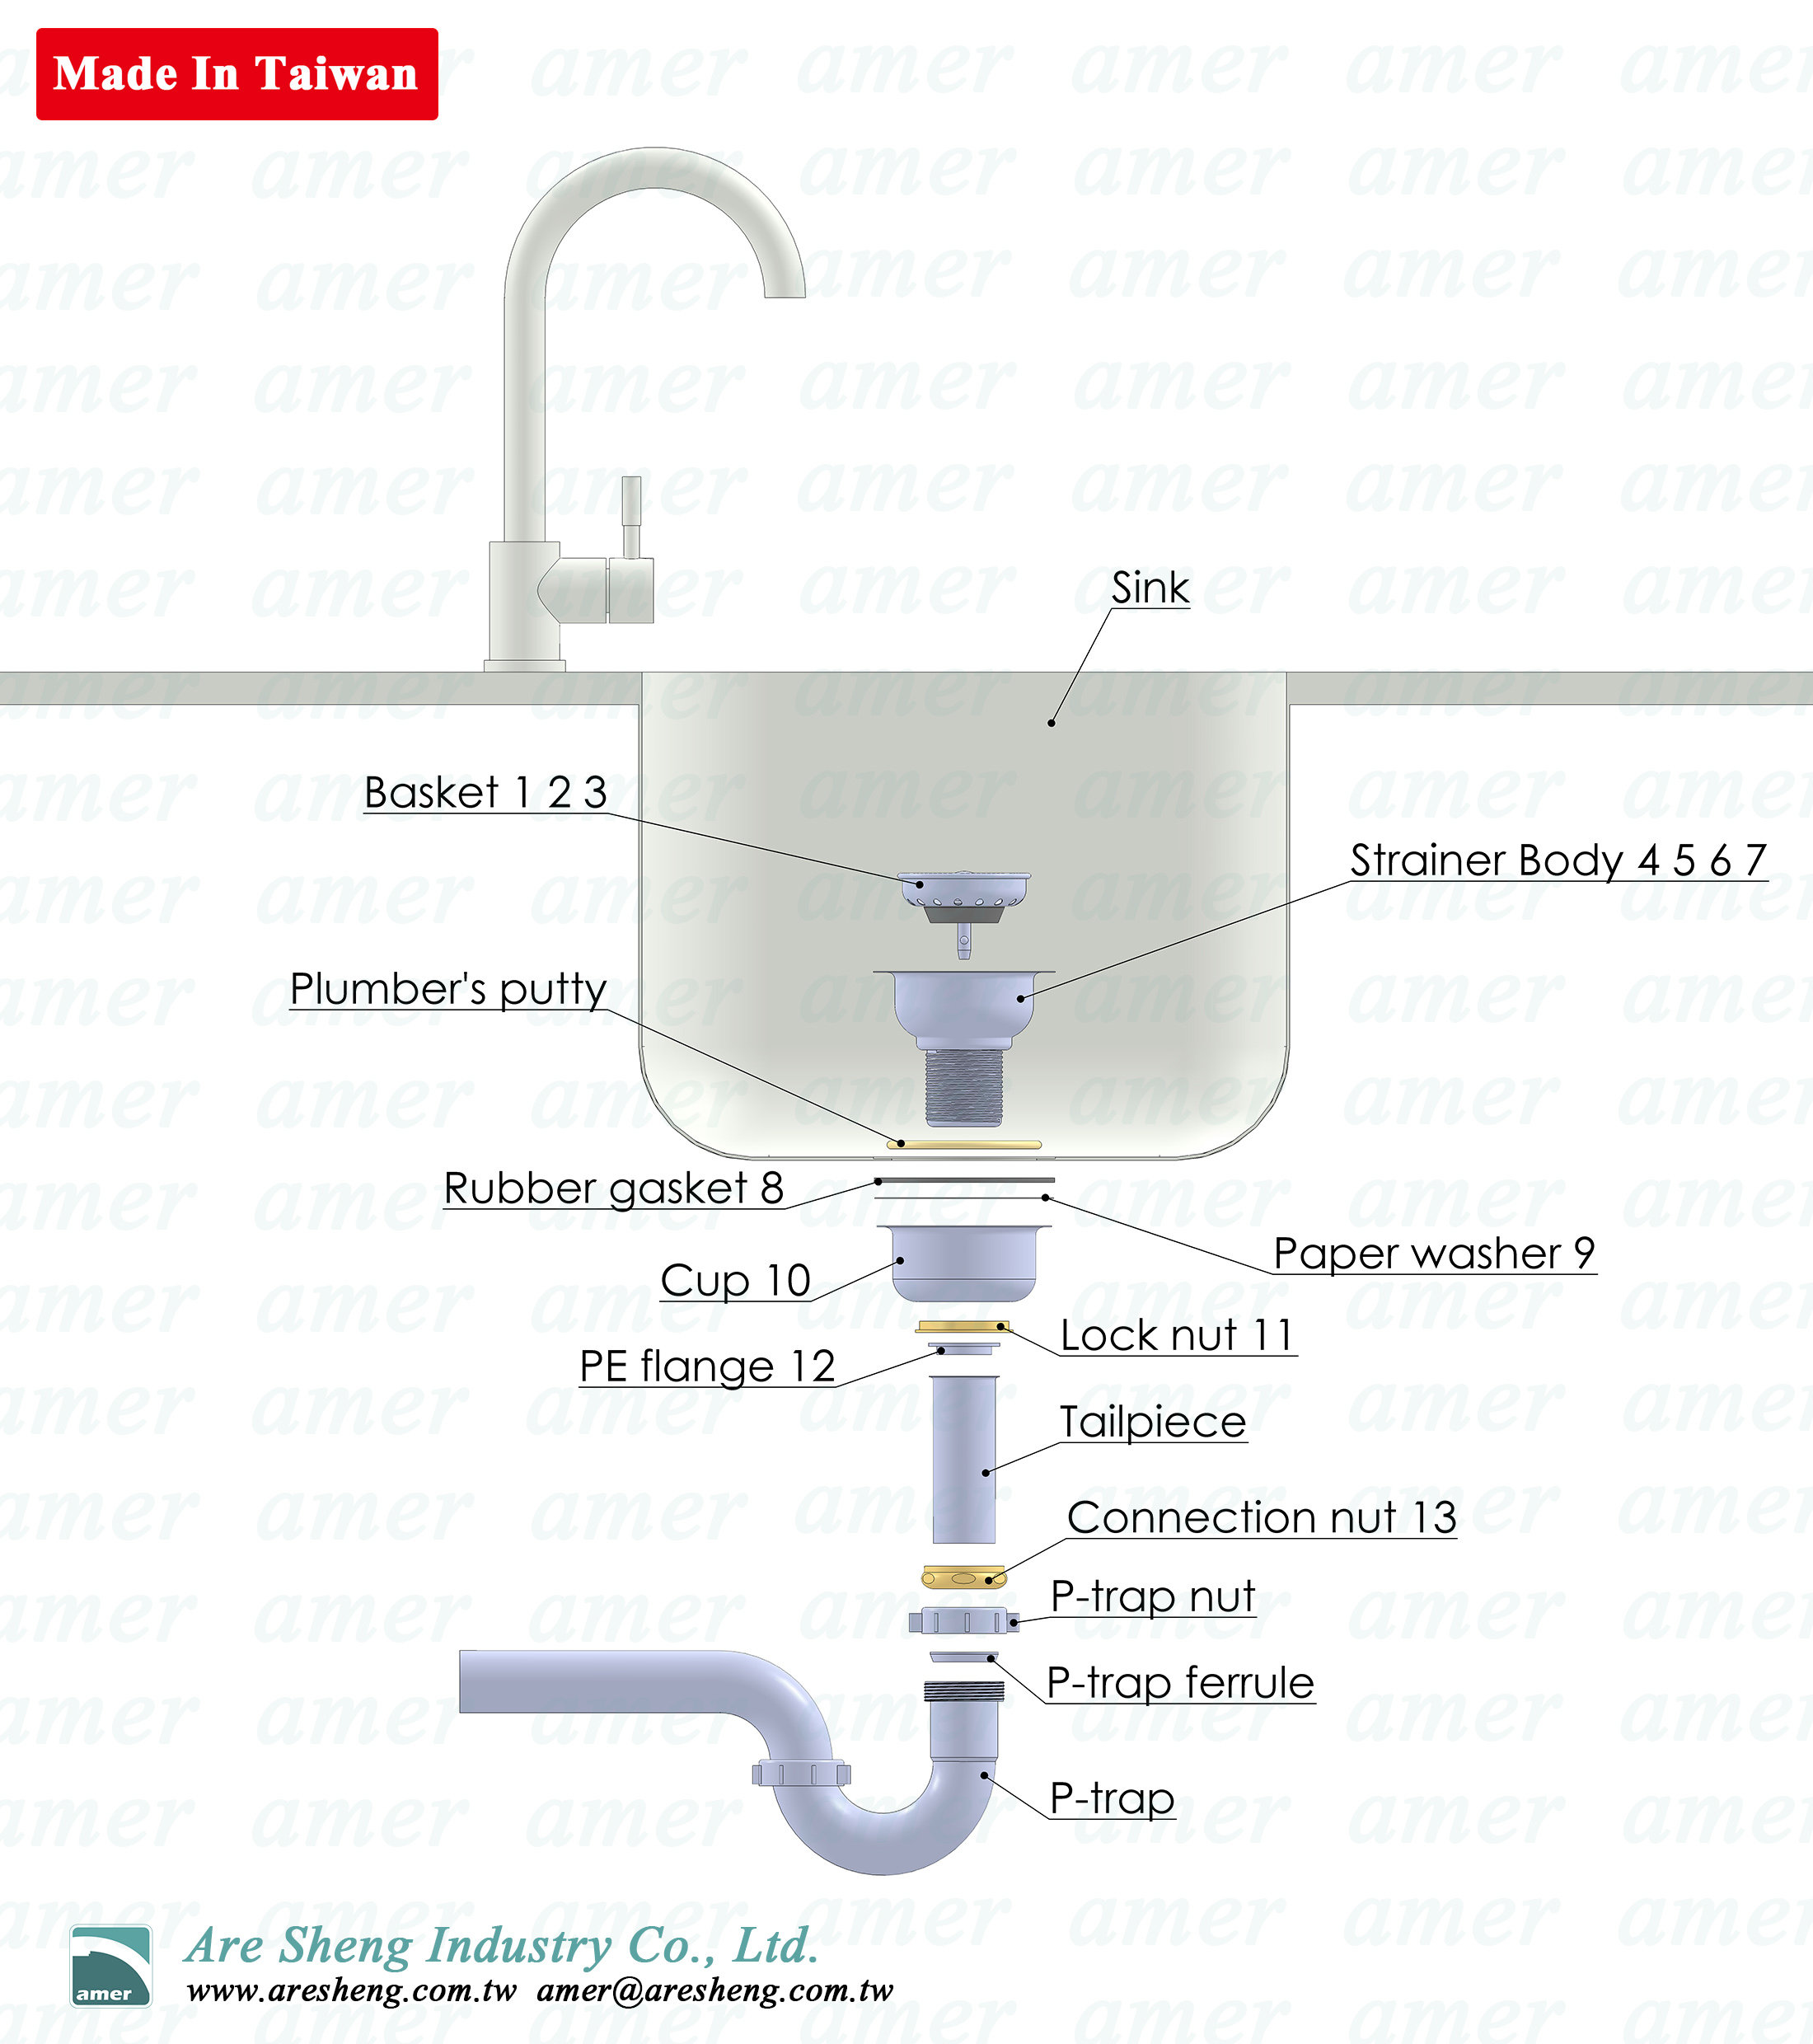 Here is the installation step. Step 1. Take some plumber’s putty and make it a circle. Put the plumber’s putty on the sink’s drain opening. Step 2. Put the strainer body on the plumber’s putty. Press it hardly. Step 3. Slide the rubber gasket and paper washer through the threaded shank. *Paper washer should be under the rubber gasket. The function is to avoid deformation of the rubber washer. Step 4. Screw on the lock nut on the shank until the cup and body is fixed firmly. Take a wrench to screw if you need. Step 5. Check the drawing as below. *Note the direction of the tailpiece. The side with flat edge is up. Slide the coupling nut from the bottom of the tailpiece. Put the PE flange on the tailpiece. *Note the direction of the PE flange in the drawing. Step 6. Screw the coupling nut on the threaded shank until they fix firmly. Step 7. Slide the P-trap nut on the tailpiece- also from the bottom. Squeeze the P-trap ferrule on the tailpiece. Screw the P-trap nut to the P-trap firmly.  Now, congratulations! You finish the installation! 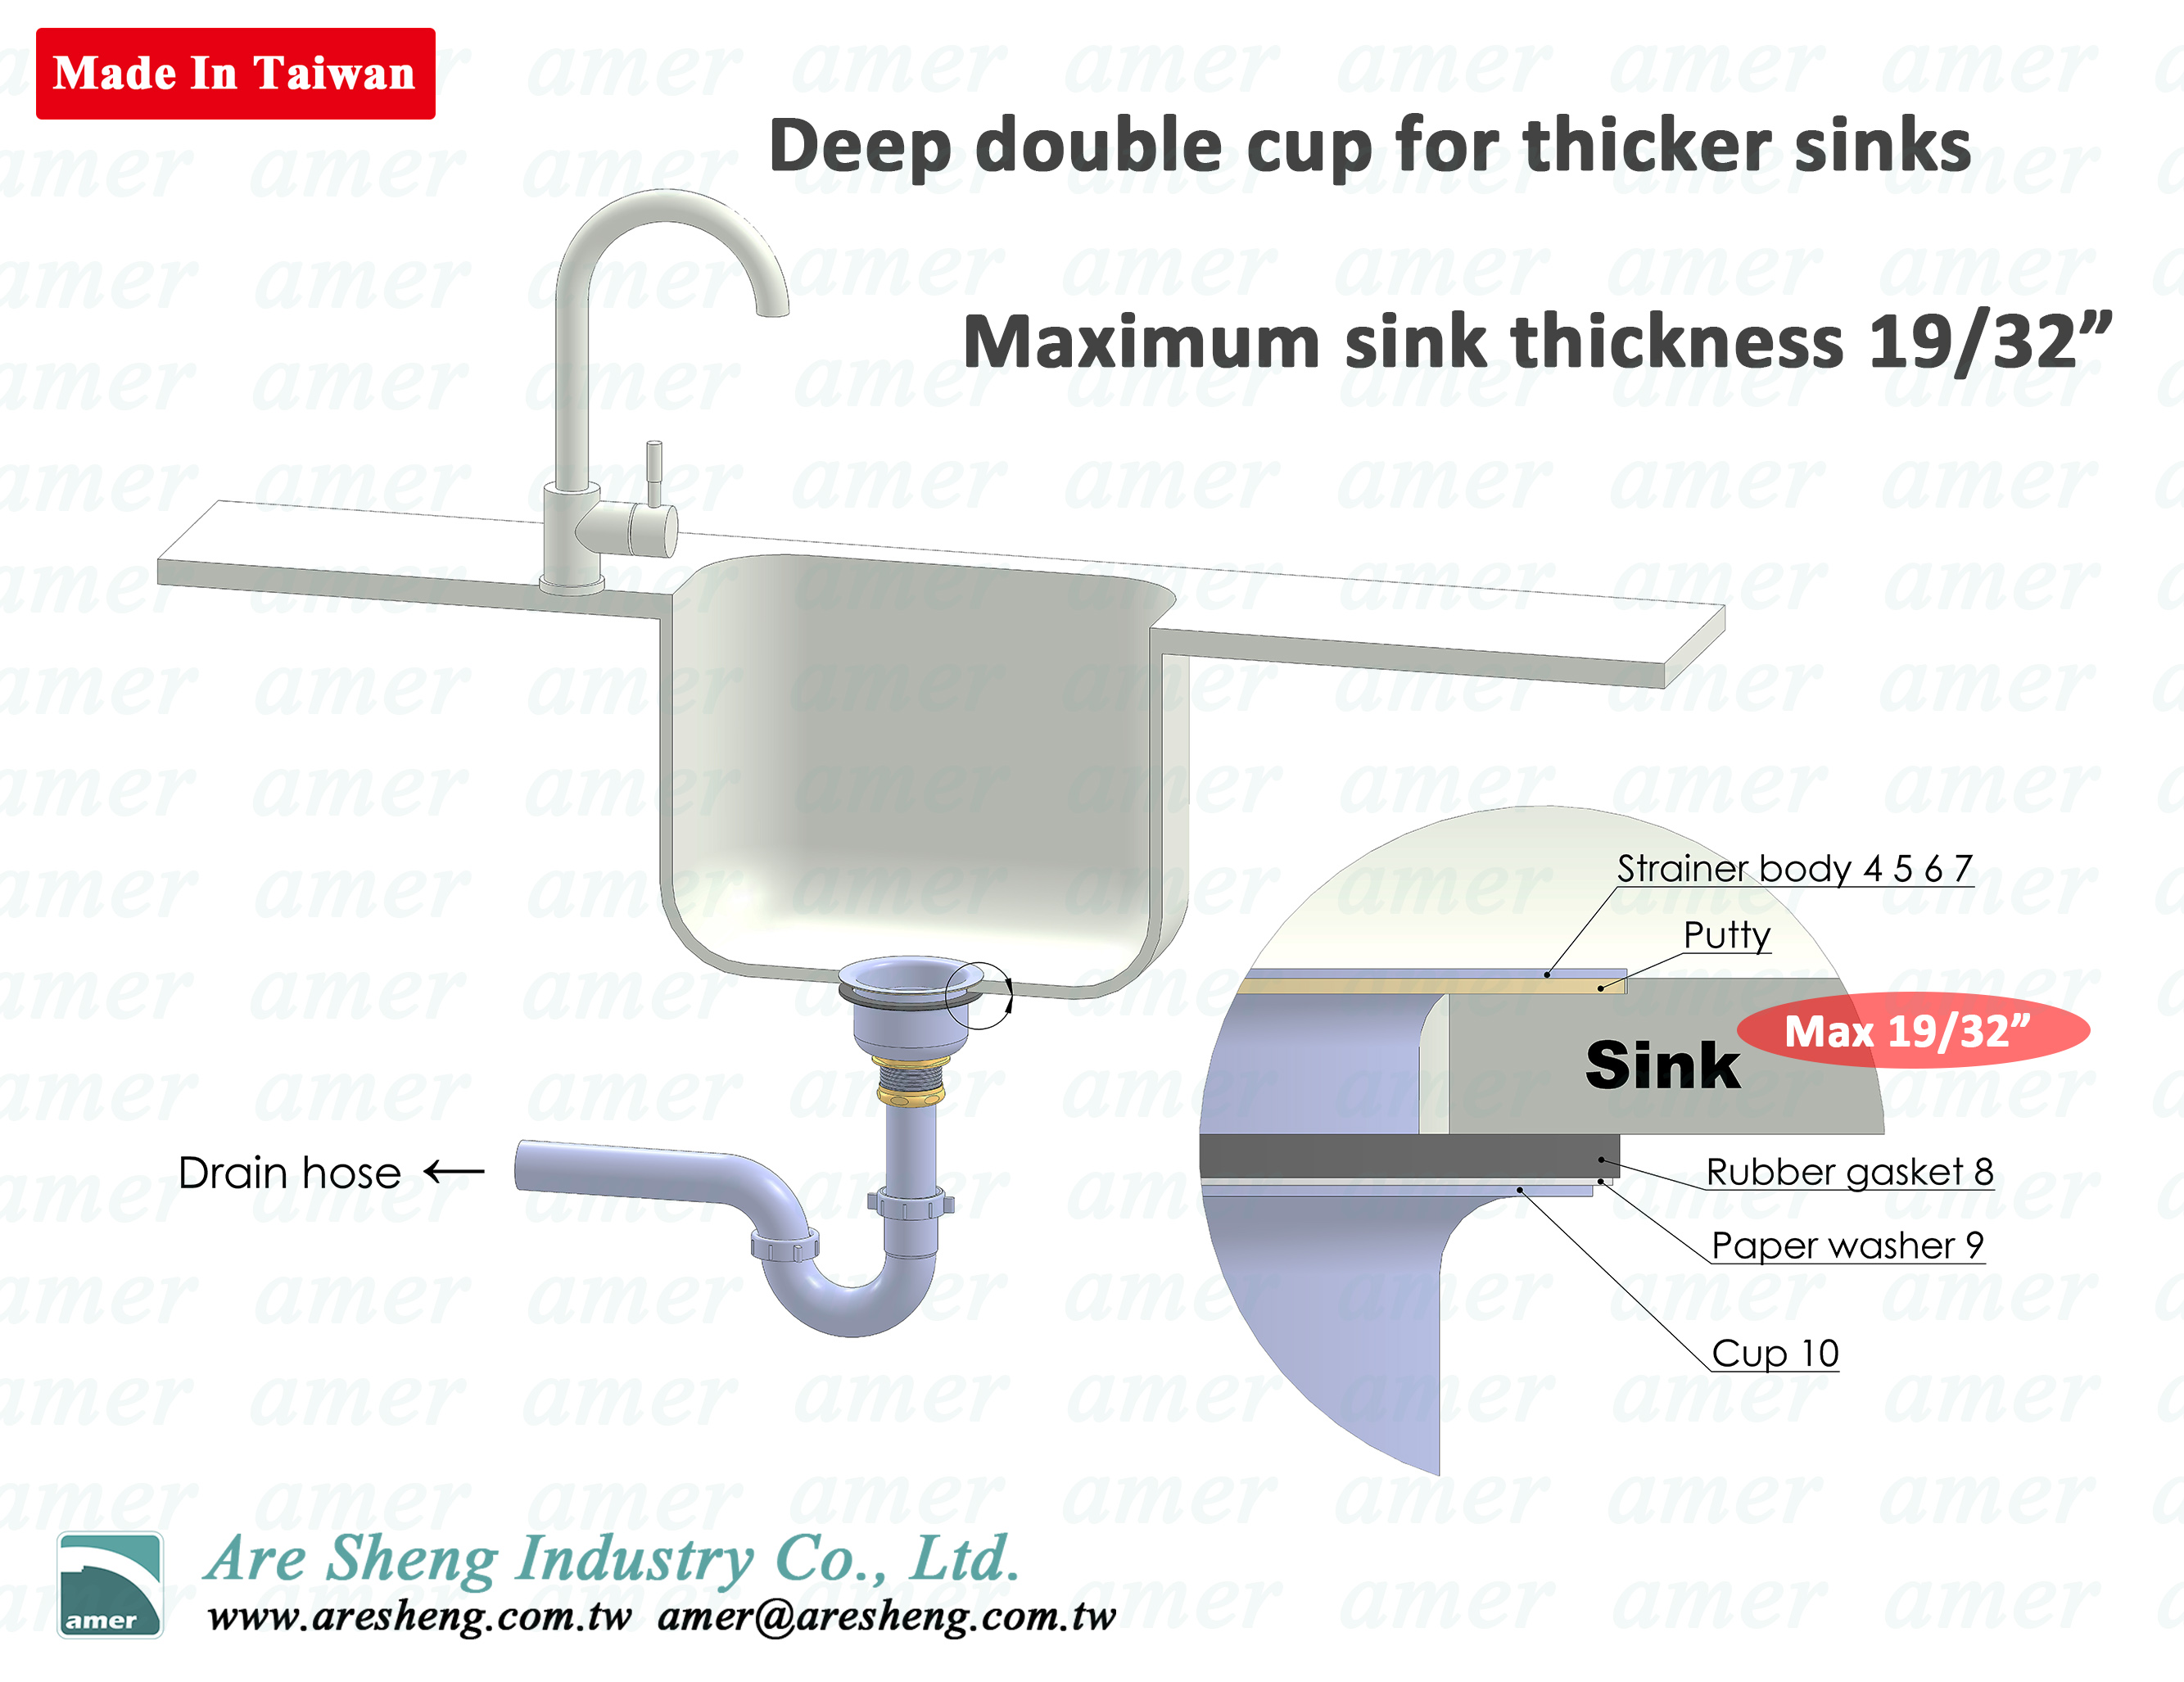
|
| Learn more about Duo Deep Cup Sink Strainer | ||||||||||||||||||||||||||||||
 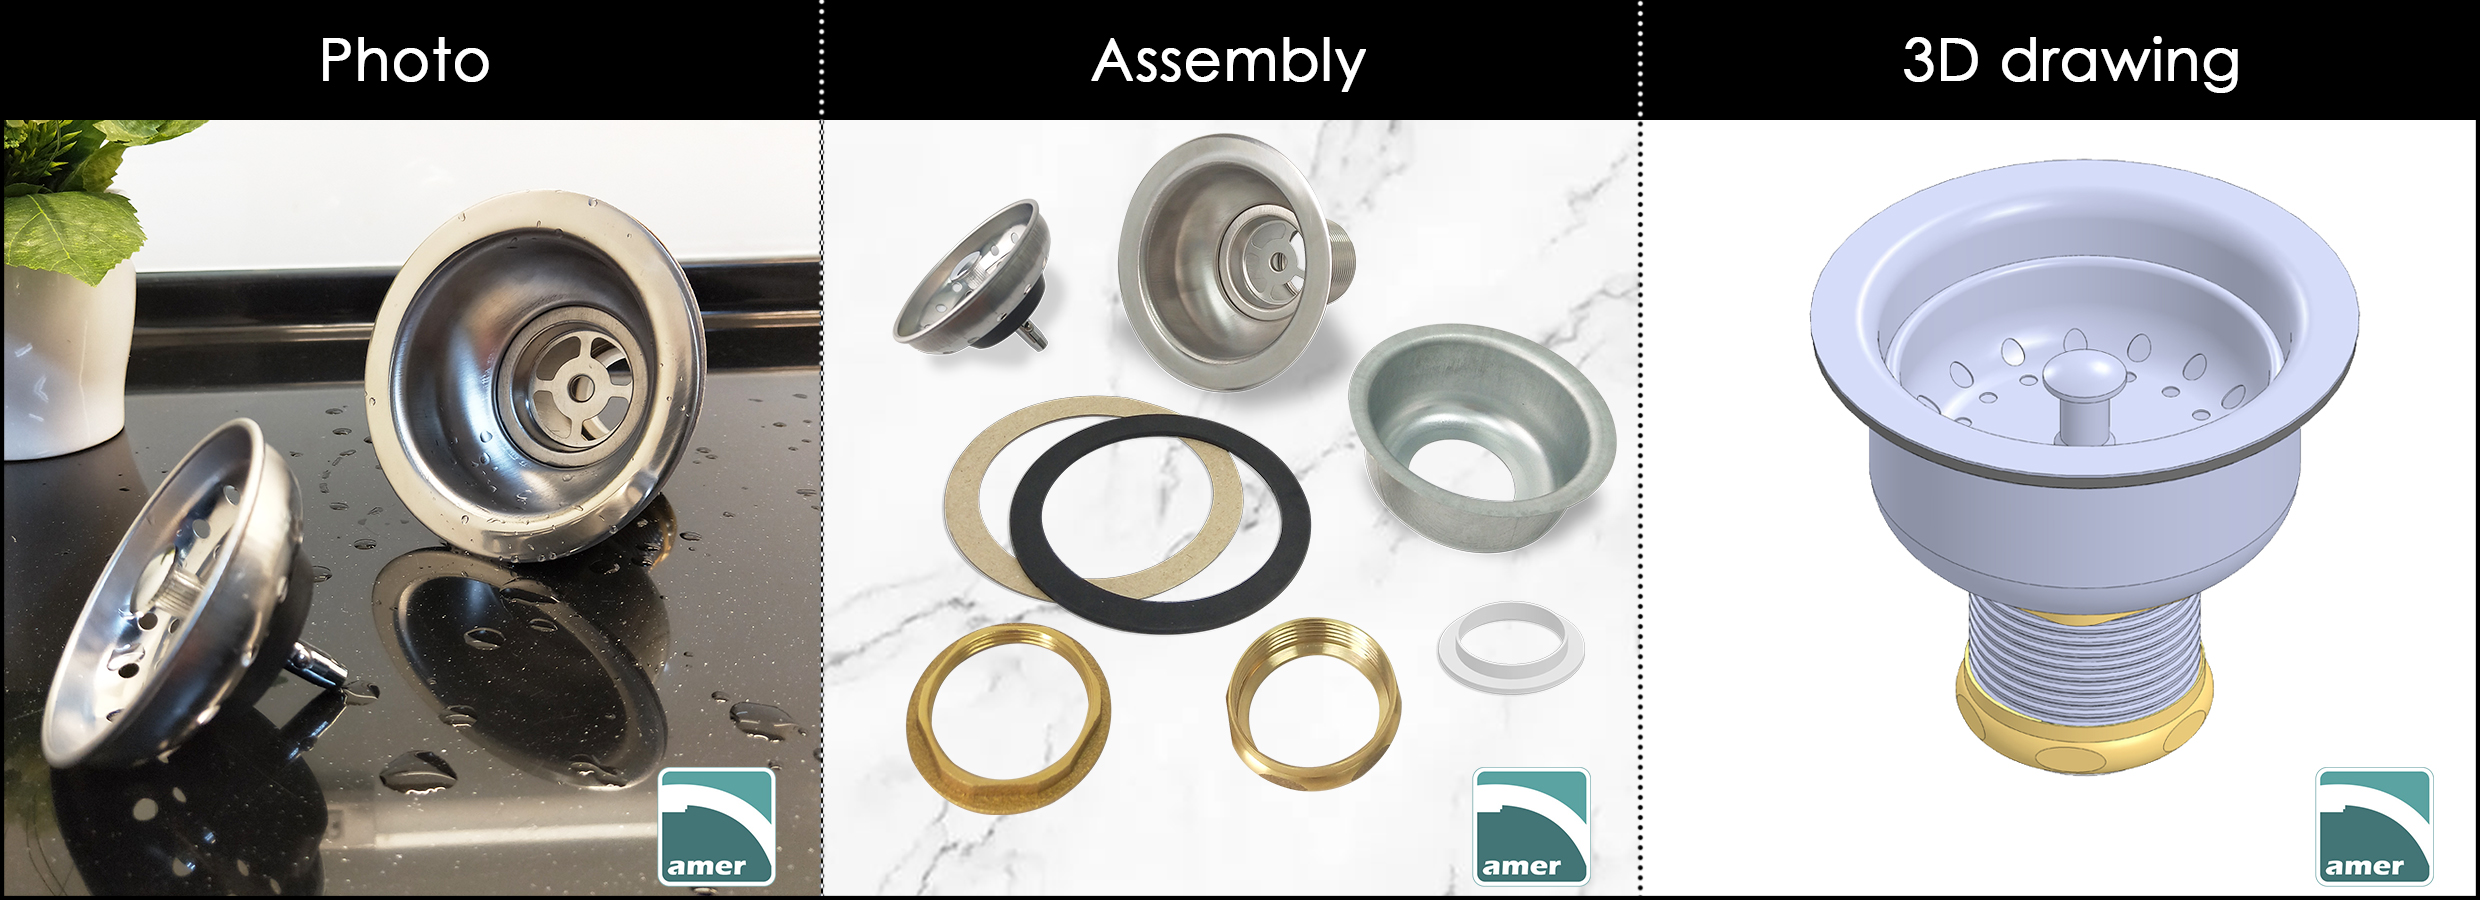 If you are tired of calling the plumber again, here I’d like to recommend this popular DUO DEEP CUP STRAINER to you. As you can see in the central picture above, this strainer comes with all the necessary assembly parts. You might need to take some steps to install it, but it will be worth doing this. > Where to buy a deep cup sink strainer and what to notice? > Why some strainer are 3.5 inch and some say 4.5 inch? > What are the sizes of duo deep cup strainer? > What’s the material of each part of sink strainer? > How do I know if the strainer can fit my drain? > How to clean a kitchen sink strainer basket? > What’s the name of each part in a sink strainer? Where to buy a duo deep cup strainer? You can easily purchase the Duo Deep Cup Sink Strainer in any hardware store, local plumbing store or DIY chain store such as Home Depot, Lowes, Walmart, or directly order it at Amazon.  How do I know if the strainer can fit my drain? Don’t worry whether the strainer can fit your sink drain or not. The standard drain opening size is 3-1/2”, and some are 4”. This deep cup strainer can cover from 3-1/2” to 4” drain openings. If you are still concerned about the size, measure the diameter of your sink drain opening like below. 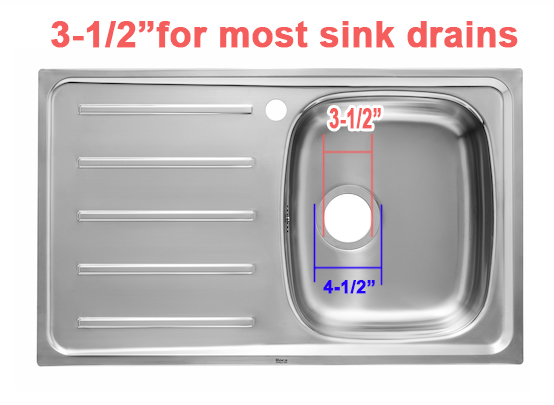 > What are the common sink strainer models? Why some strainer are 3.5 inch and some say 4.5 inch? Sometimes, the product descriptions on the package or website are so confusing. It says that the strainer is for 3.5 inch – 4 inch diameter drain opening. But why the description of some strainers is 4.5 inch?  Actually, 3.5 inch and 4.5 inch are for the same product, but indicating different parts. Please check the drawing below. The size 4-1/2” is the top diameter of the strainer. However, the 3-1/2” means that this product is to fit the 3-1/2” opening on your sink. The part (B) will be put through your sink. The dimension is 3-5/16”, so that it can be put into a 3-1/2” hole on your sink. 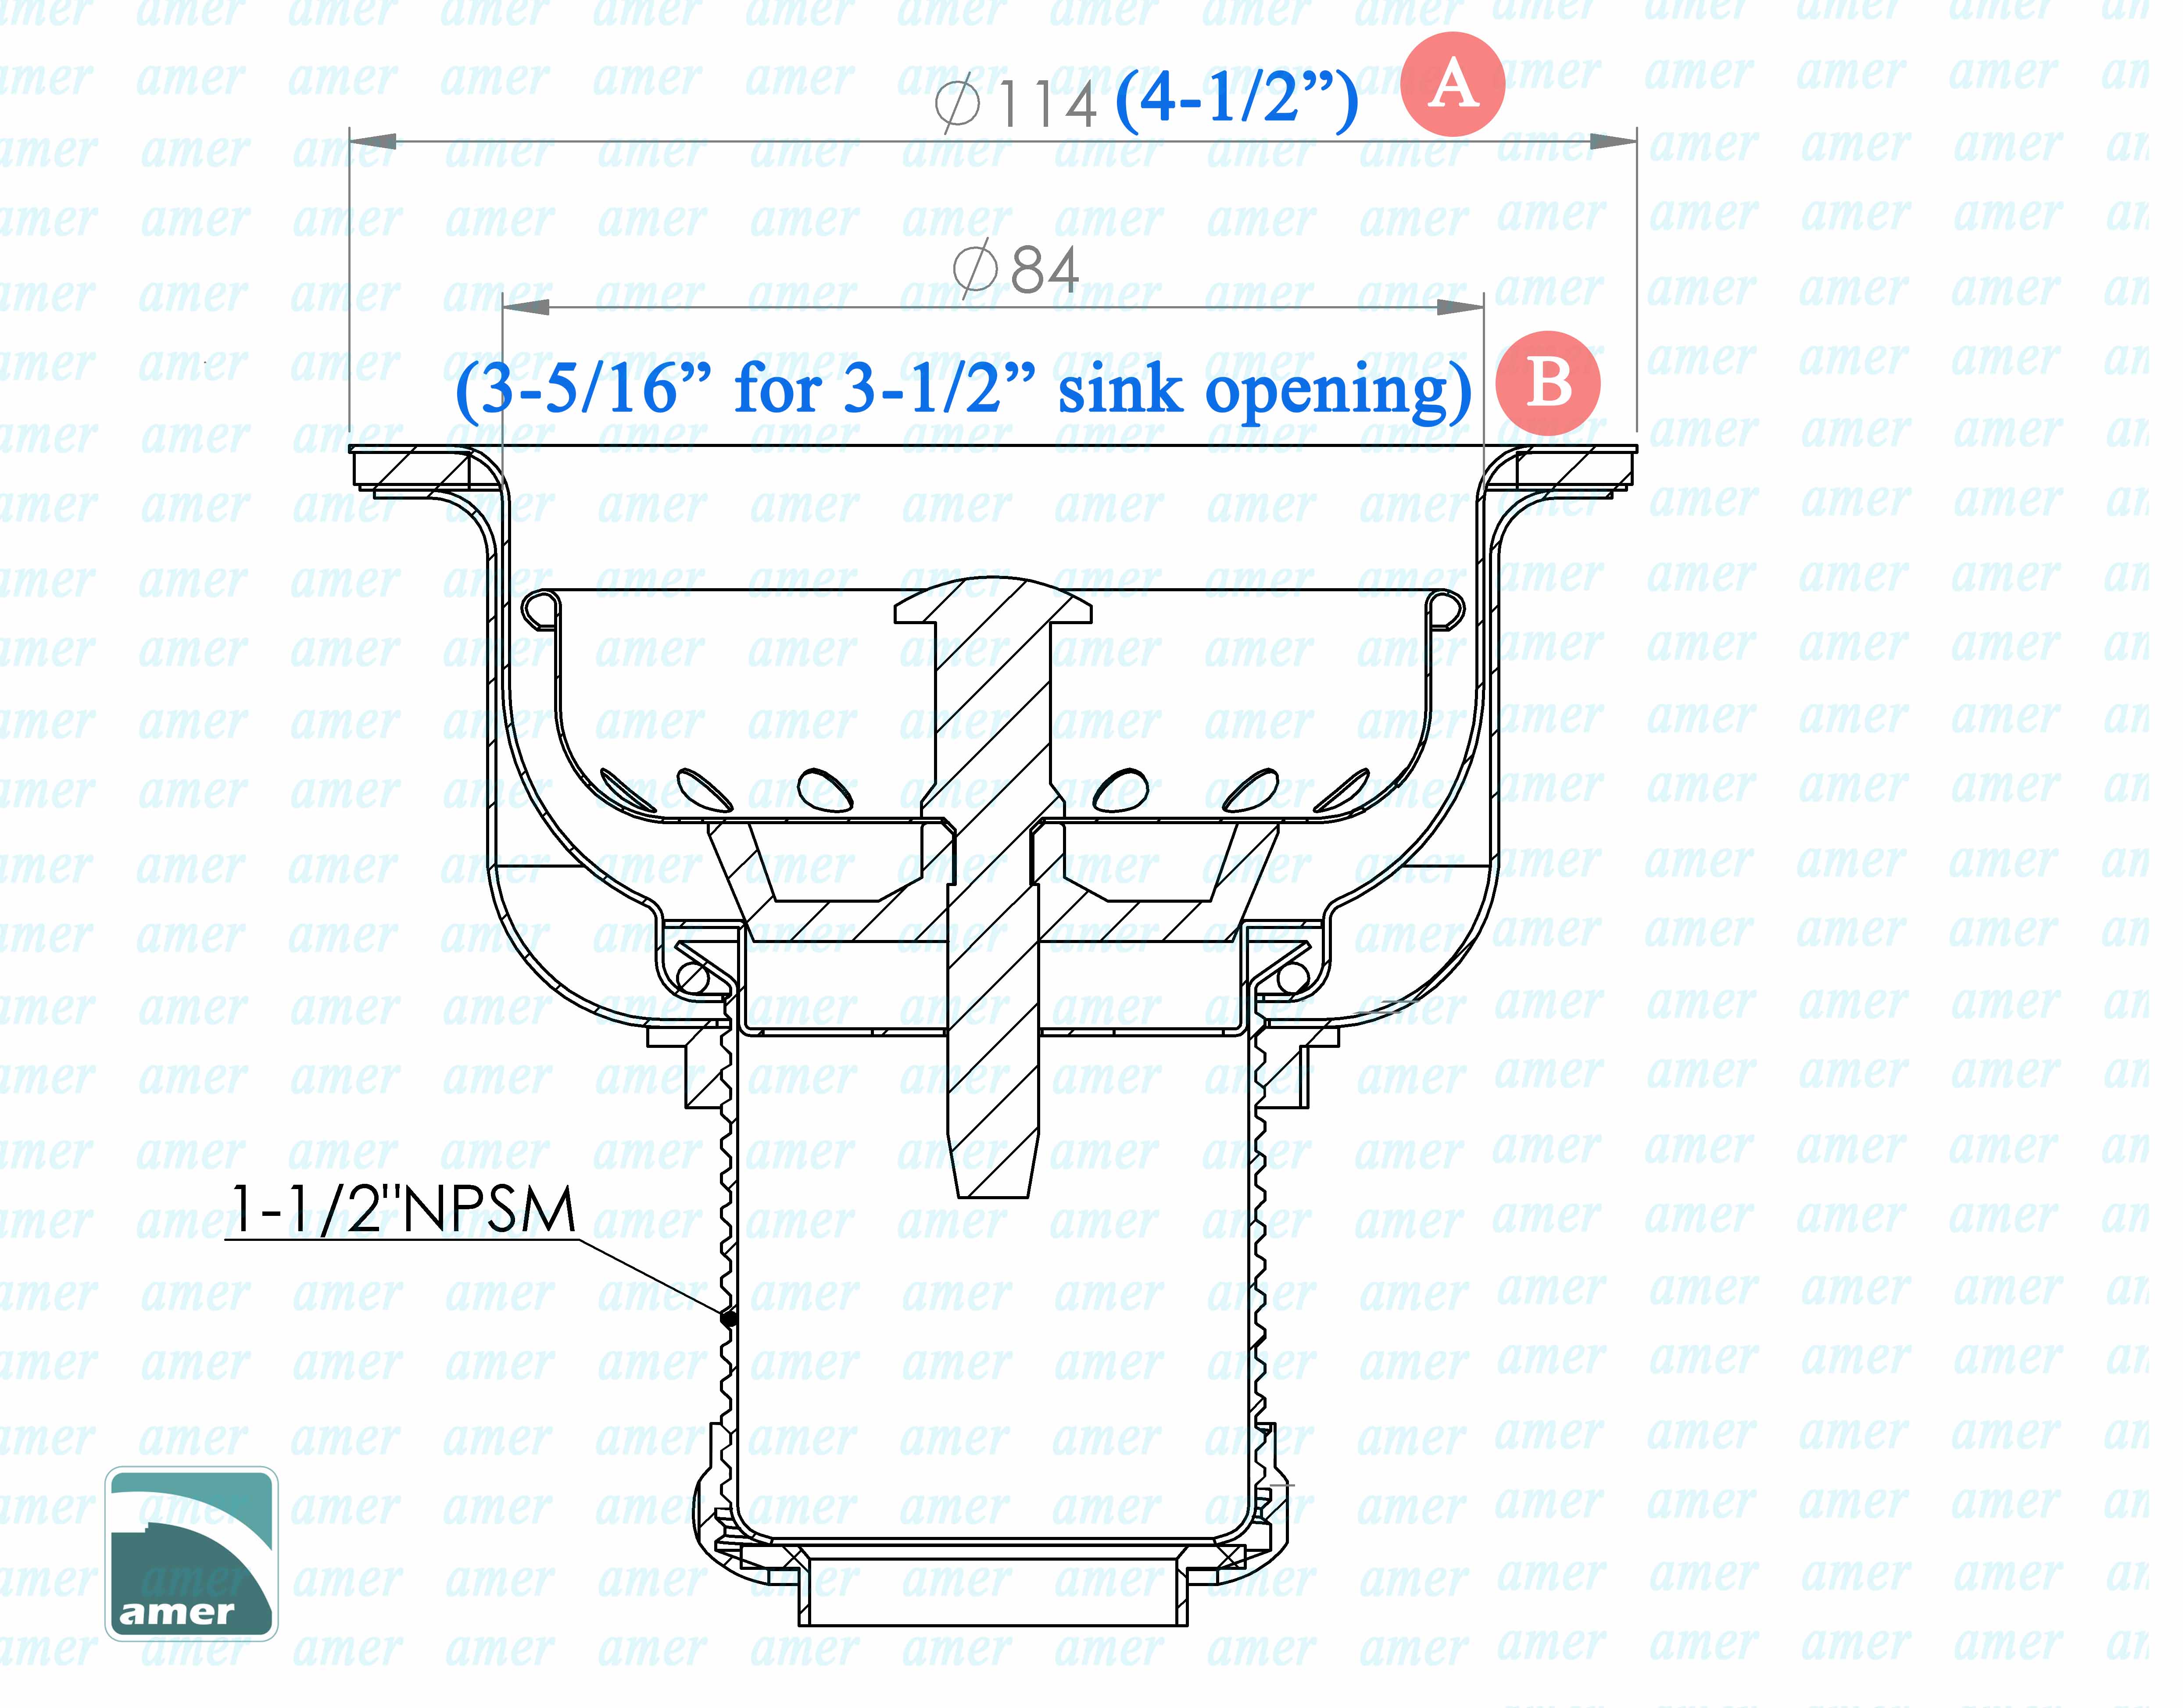 What are the sizes of duo deep cup strainer? In the drawing below, you can check the dimension of each part of this deep cup strainer (Model #D78-005). It has a 4-1/2” top diameter, and the body of the interior cup, which will go through the 3-1/2” sink hole, is 3-5/16” (about 84mm) in diamter. The thickness is usually 0.6 to 0.7mm, and the assembly total height is about 3-7/8” (99mm). The height of the interior cup is 1-15/16” (about 48.5mm). The threaded shank is 1-3/4” (44mm). The unit weight is about 348g. 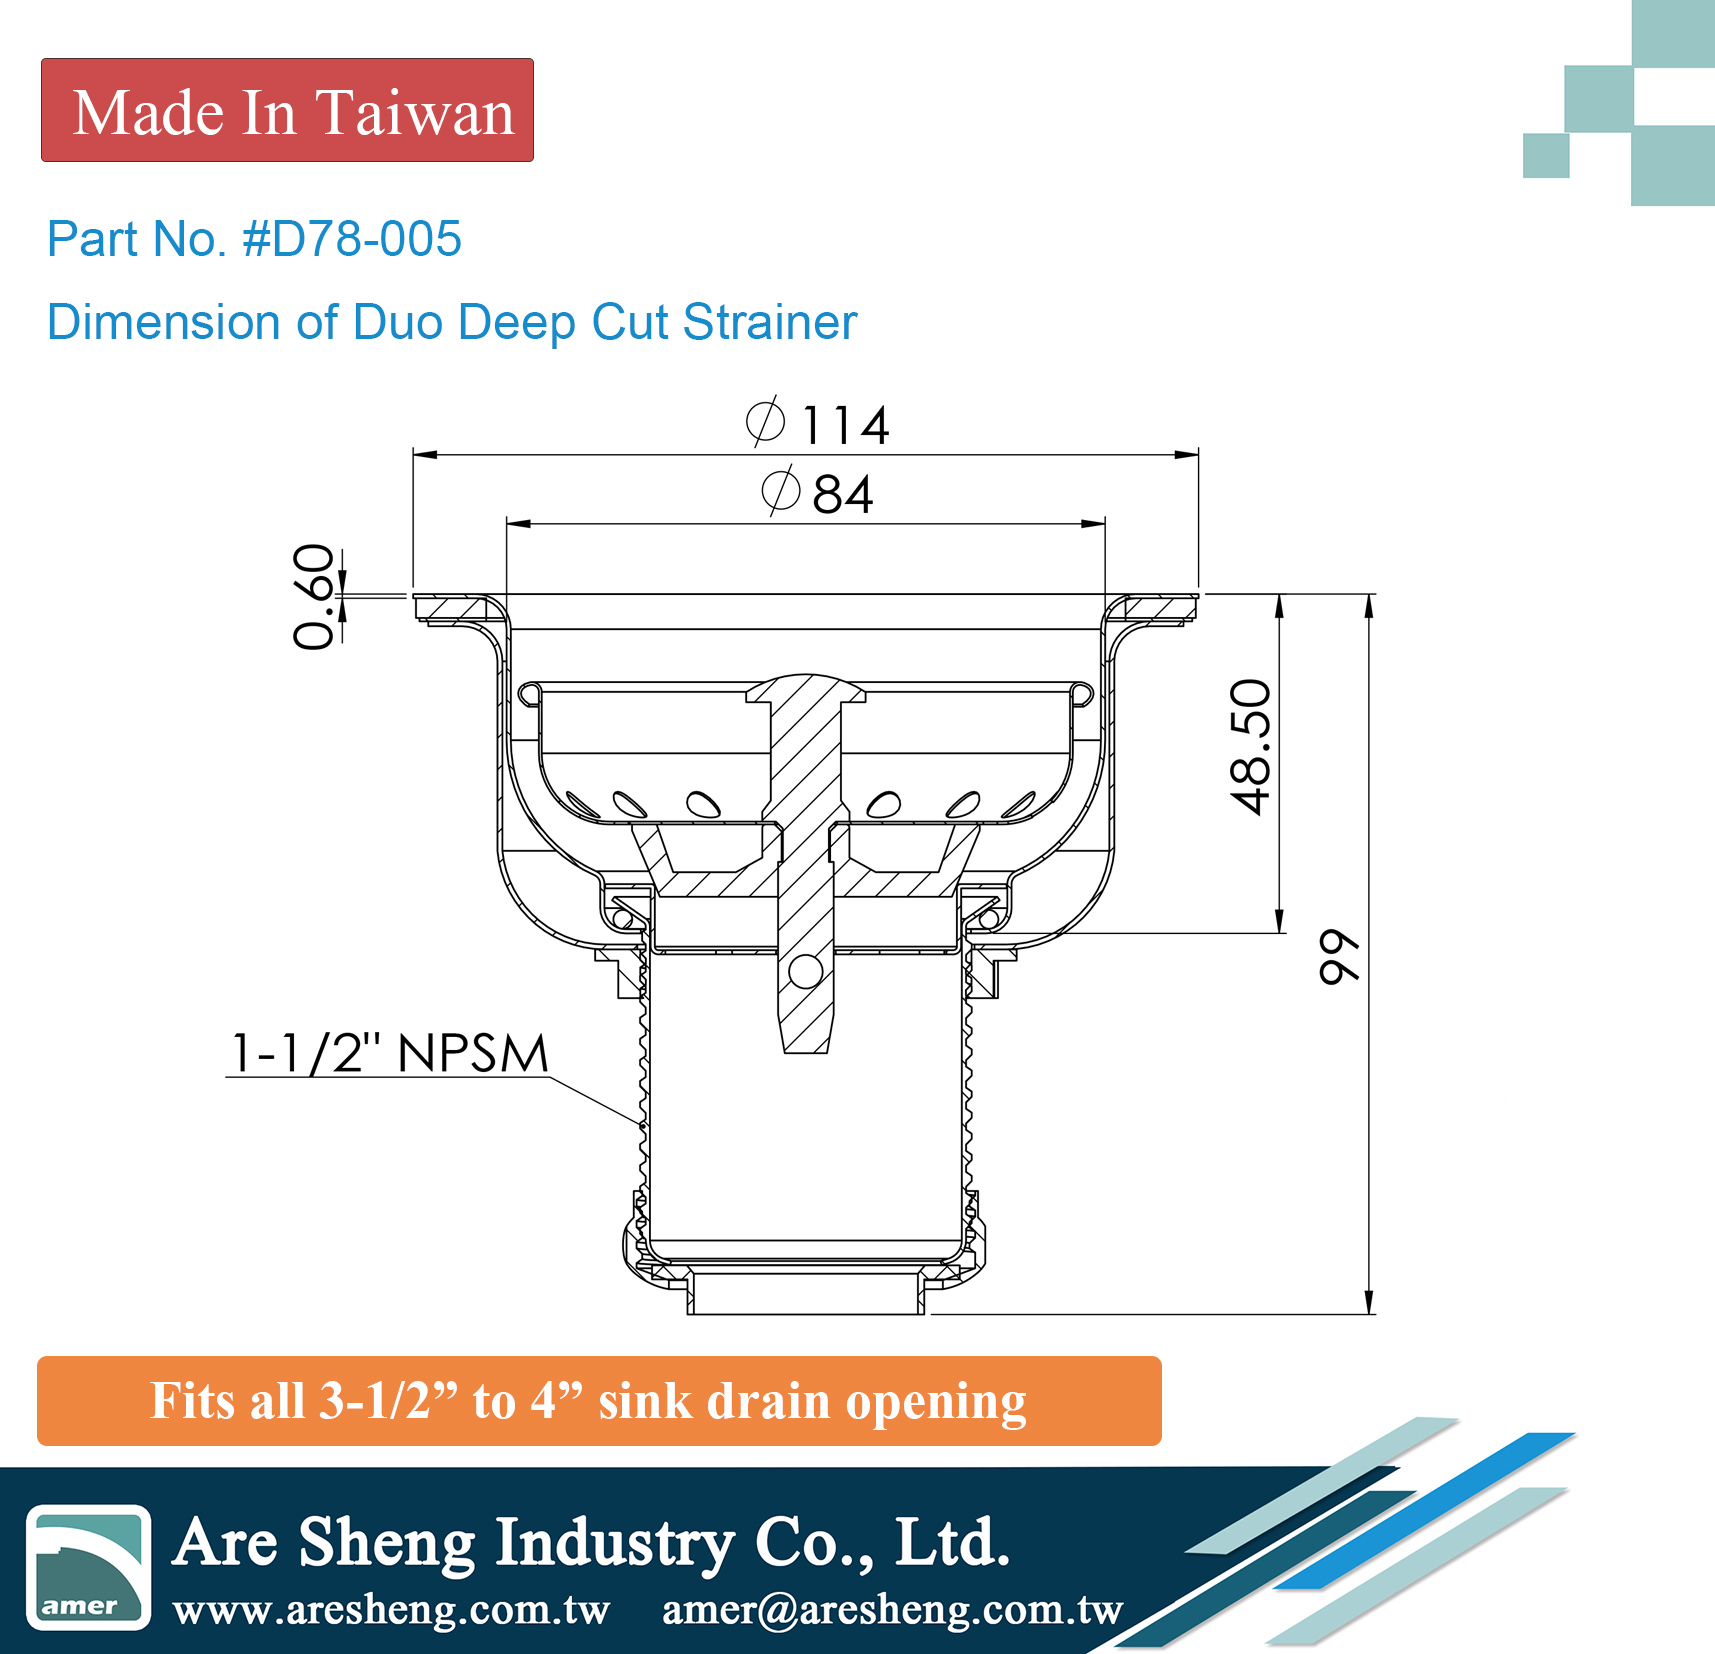
> What’s the material of each part of sink strainer? > What’s the name of each part in a sink strainer? 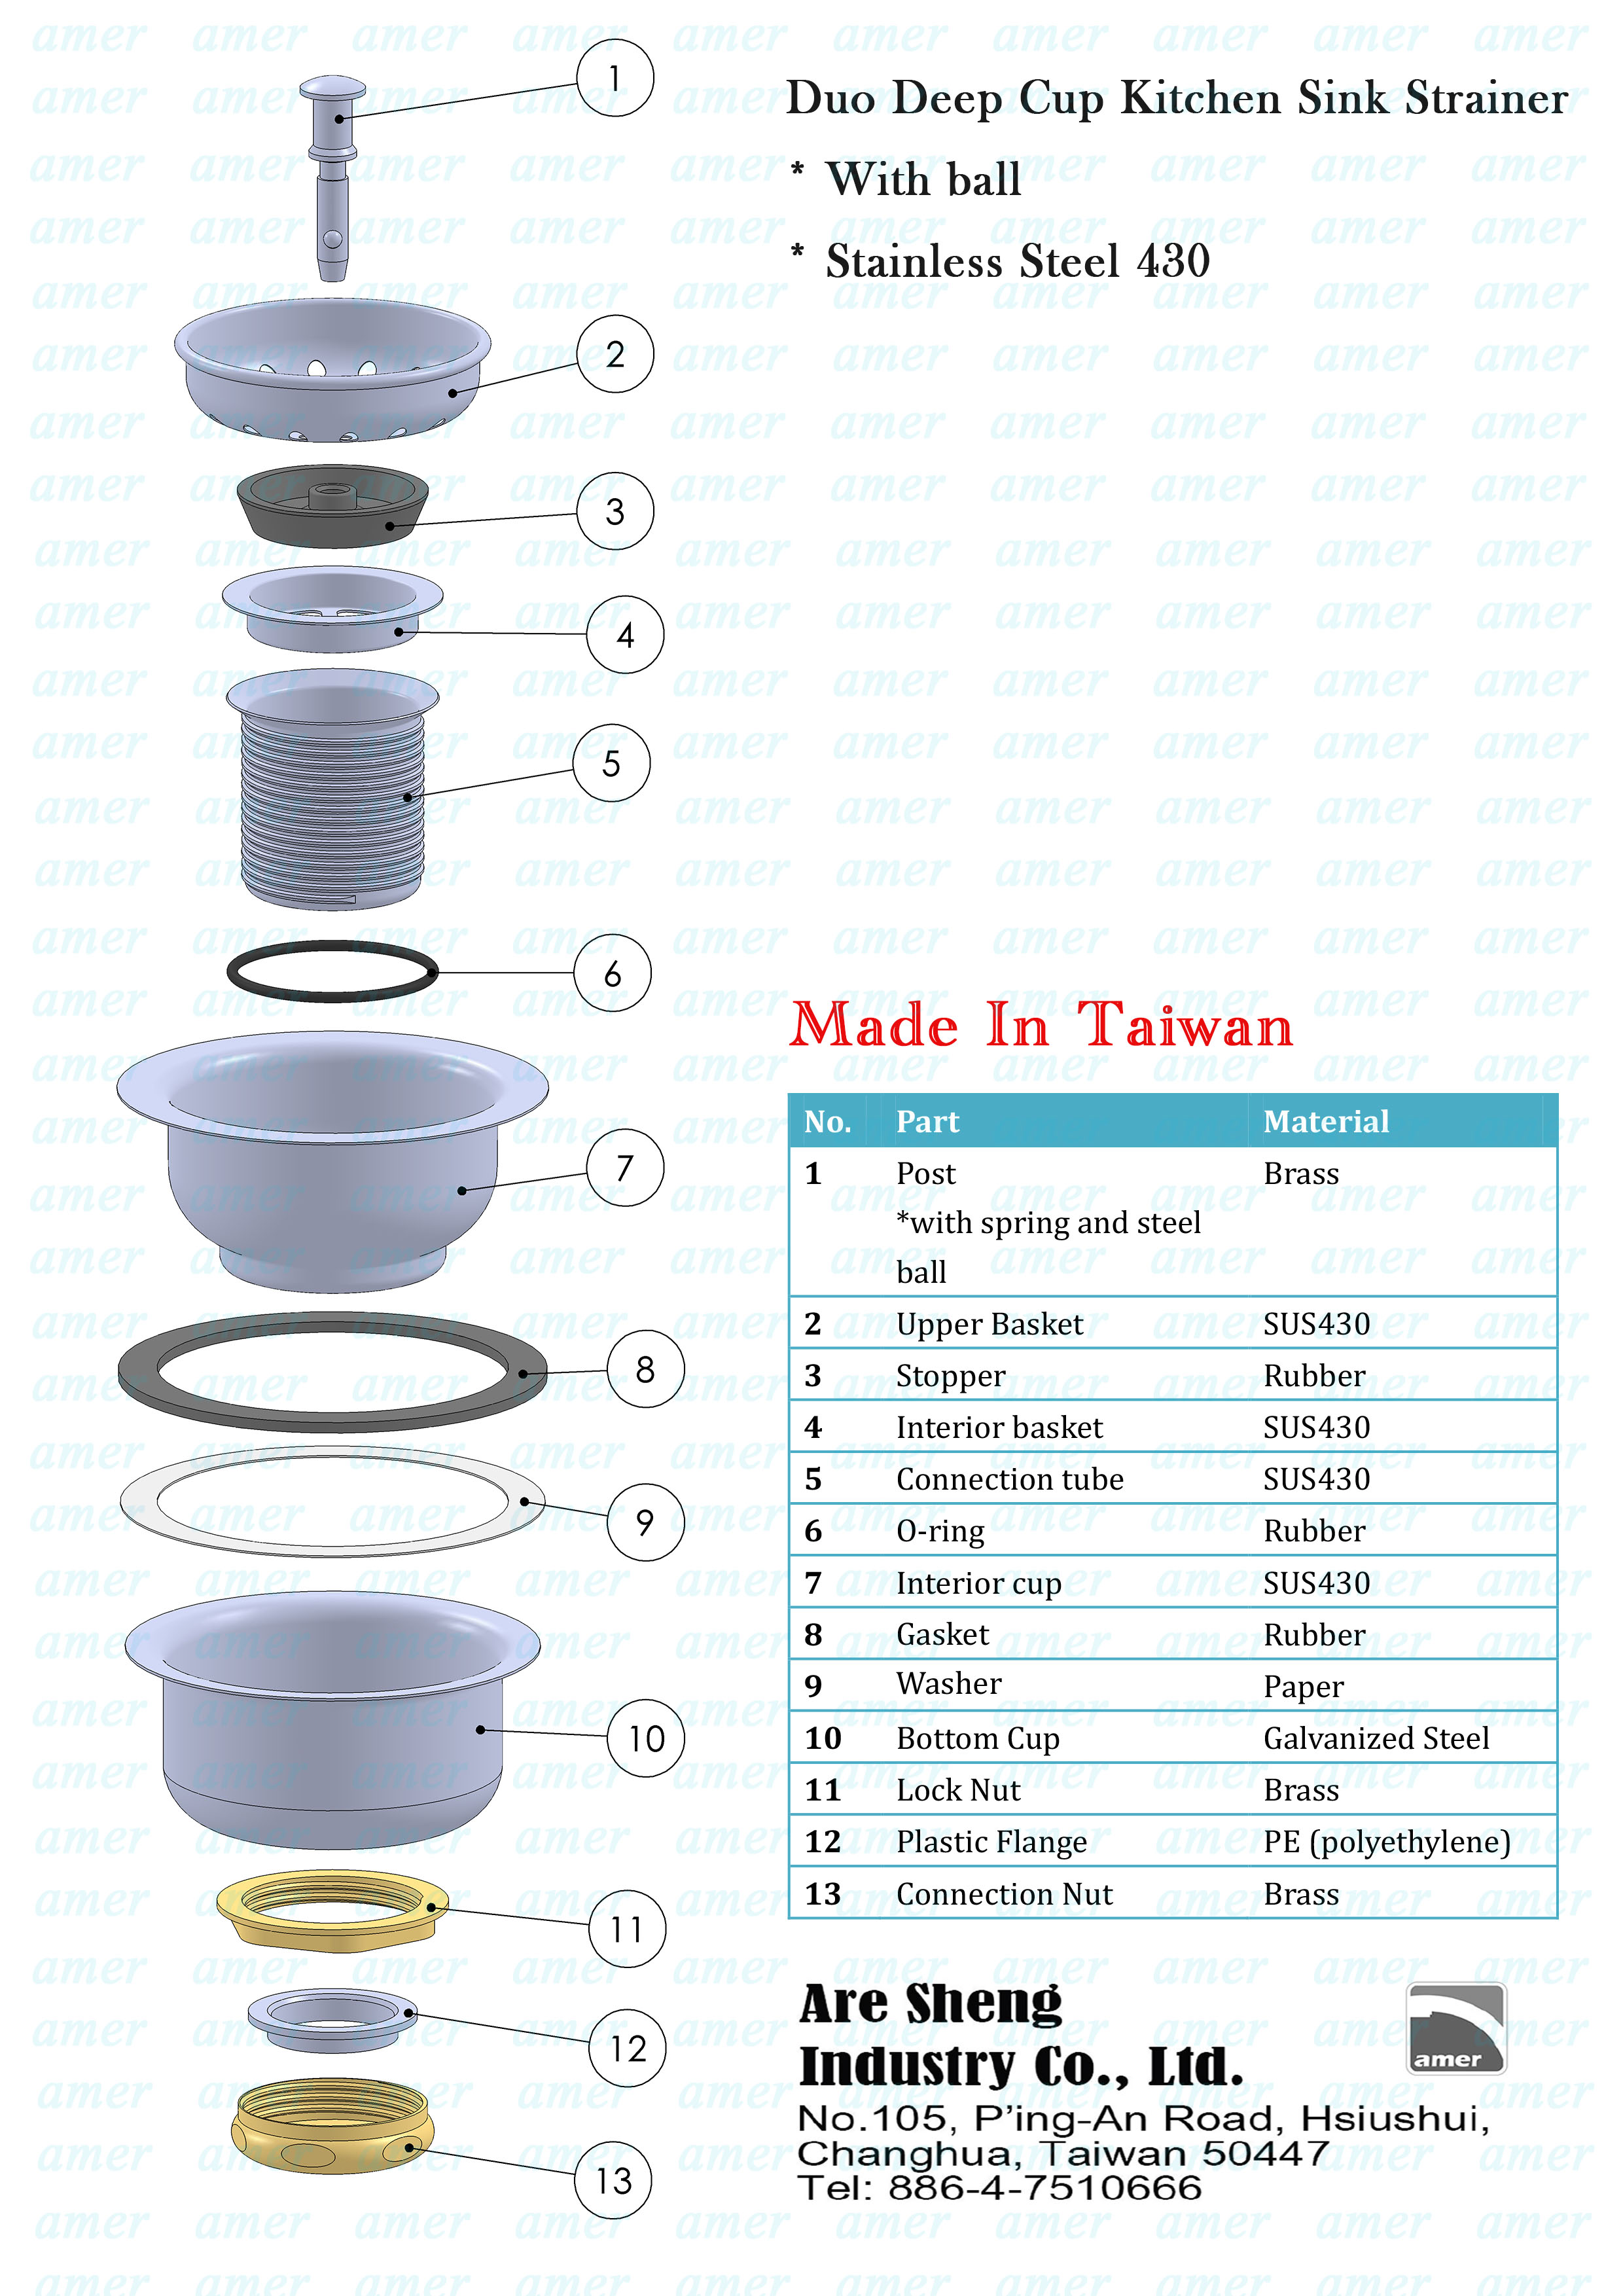
|
| How to start business with Are Sheng? |
  1 Inquiry Please refer to our website / catalogue/ brochure/ DM and advise the item number for the products you want. Also, please let us know your estimated order quantity at the same time. If you have any special requirement, for example, lead free/ certificate/ surface treatment/ blister card/color box…, please advise too, so that we can quote a precise and better price to you. Thank you. --------------------------------------------------------------------------------------------------------------  2 Quotation After receiving your inquiry, Are Sheng will reply in two working days and will provide the quotation in 3-5 working days. *If you do not receive our reply in 2 days, please send the mail via [email protected] again.* Our prices are usually quoted based on FOB Taiwan (Keelung or Kaohsiung). If you need CIF prices, please advise the port of destination, so that we can quote CIF prices to you. Our quotation will include package our item number/ product description/package/ MOQ (usually a few full cartons)/ Unit price/ trade term, etc. If you need any other information, please let us know. Thank you.  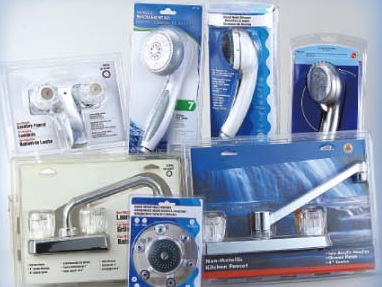 --------------------------------------------------------------------------------------------------------------   3 & 4 Price approval/ Sample approval If the prices are accepted, we will provide samples for customers to check. *For new customers, there might have some sample charges before the first order.* --------------------------------------------------------------------------------------------------------------  5 Purchase Order After receiving your purchase order, we will make a PI for your confirmation. If everything is all right on the PI, please confirm by signed PI. Thank you. --------------------------------------------------------------------------------------------------------------  6 Deposit/ Down payment Usually, the payment term will be “30% down payment; 70% upon receiving copy B/L” or “50% down payment; 50% upon receiving copy B/L”. After the order is confirmed, please arrange the down payment to the appointed bank account. *If you have the payment schedule, please let us know first, so that we can ask our accountant to note it.* --------------------------------------------------------------------------------------------------------------  7 Production We will arrange the production soon after receiving the down payment. Usually, the lead time of sea orders is about 40 – 50 days. --------------------------------------------------------------------------------------------------------------  8 Quality control (QC) Our products are under serious quality inspection before shipment. Depending on different products, there are different tests. We have water test, air test, salt spray test, and have various gauges to make sure that the sizes are correct and in tolerance.    --------------------------------------------------------------------------------------------------------------  9 Shipment After the products all pass quality inspection, we will arrange the shipment and send the shipping advice to you. If you use FOB term, please ask your forwarder to contact with us ( at least 2 weeks before the estimated shipping date). Thank you. --------------------------------------------------------------------------------------------------------------   10 & 11 Balance payment / Telex release We will send the original documents or arrange telex release soon after receiving the balance payment from you. --------------------------------------------------------------------------------------------------------------  12 Pick up order Please pay attention on the ETA and contact with the forwarder to pick up the goods on time. --------------------------------------------------------------------------------------------------------------  13 After-service As a decent and responsible enterprise, we value customers’ feedback and we expect long-term cooperation. If there is any problem after the sale, we will do our best to provide a satisfying solution to customers.  -------------------------------------------------------------------------------------------------------------- |
| What you should know when purchasing from manufacturer? |
|
Order Policy: What you should know when purchasing from manufacturer? - MOQ (Minimum order quantity) MOQ is indicated on each product page. Specification For each item, we need to purchase a certain amount of material. Besides, before manufacturing each part, we need to set up the molds and test, which is time consuming. Therefore, there is MOQ for each item, please check the MOQ at the bottom of each product or send the inquiry to check with us. - MOA (Minimum order amount) You can mix various items to meet the MOA. Air order: Meet the MOQ and full carton request. The air freight/ courier charge will be needed. Sea order: For FOB term, the MOA is US$6,000 – 8,000 (depends on the destination port) For CIF term, the MOA is US$8,000 – 10,000 (depends on the destination port) Specification Customers can place air or sea order which depends on how long you need the goods and the total volume of your order. If the total volume is under 1CBM, you can consider to ship by air or express. Kindly note that for orders under 1CBM, the forwarder/ shipping company will charge for 1CBM. If the total volume of your order is over 1CBM, it’s better to ship by sea which can save more freight charge. But you might need to note the voyage of the shipment. Usually, it will take 30-45 days to US area. - Lead time: In normal situation, the lead time will take about 45 days. Specification To save the space of our warehouse, the products in stocks remain unassembled. Once the order is confirmed, we will arrange to assemble the products and pack the goods. Therefore, for items which are in stock, it will take 1-2 weeks to complete the order. Besides, for the first order of the customized products, the lead time will take 50-70 days since we need to check and examine each step carefully. |
| How to install a toilet? |
 How to install toilet bowl? When you are modeling the toilet, here are some tips to help you do it better and faster. Choose right kits When you visit the hardware store, you will find that there are different types of bolt. The most common models are like below. The left one is tank bolt. The right side is closet bolt. Their head styles are different. The tank bolt is round head. The closet bolt is oval head. To install the toilet bowl, you will need the closet bolt (picture at right side). 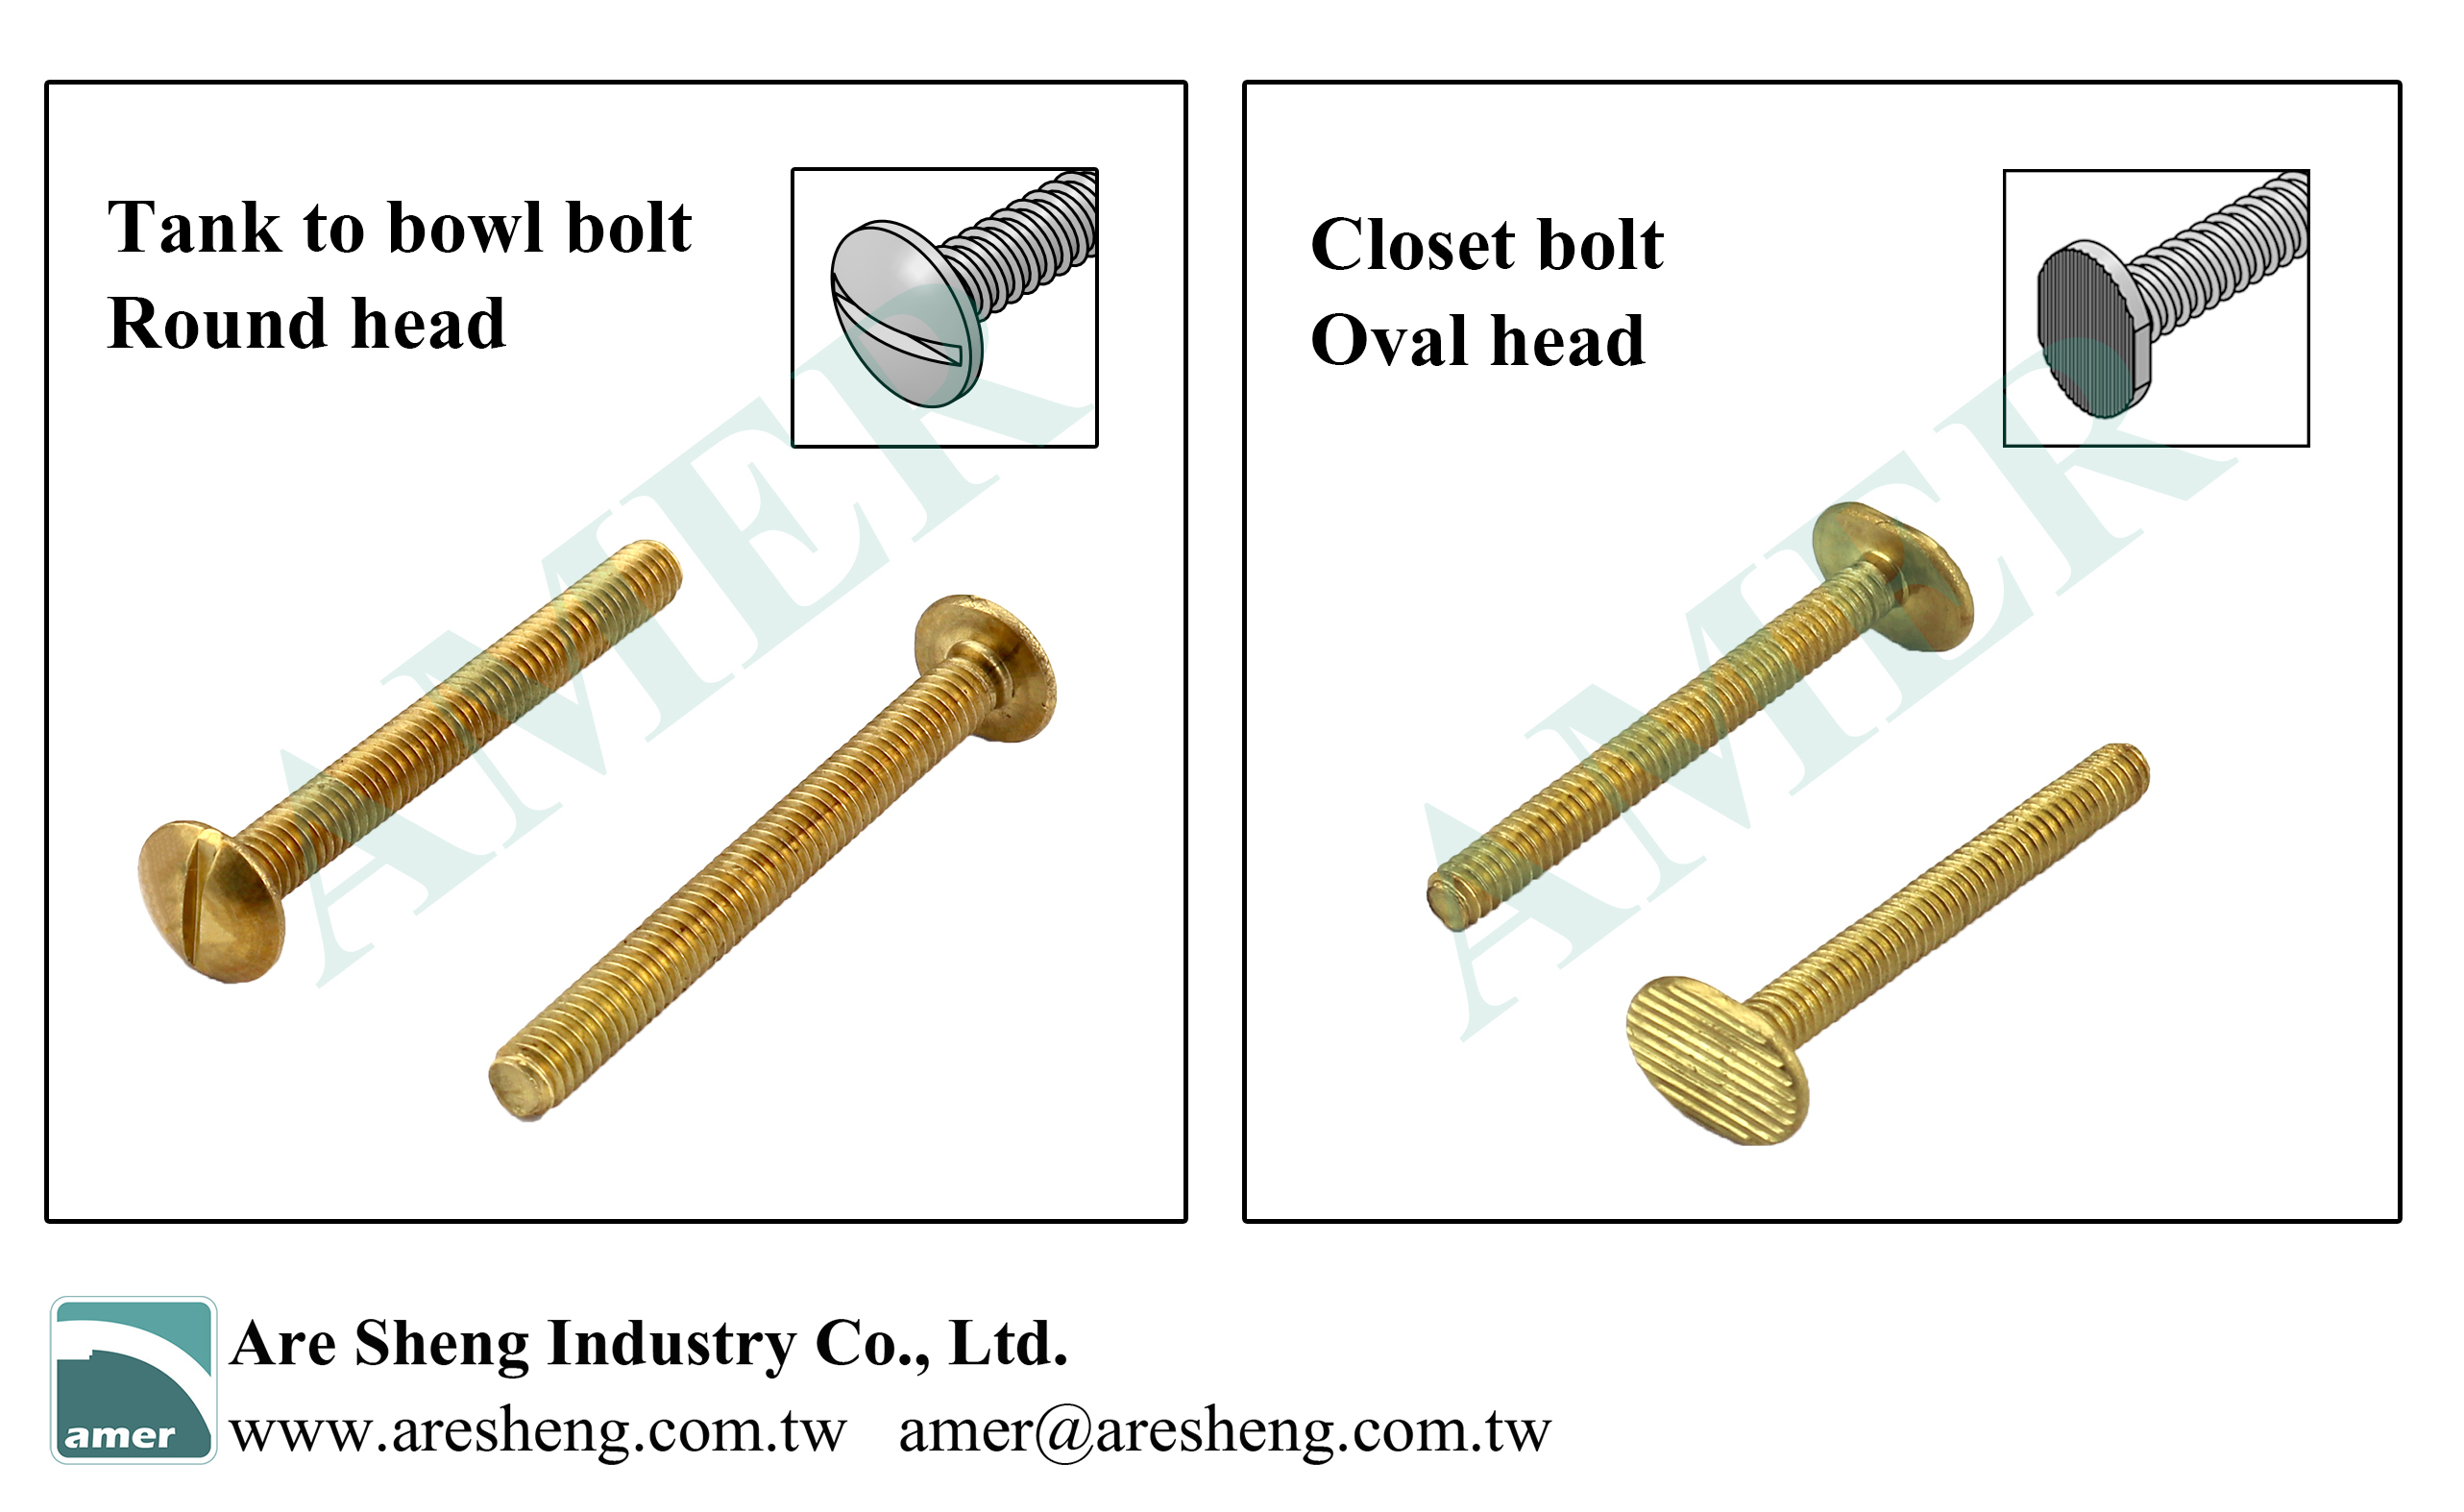 The reason why you need an oval-head bolt is because it can easily pass through the toilet flange and slide into the track of the flange. Its oval-head also allows it to be better fixed. 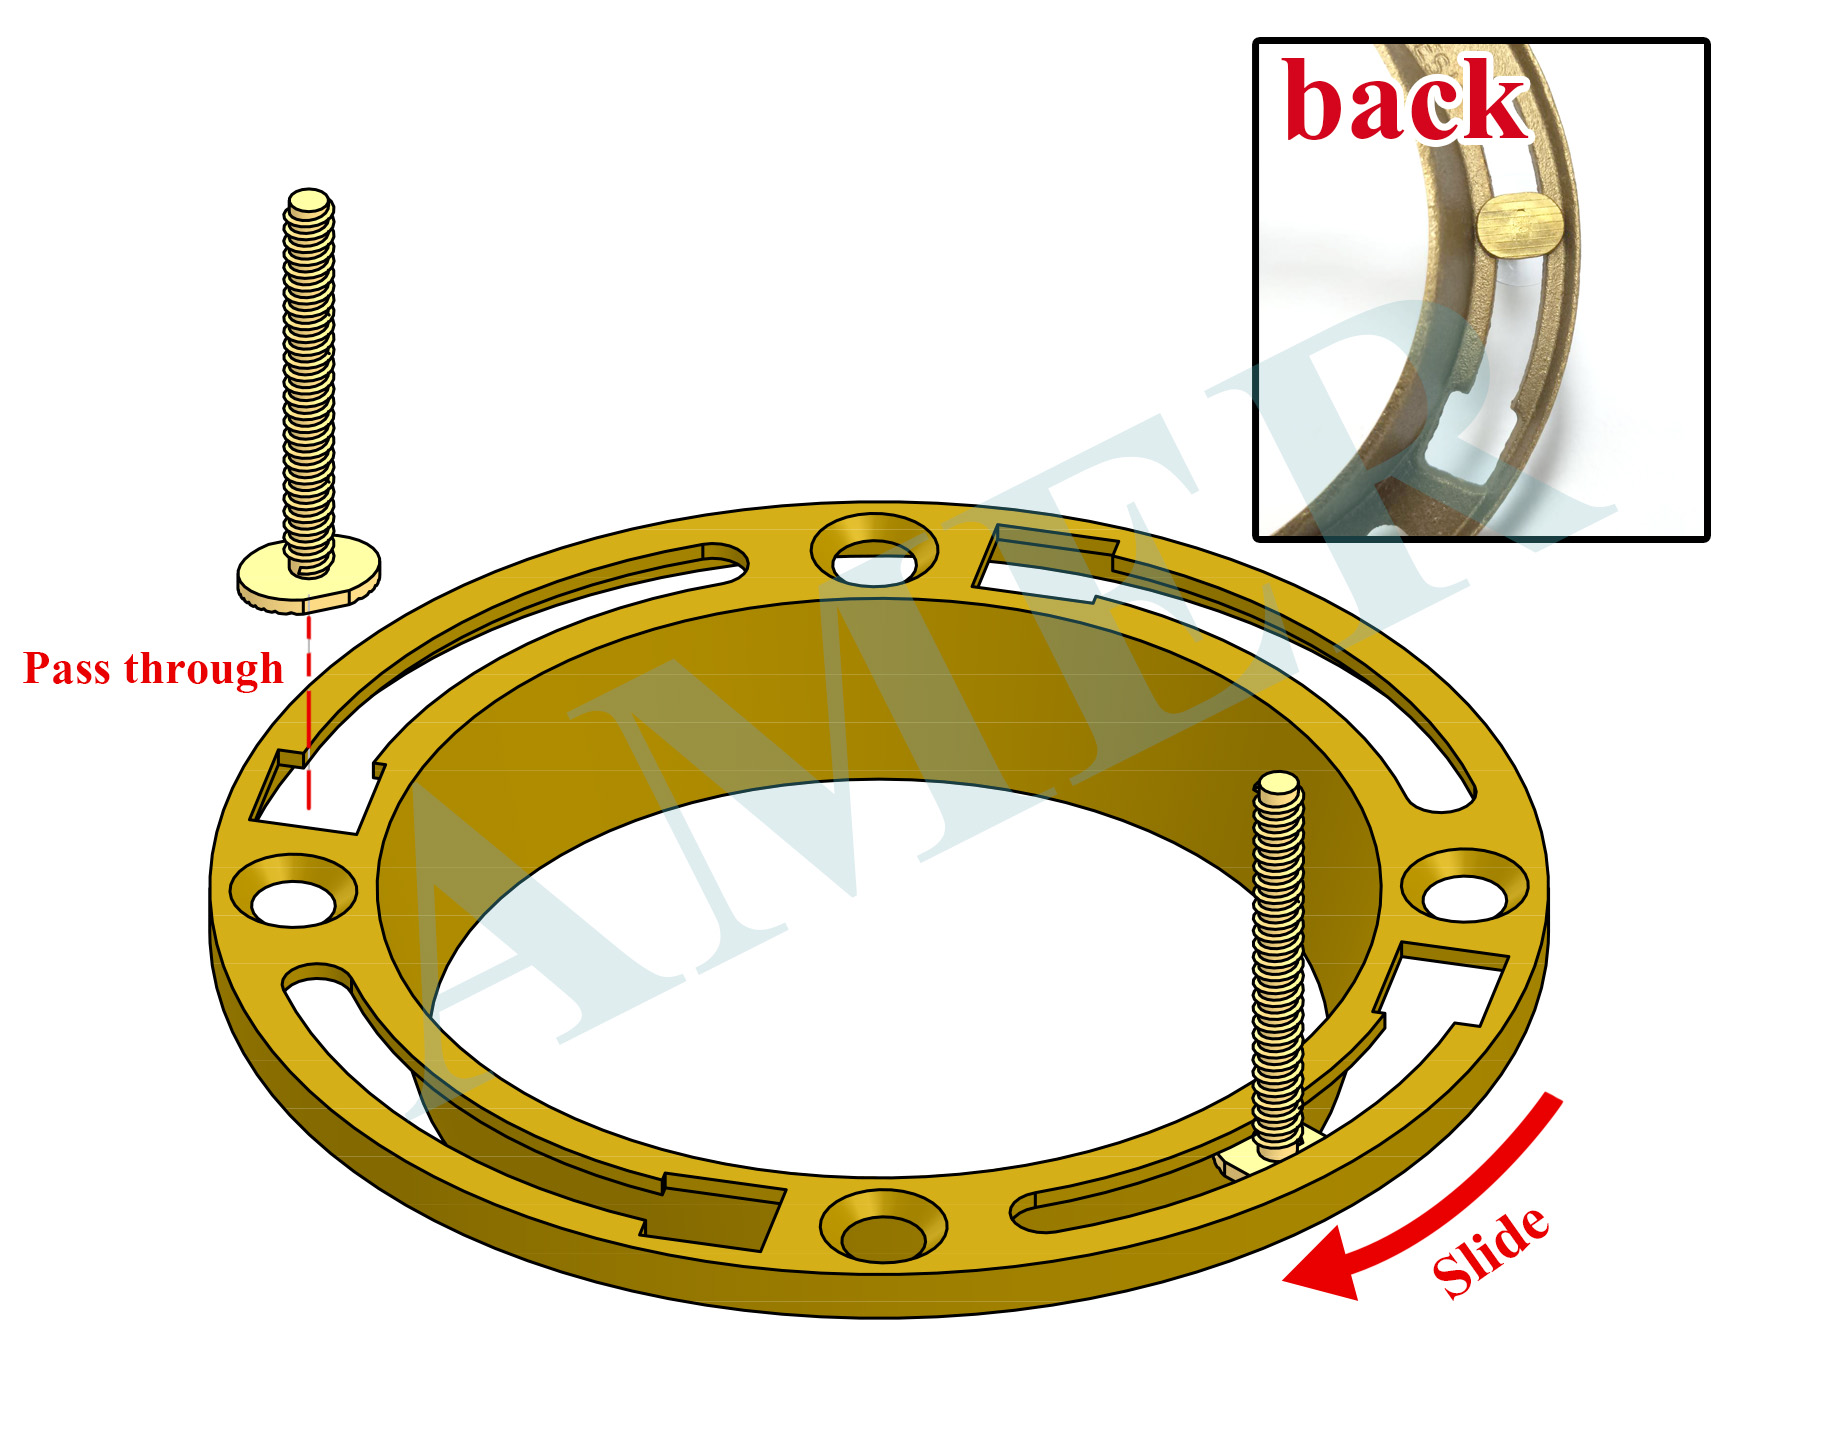 What’s inside a closet bolt repair kit set? Configuration A: 2 closet bolts, 4 open nuts, 4 metal washers Configuration B: 2 closet bolts, 2 open nuts, 2 metal washers, 2 speed nut Configuration C: 2 closet bolts, 2 open nuts, 2 plastic captive washers, 2 metal washers 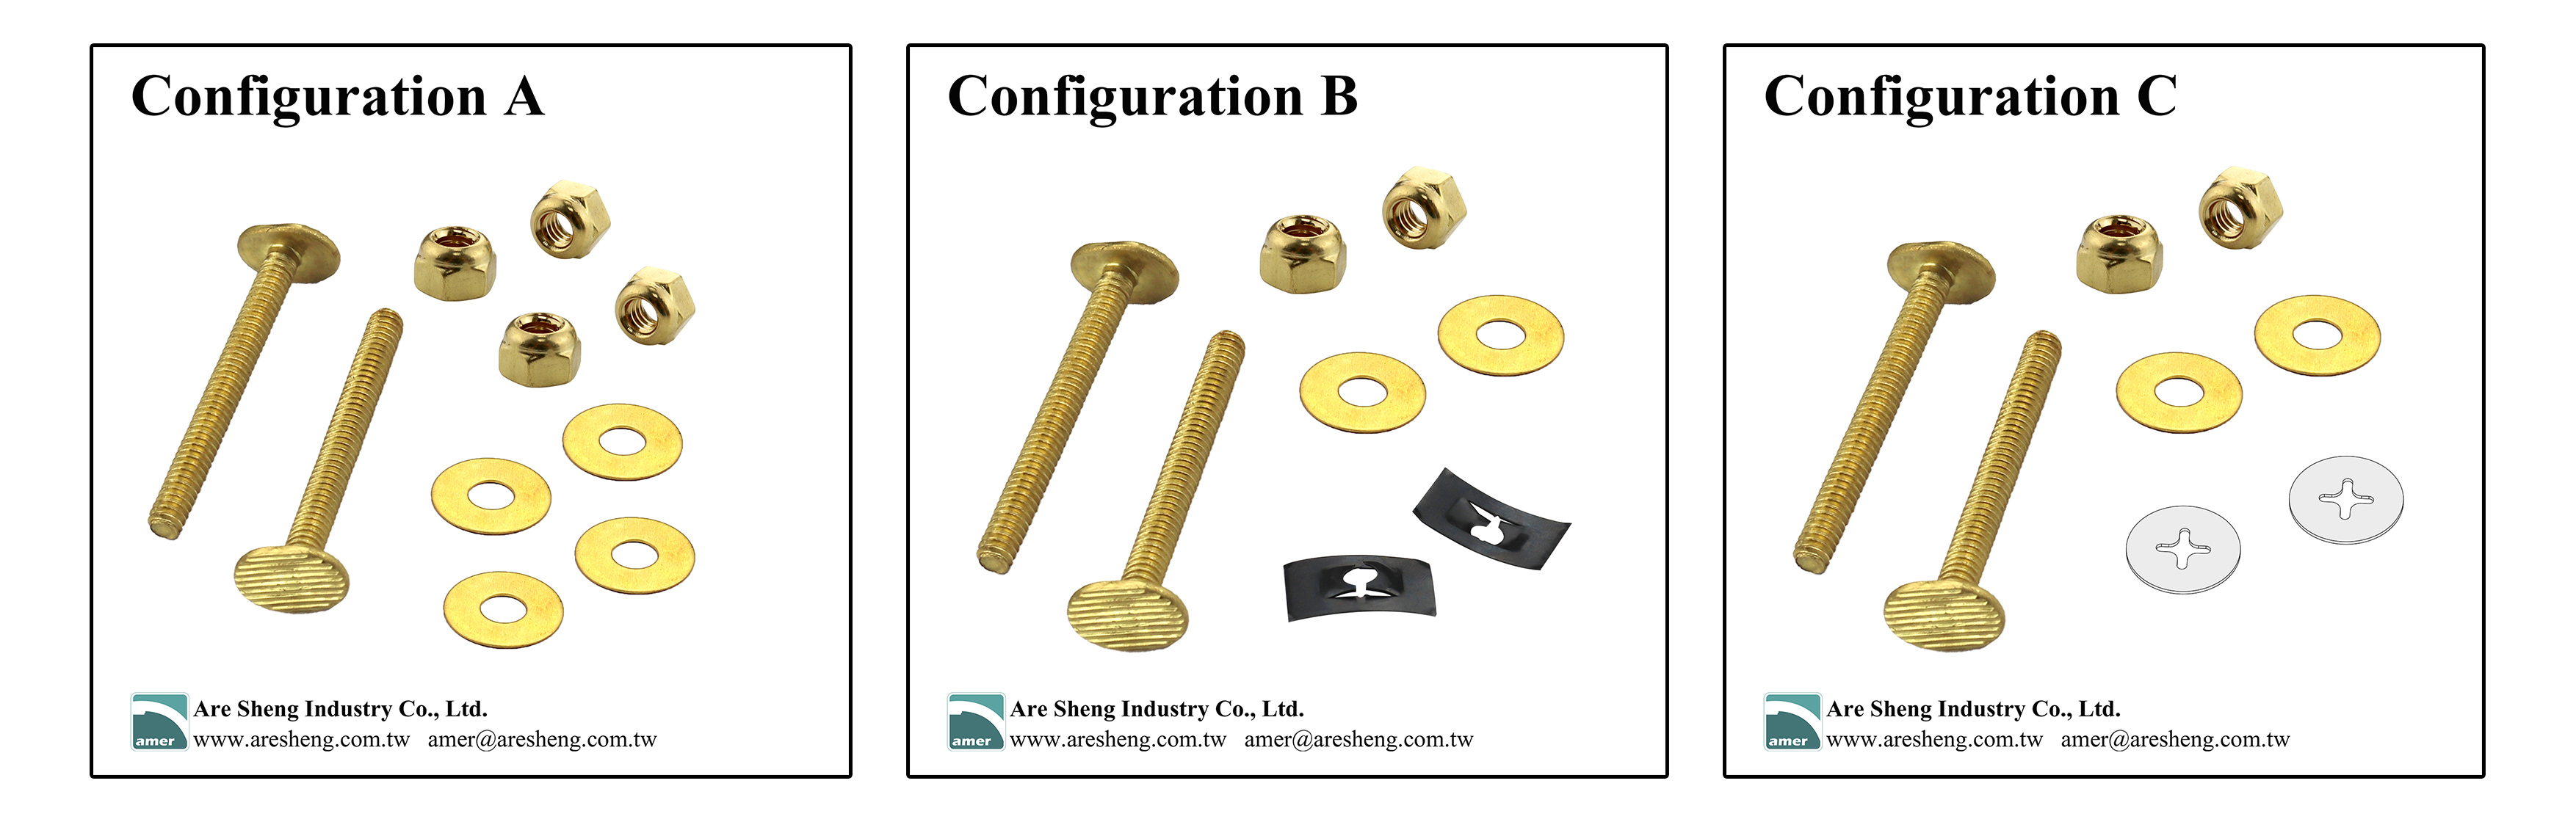 Configuration A This is the easiest way to install the toilet bowl. The step of positioning the toilet bowl is the most frustrating part in the installation process. Each time you miss positioning it on the bolt, you risk crushing and shifting the wax ring. But if you have 4 open nuts and 4 washers, you can fix the bolt on the toilet flange firmly like the picture below. In this way, the bolt will not move and slide when you are setting the toilet bowl. 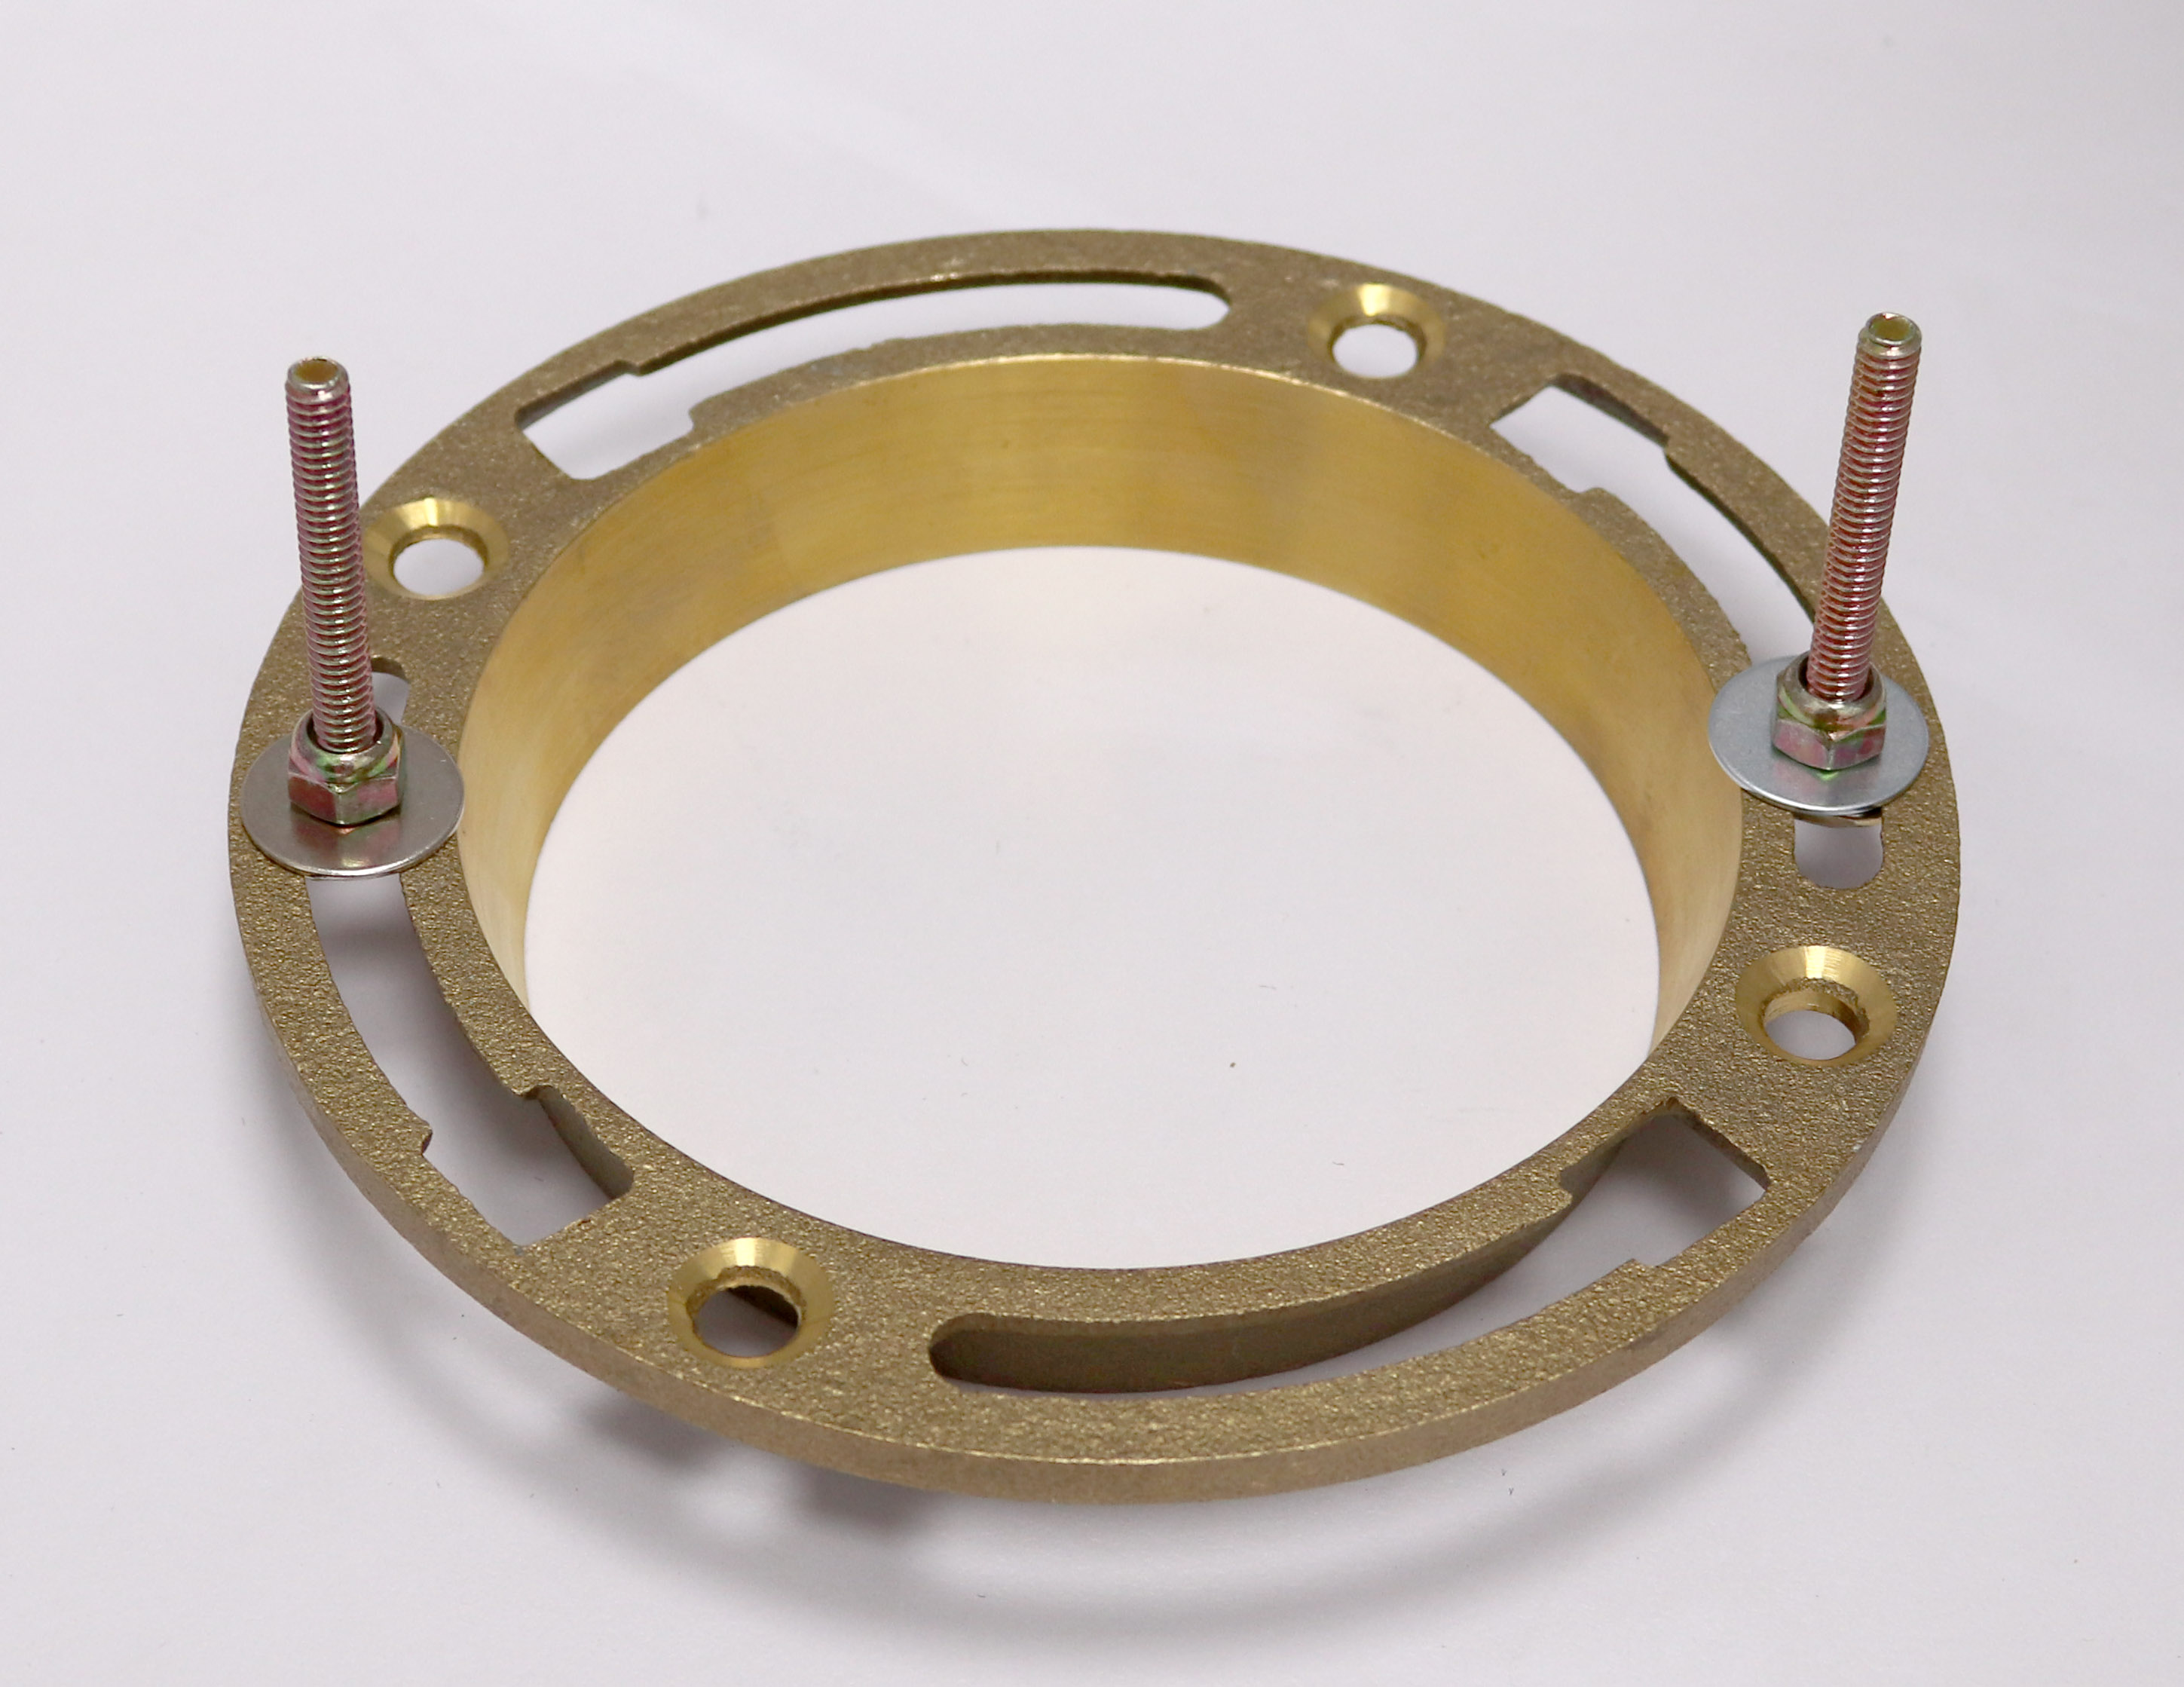 Configuration B This set uses a steel speed nut to fix the bolt. The speed nut has two prongs to grip the thread of bolt. The rectangular part works as a washer to stuck the bolt head and nut on the track of the flange. It still allows the bolt to move a bit, but the price is cheaper. The picture below illustrates how it works. 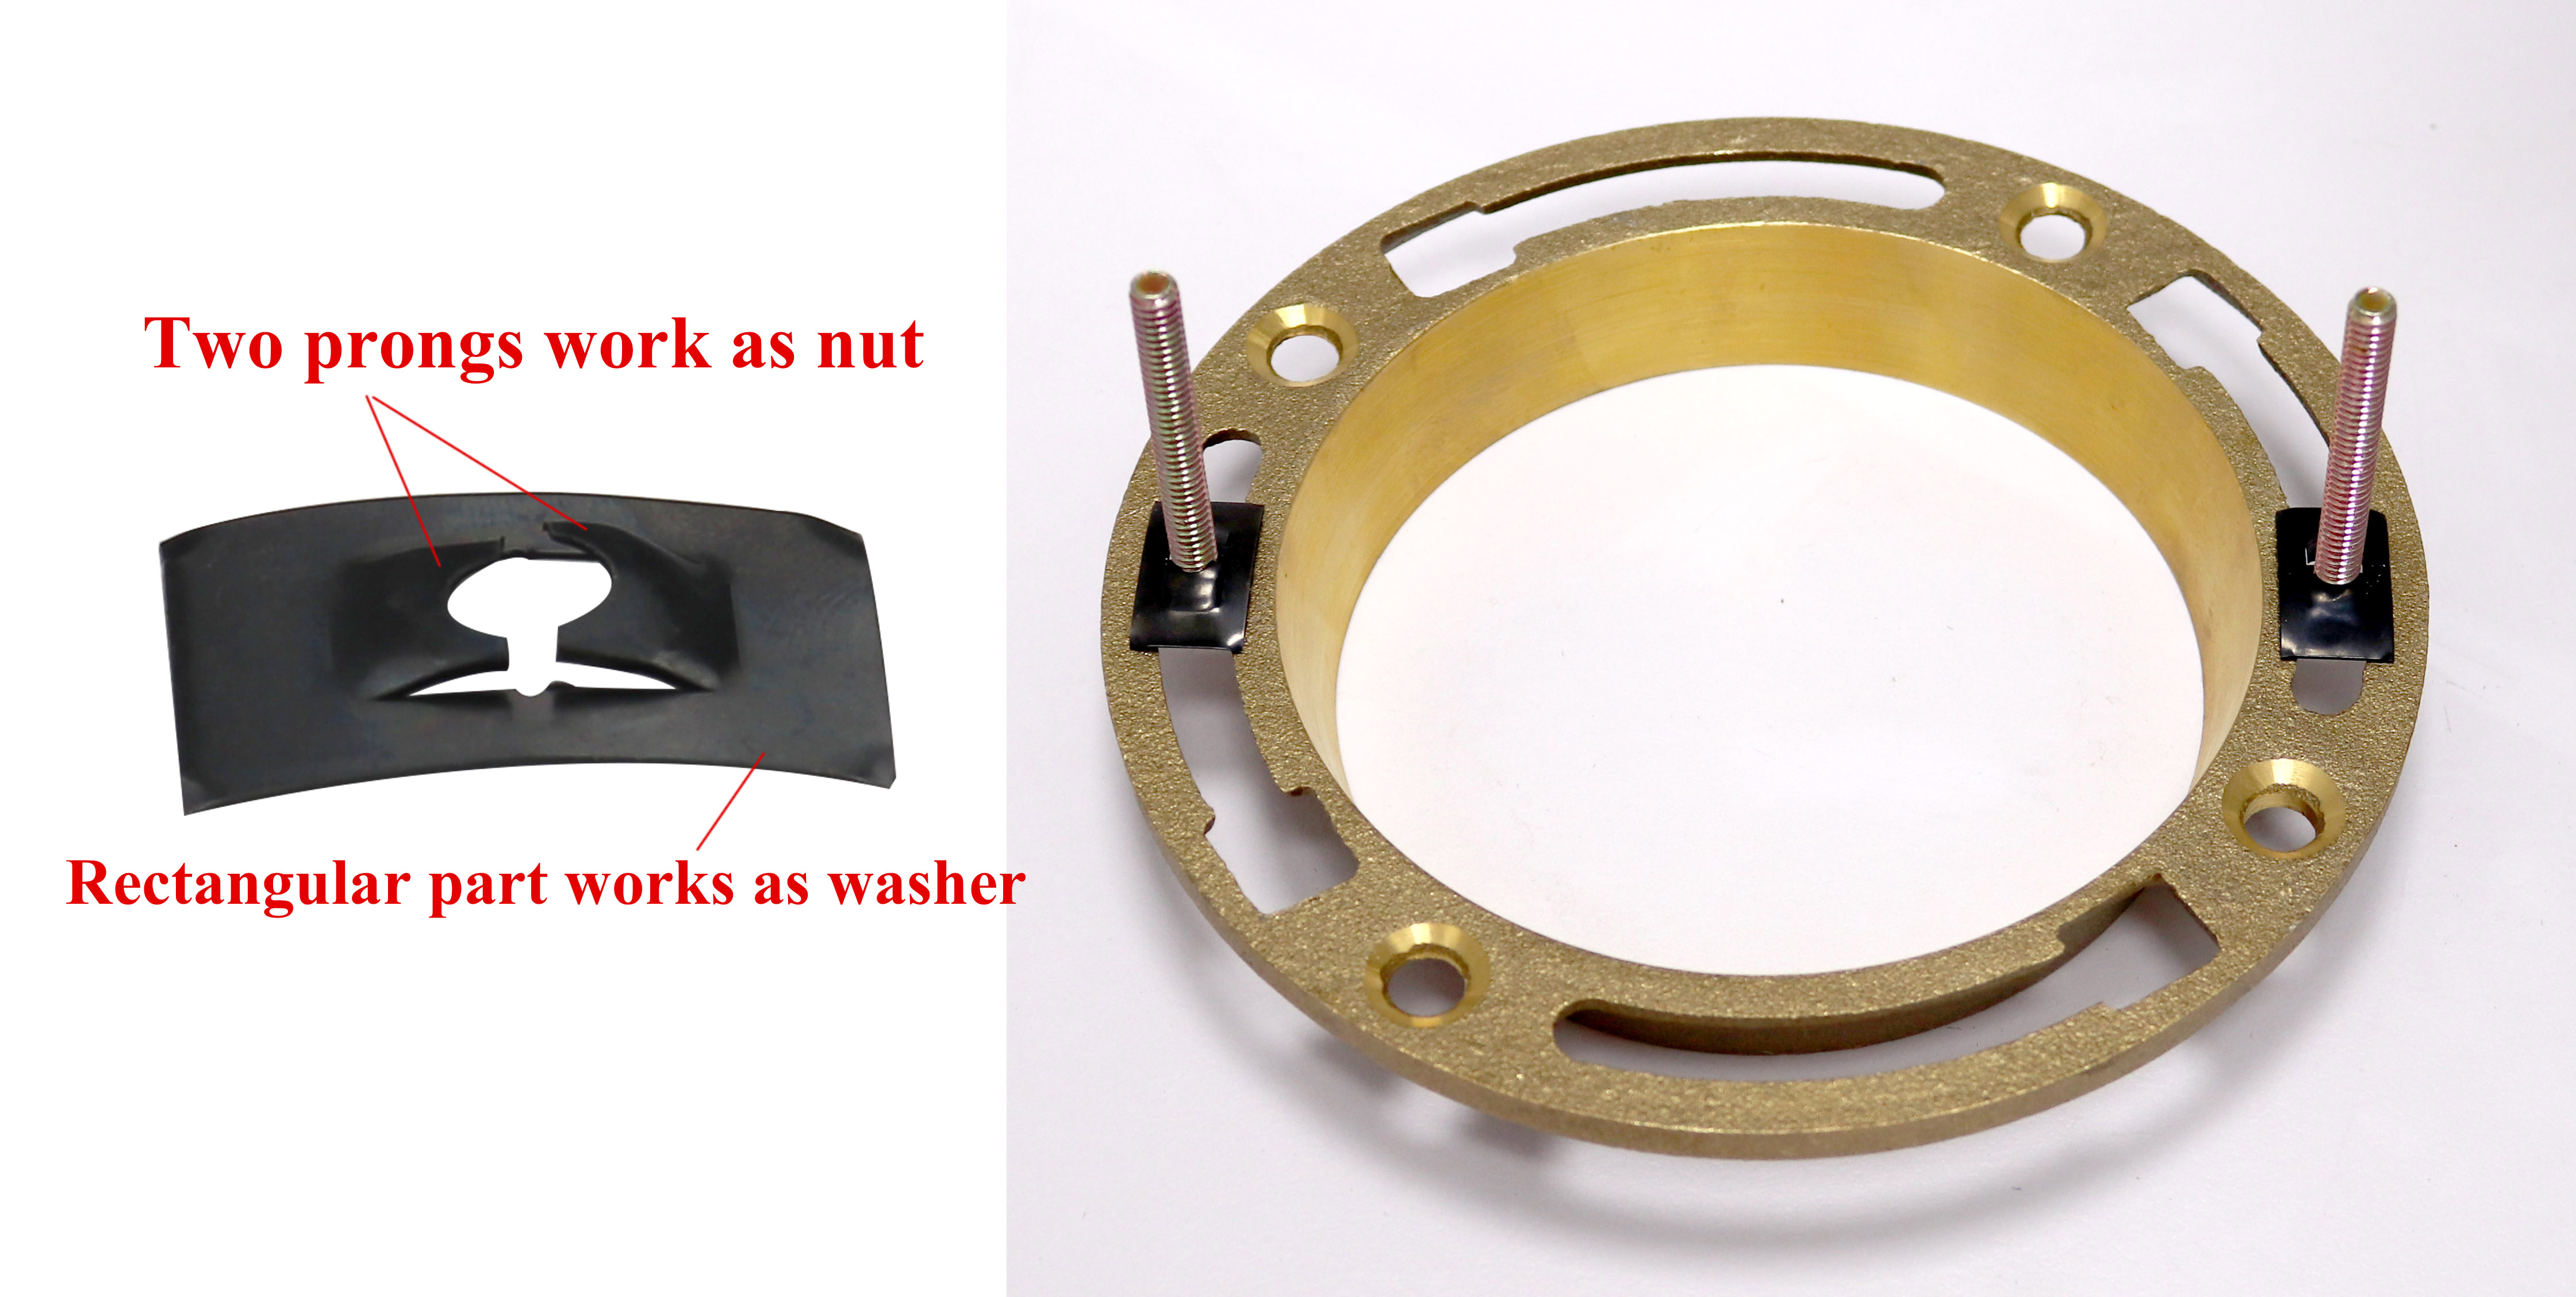 Configuration C This set uses a plastic captive washer to fix the bolt. *Note that the captive washer is for 1/4” closet bolt. It cannot be used on 5/16” closet bolt. This set is the most economical assembly, but it allows the bolt to slide and move. You may take several tries. Refer to the installation below. 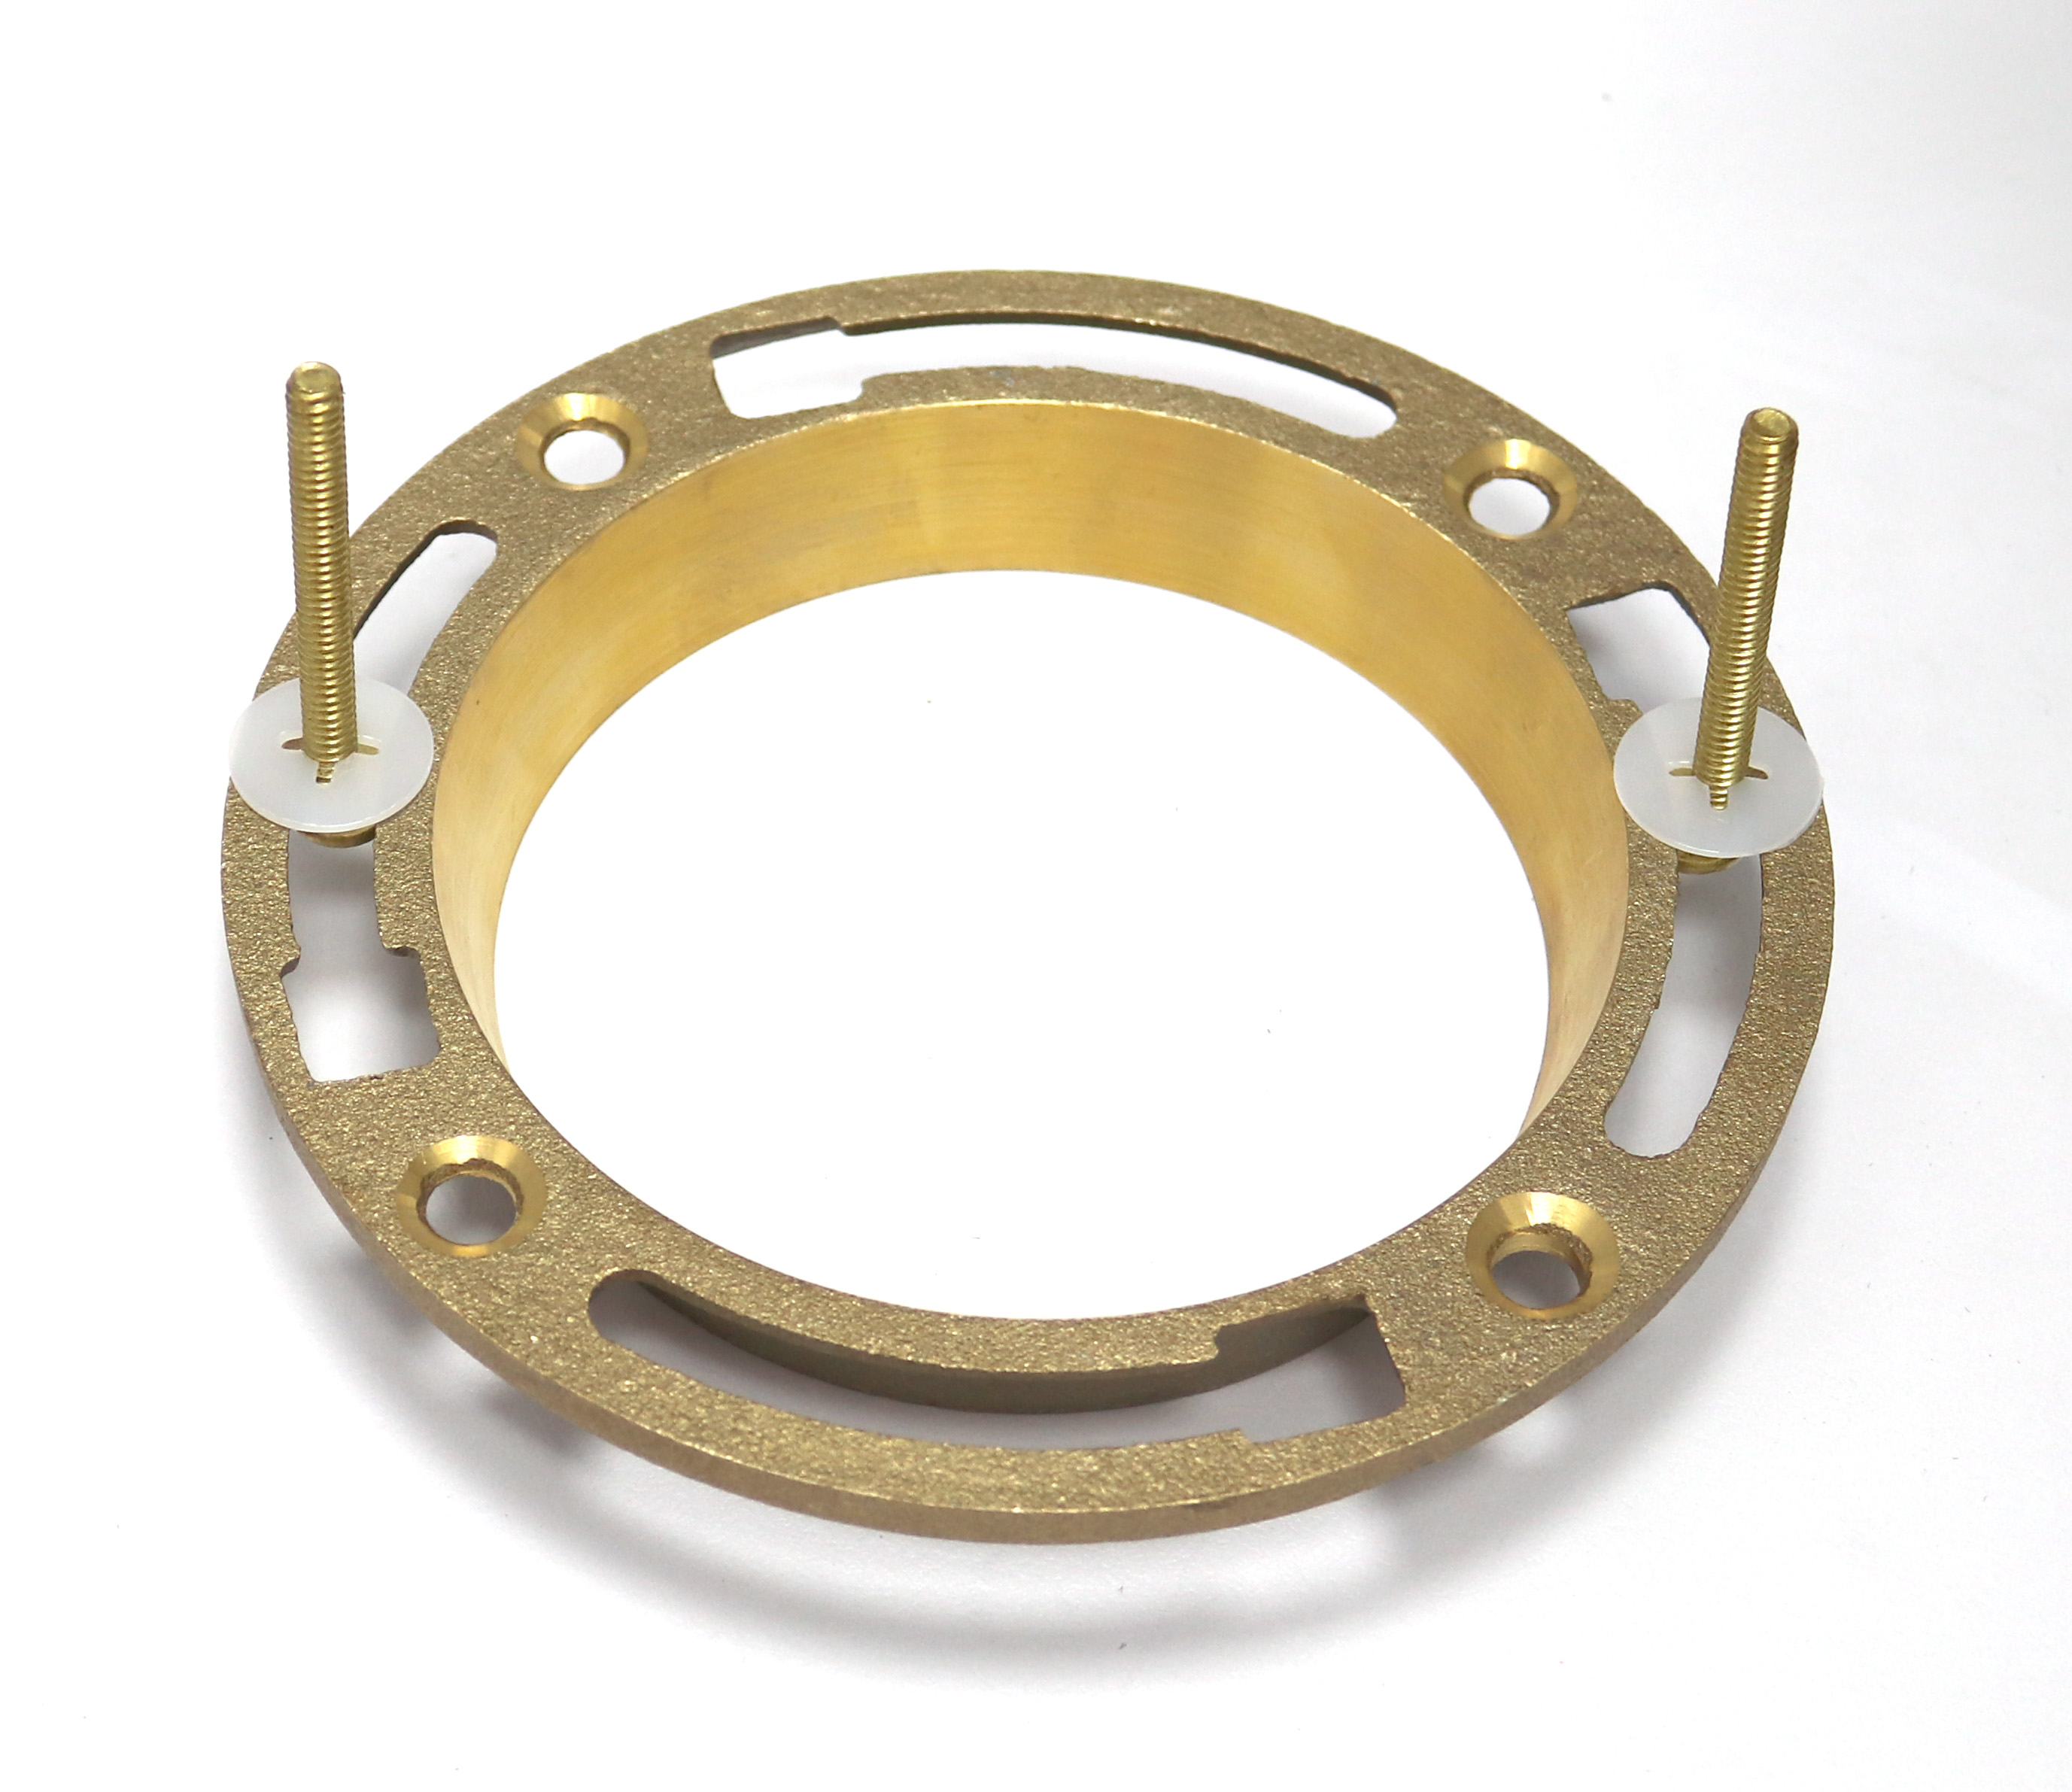 Material There are different materials of the closet bolt. Brass is the best choice. It won’t rust away and will be easier to cut off later, but the price is higher. Here you should note that in the hardware store, you will find the brass bolt and steel bolt. The steel bolt usually have yellow zinc plated finish that makes them look like brass, so check the label and make sure you purchase the right one. 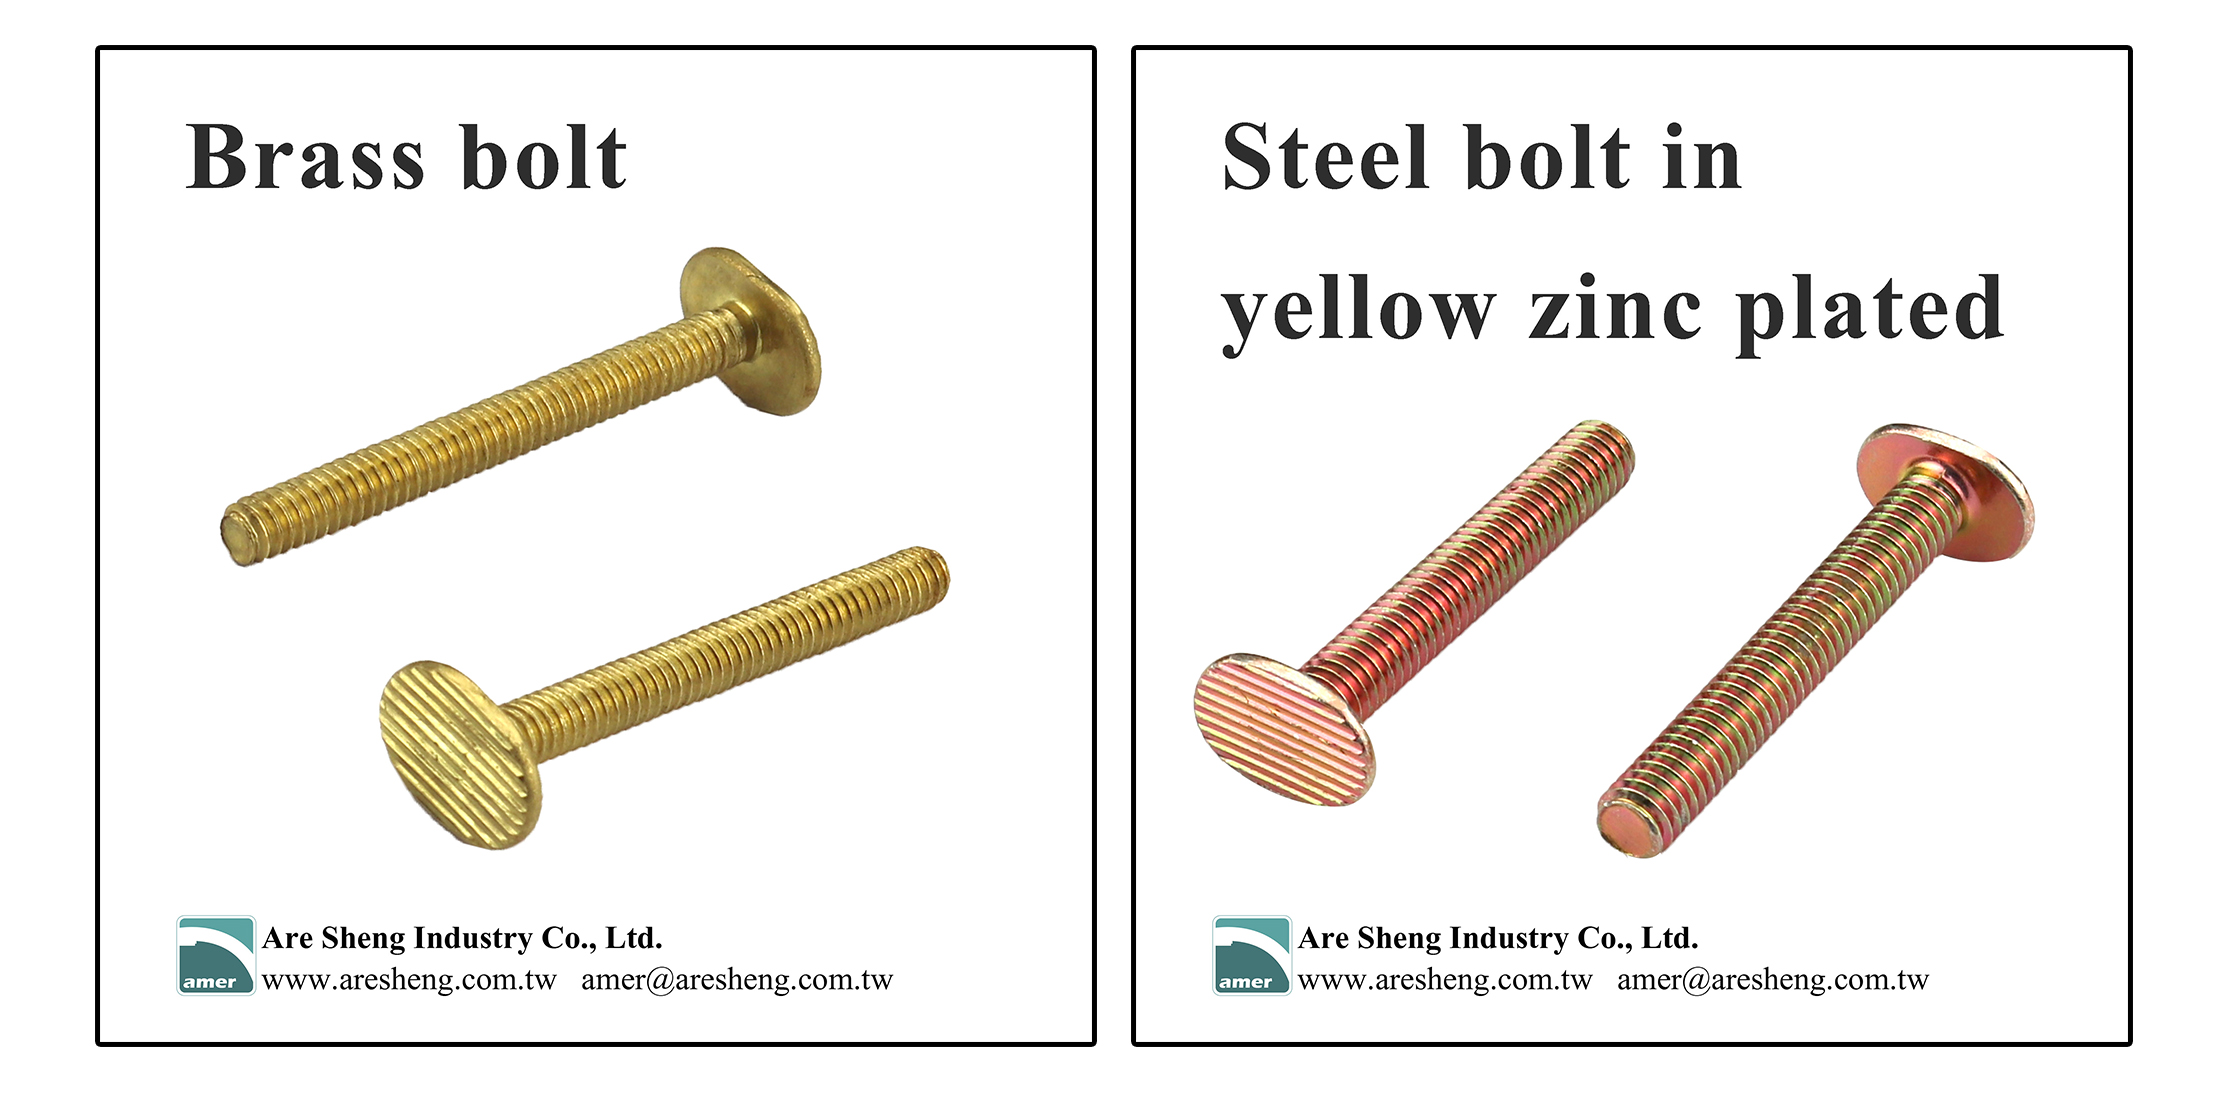 Also take a look on the material of other parts. Sometimes, it comes with a brass bolt but all other parts are steel. The steel nut and washer will rust quickly and weld to the bolt due to the corrosion. 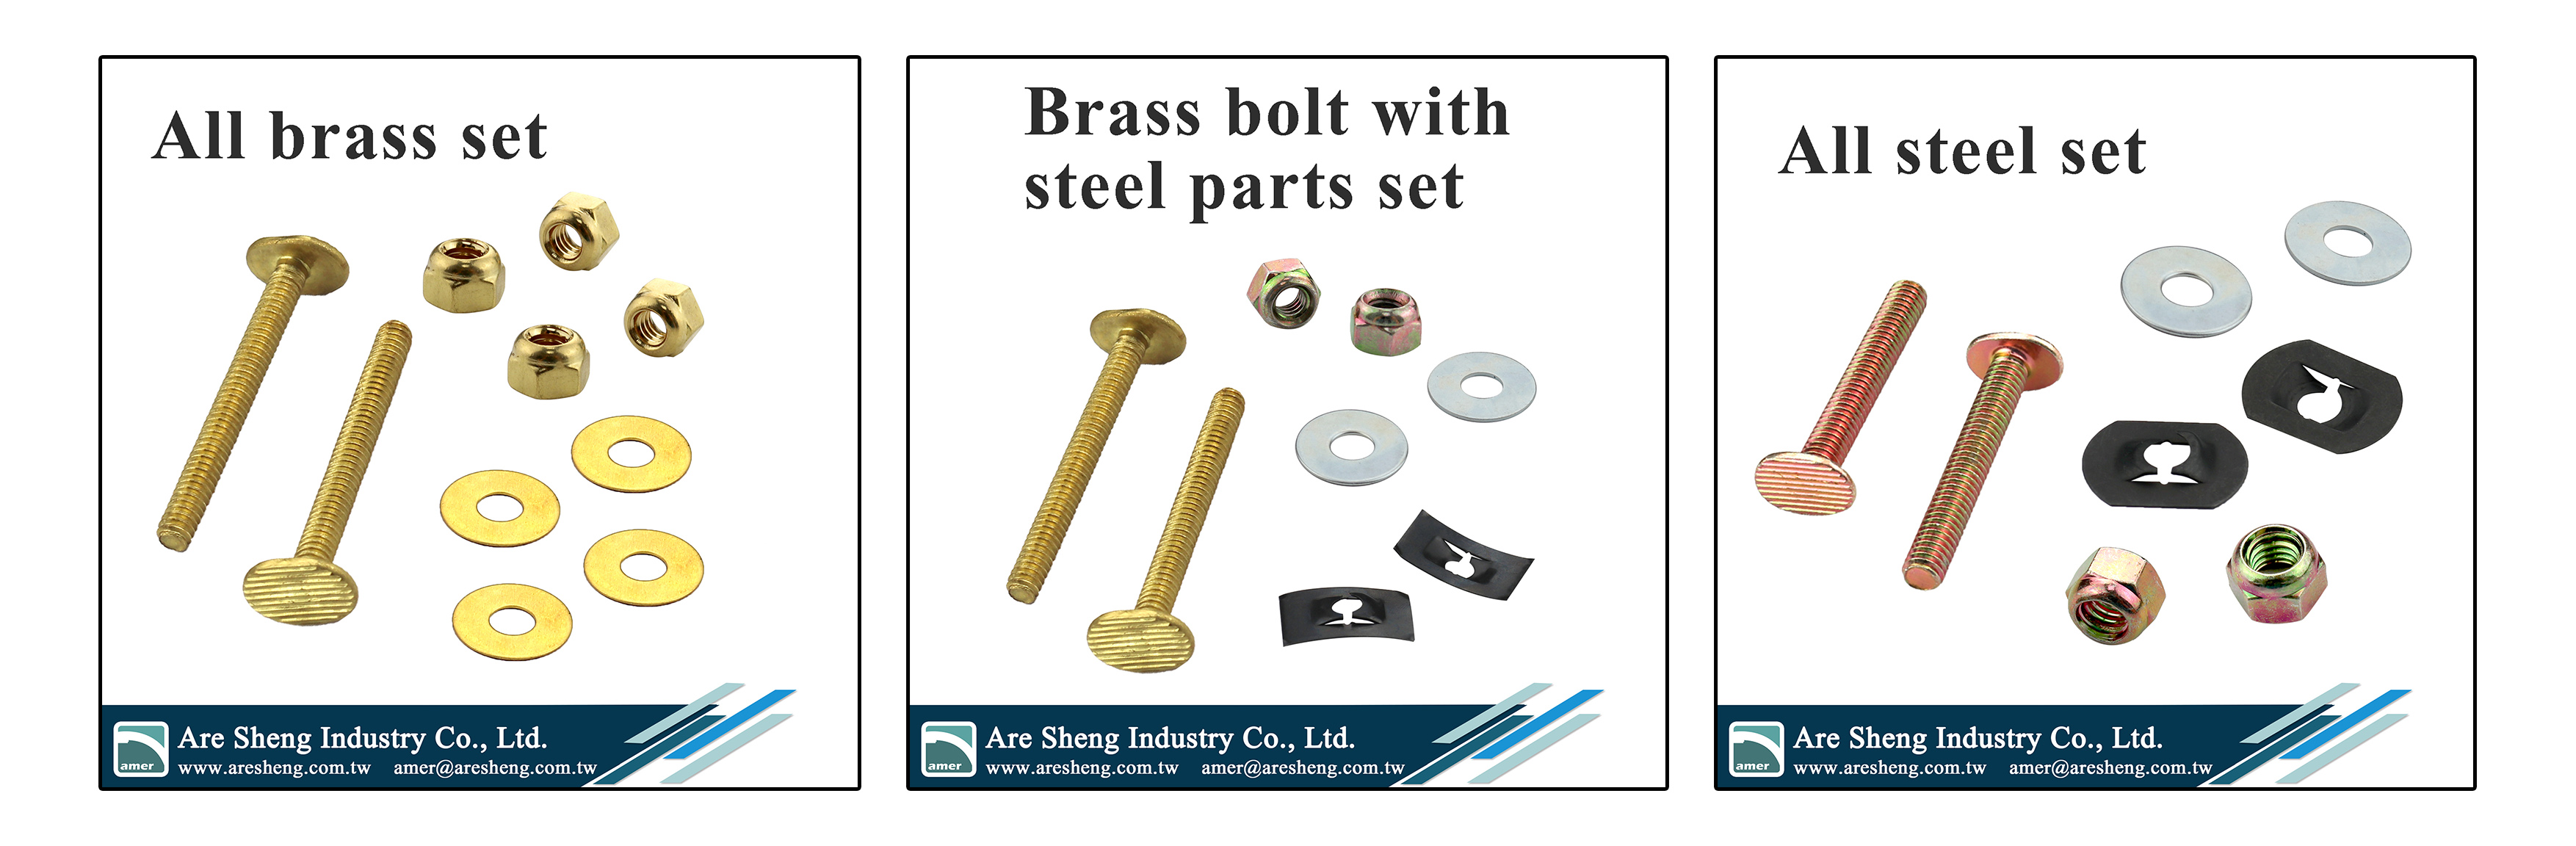 Installation Instruction Step 1: Turn off the water In most cases, you will find a shutoff valve on the wall behind or beside the toilet. There are different shutoff valves, but the function is the same—switch on and off the water. Here, switch off the water. Then, flush the toilet to drain out all the water in the toilet tank and bowl. 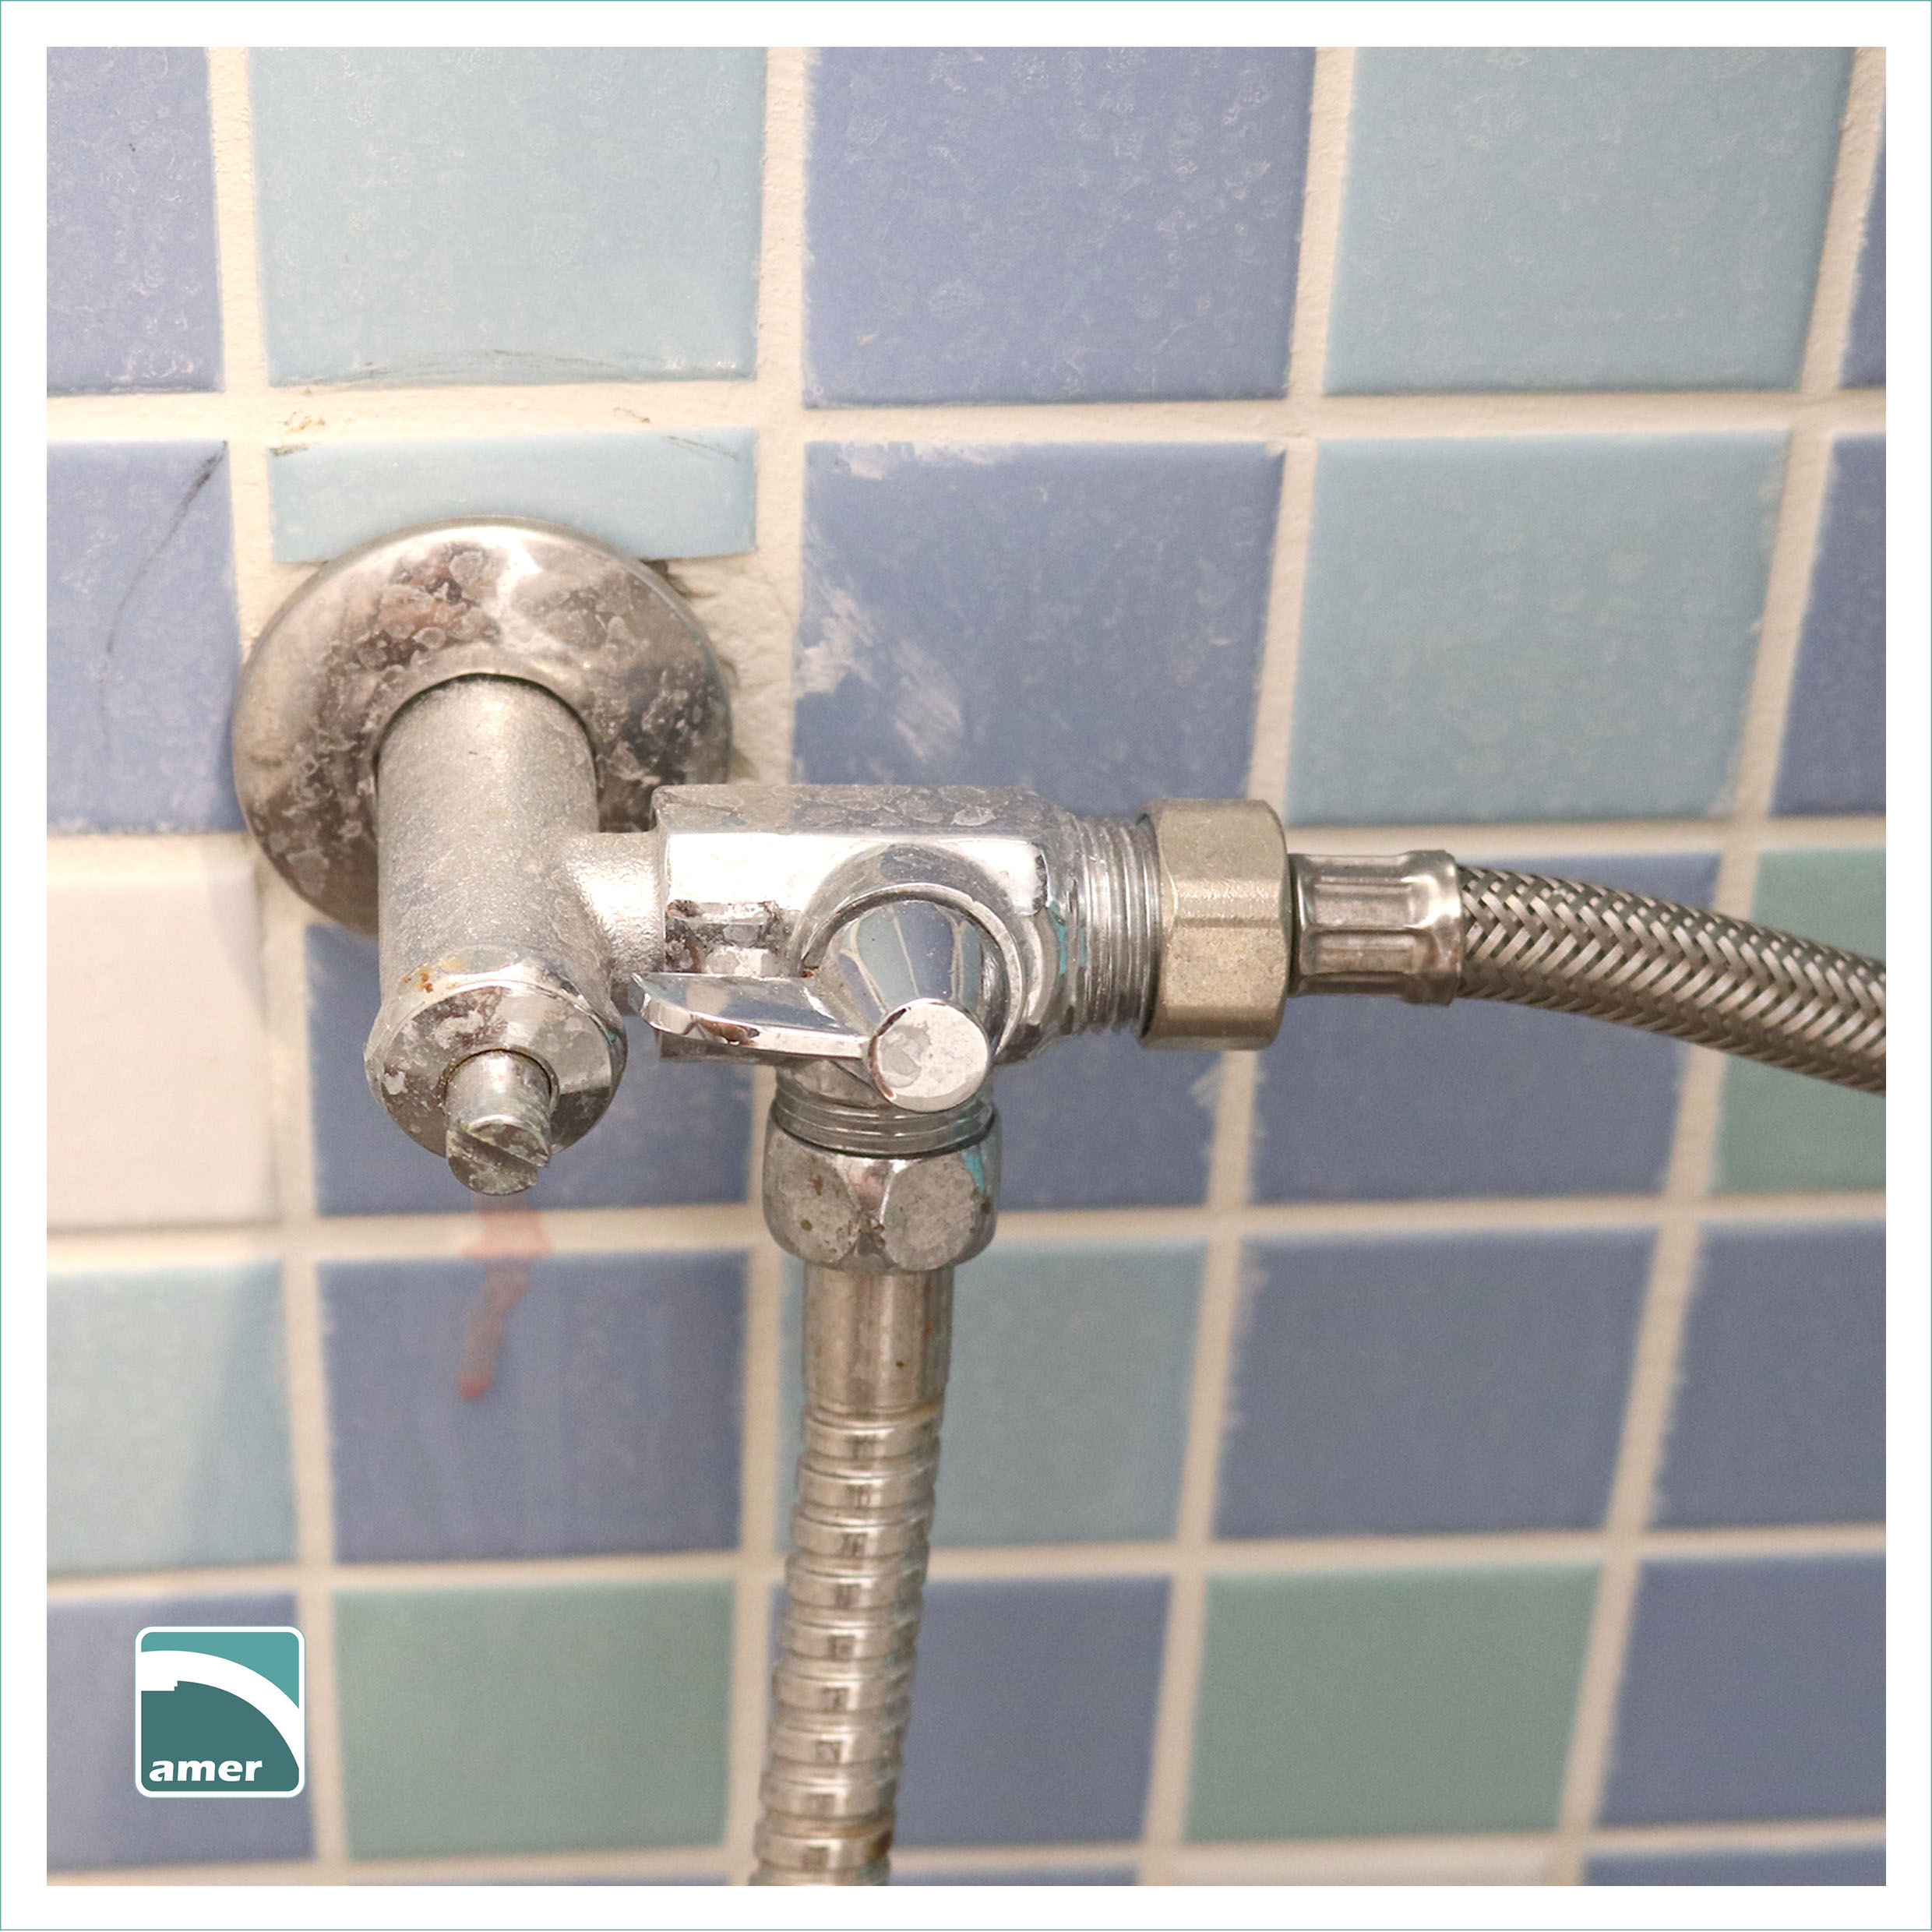 Step 2: Unscrew the water supply line The toilet water supply line usually has a 7/8” B.C. plastic nut screwed on the fill valve (sometimes brass nut). Unscrew it after switch off the valve. You will need a bucket here to hold the remaining water in the water supply line. Better to keep the floor dry. 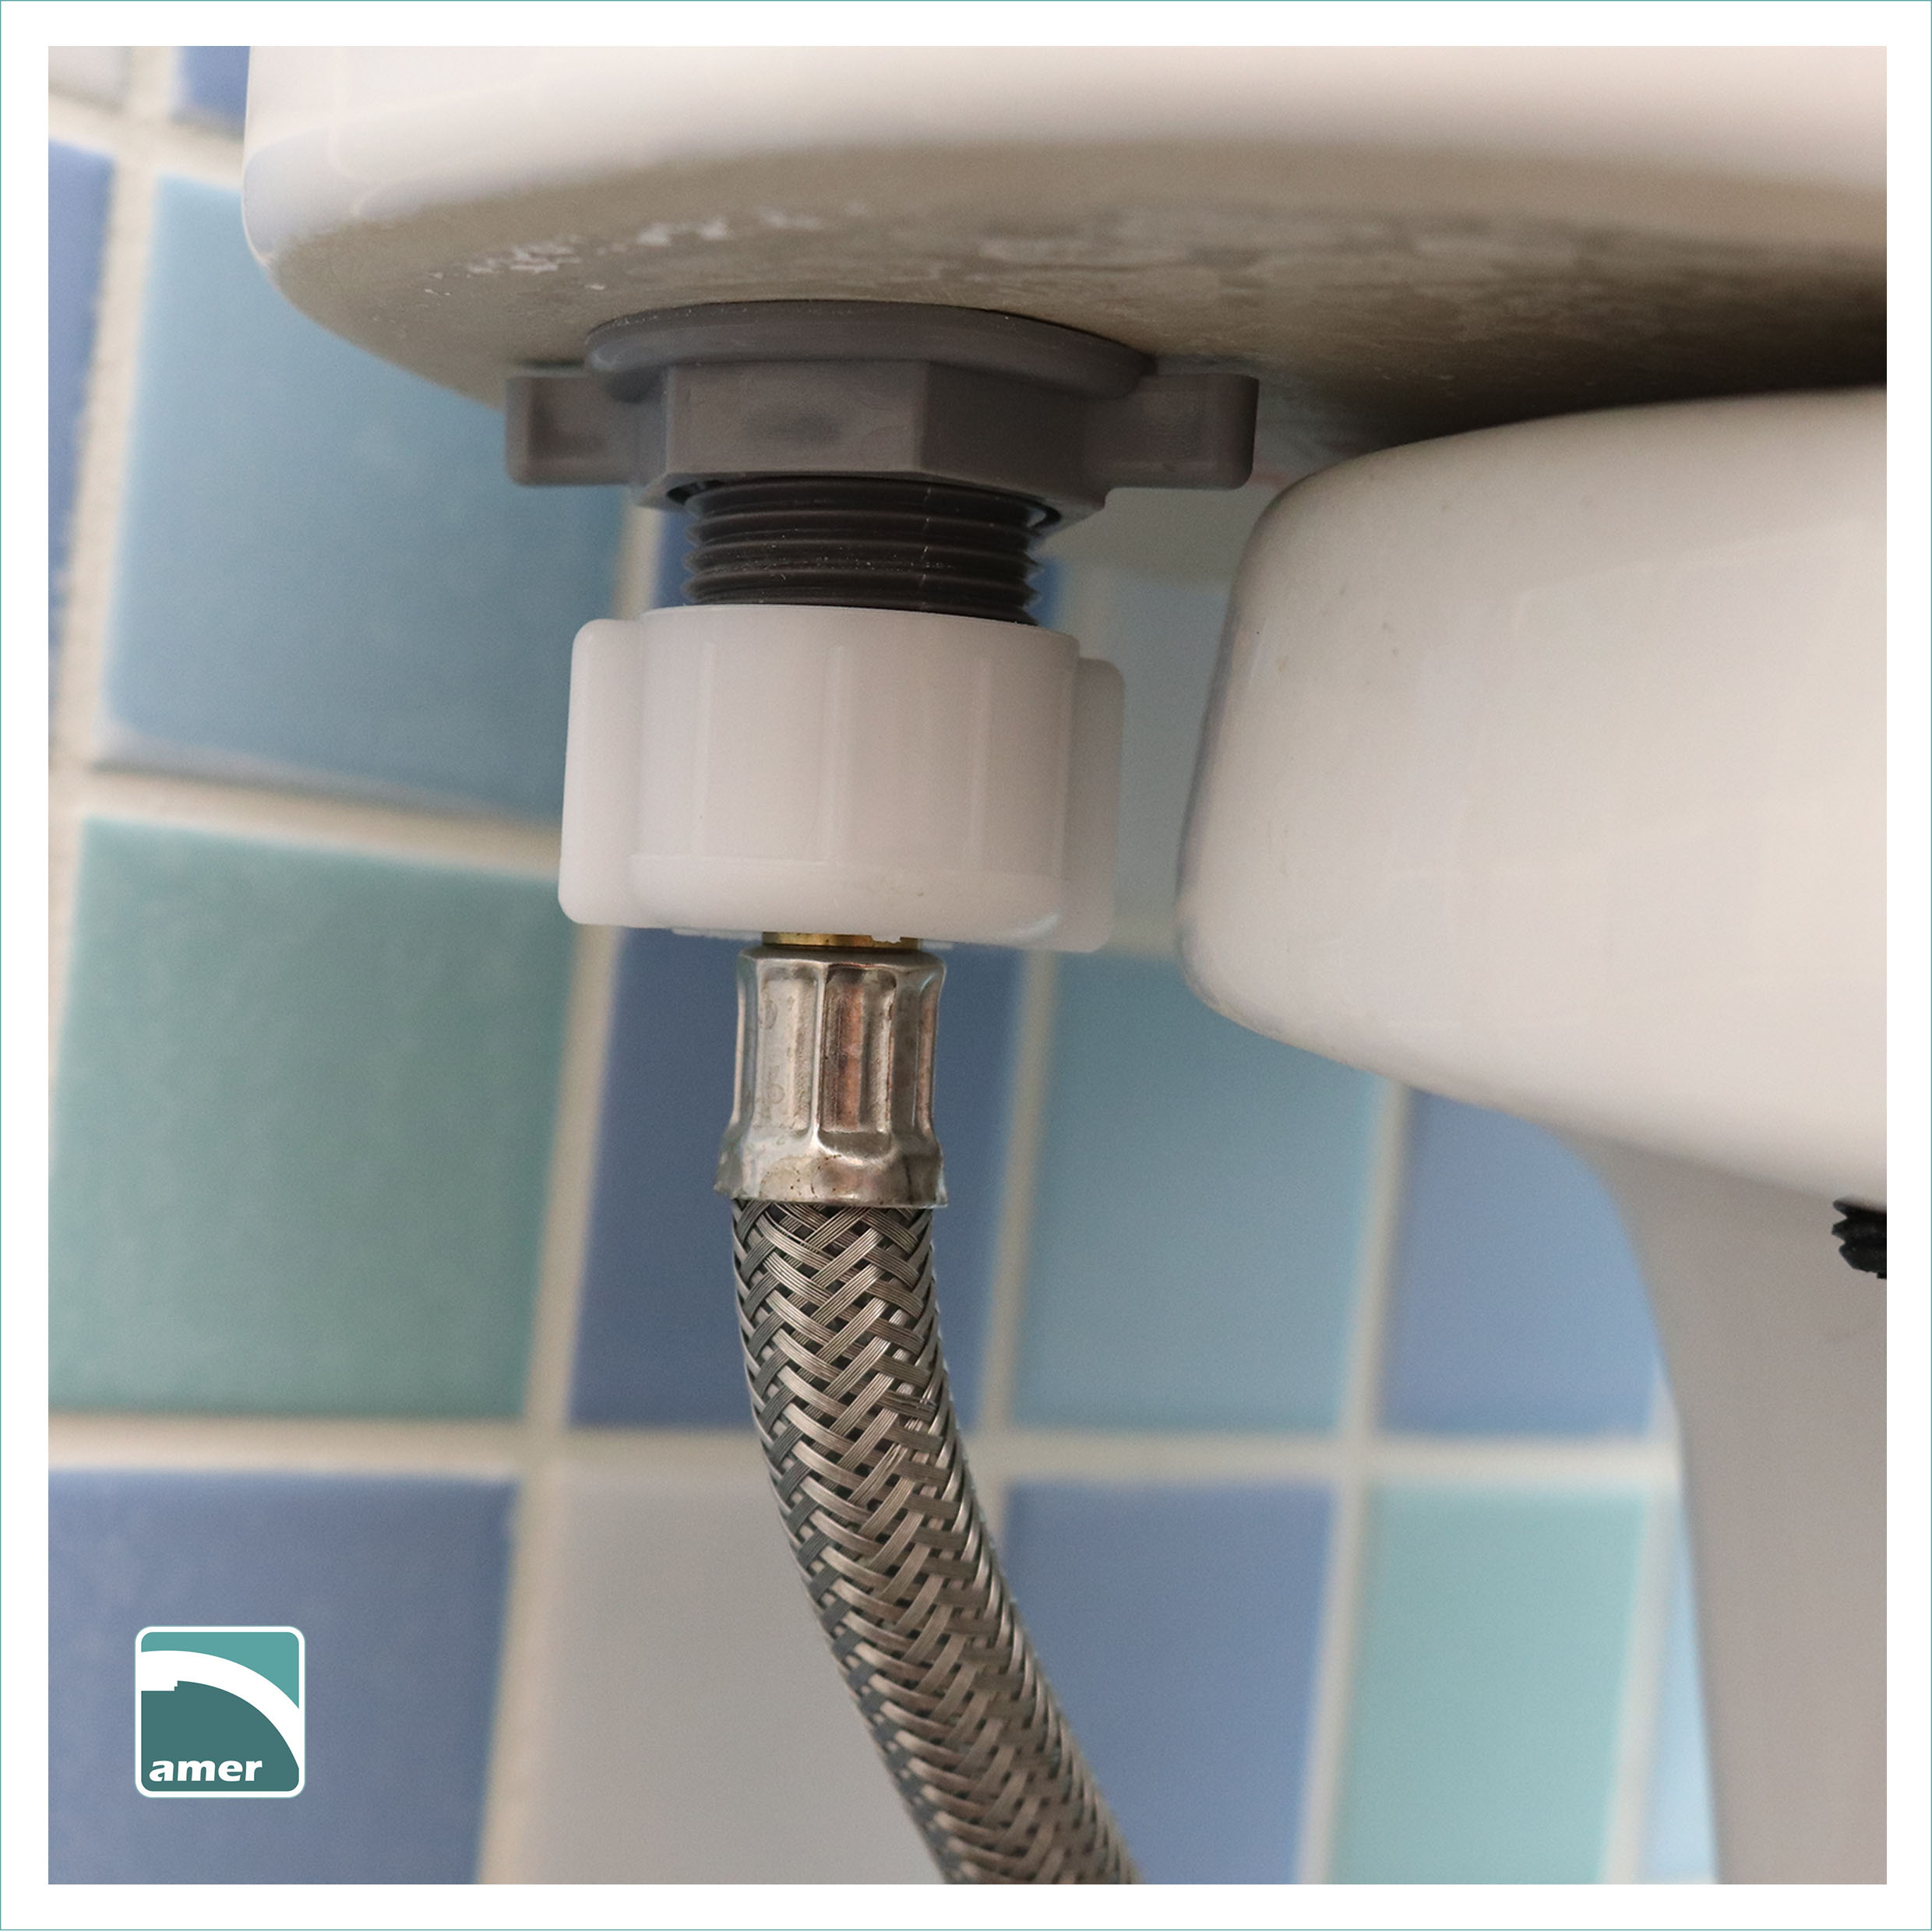 Step 3: Unscrew the tank bolt In most cases, the metal nuts are corroded and welded on the bolt. If it is a plastic nut, it will also stick on the bolt due to the scale. Spray some lubricant on it and grab a plier or wrench to unscrew it. Then, remove the tank from the bowl carefully. 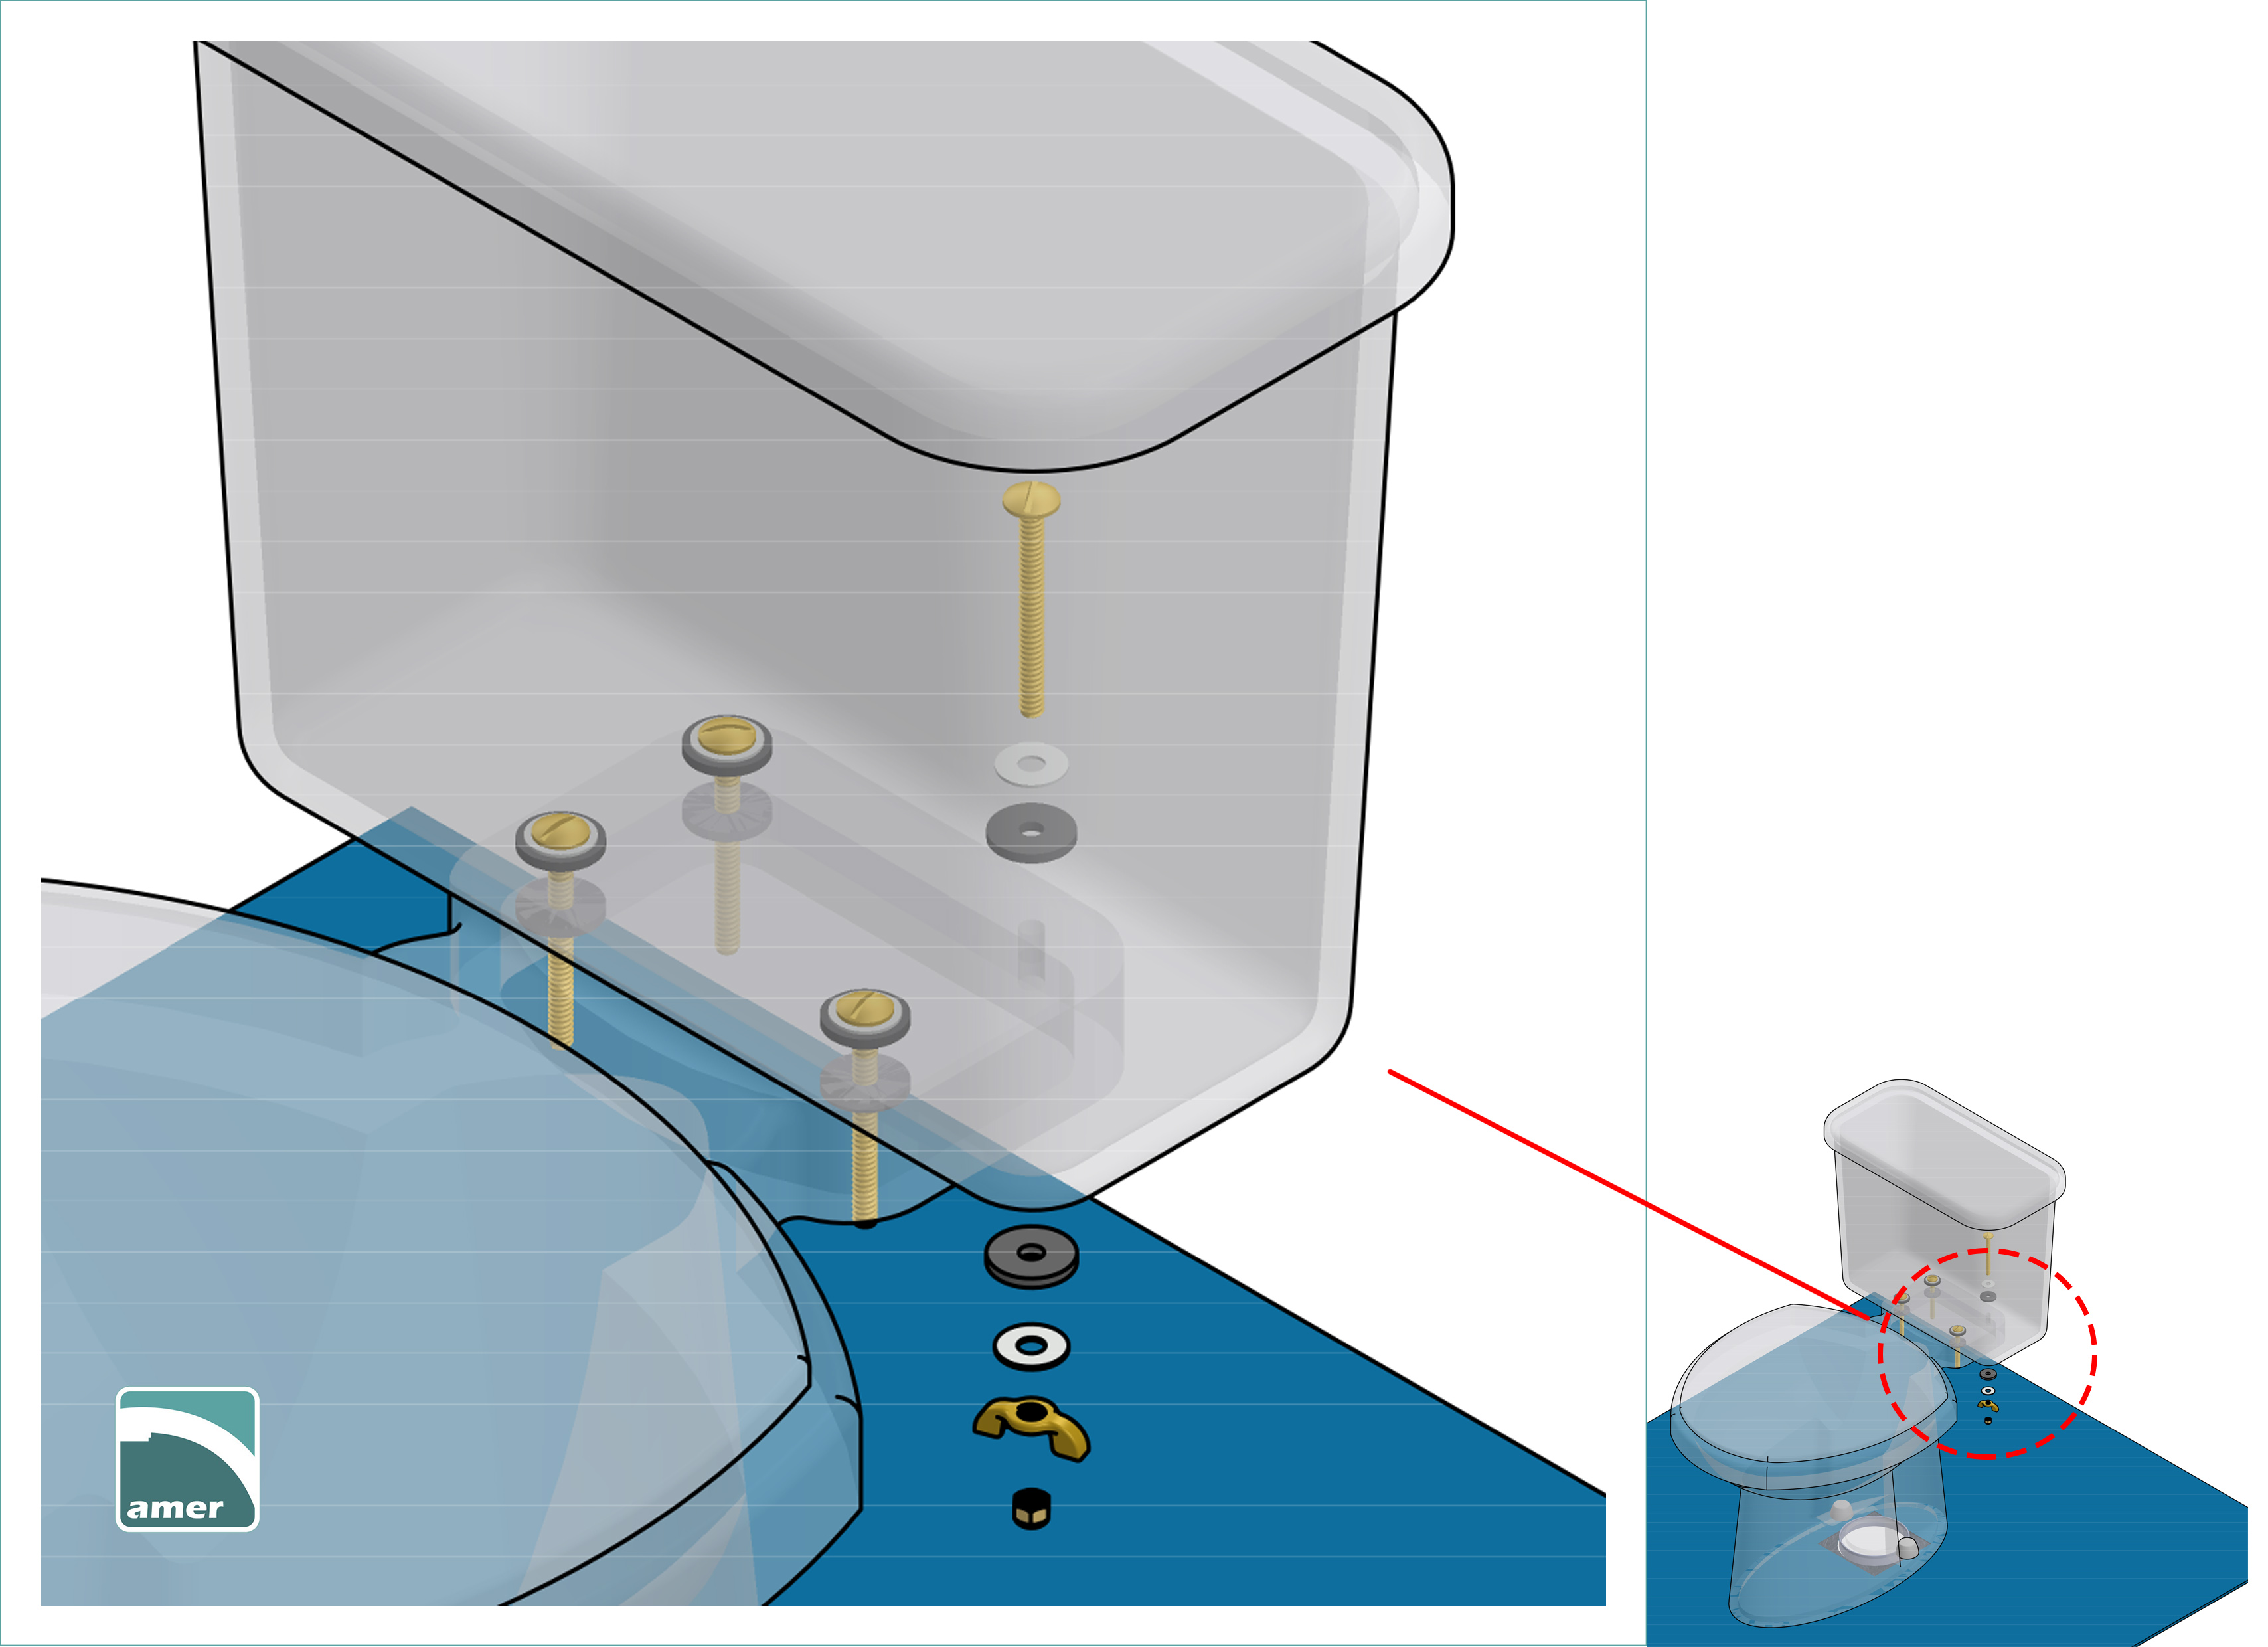 Step 4: Unscrew the closet bolt Remove the floor bolt cap. Unscrew the nut with an adjustable wrench or try to create enough space and cut the bolt with a hacksaw. Remove old caulk around the base of the bowl. You can use the putty knife to remove it. 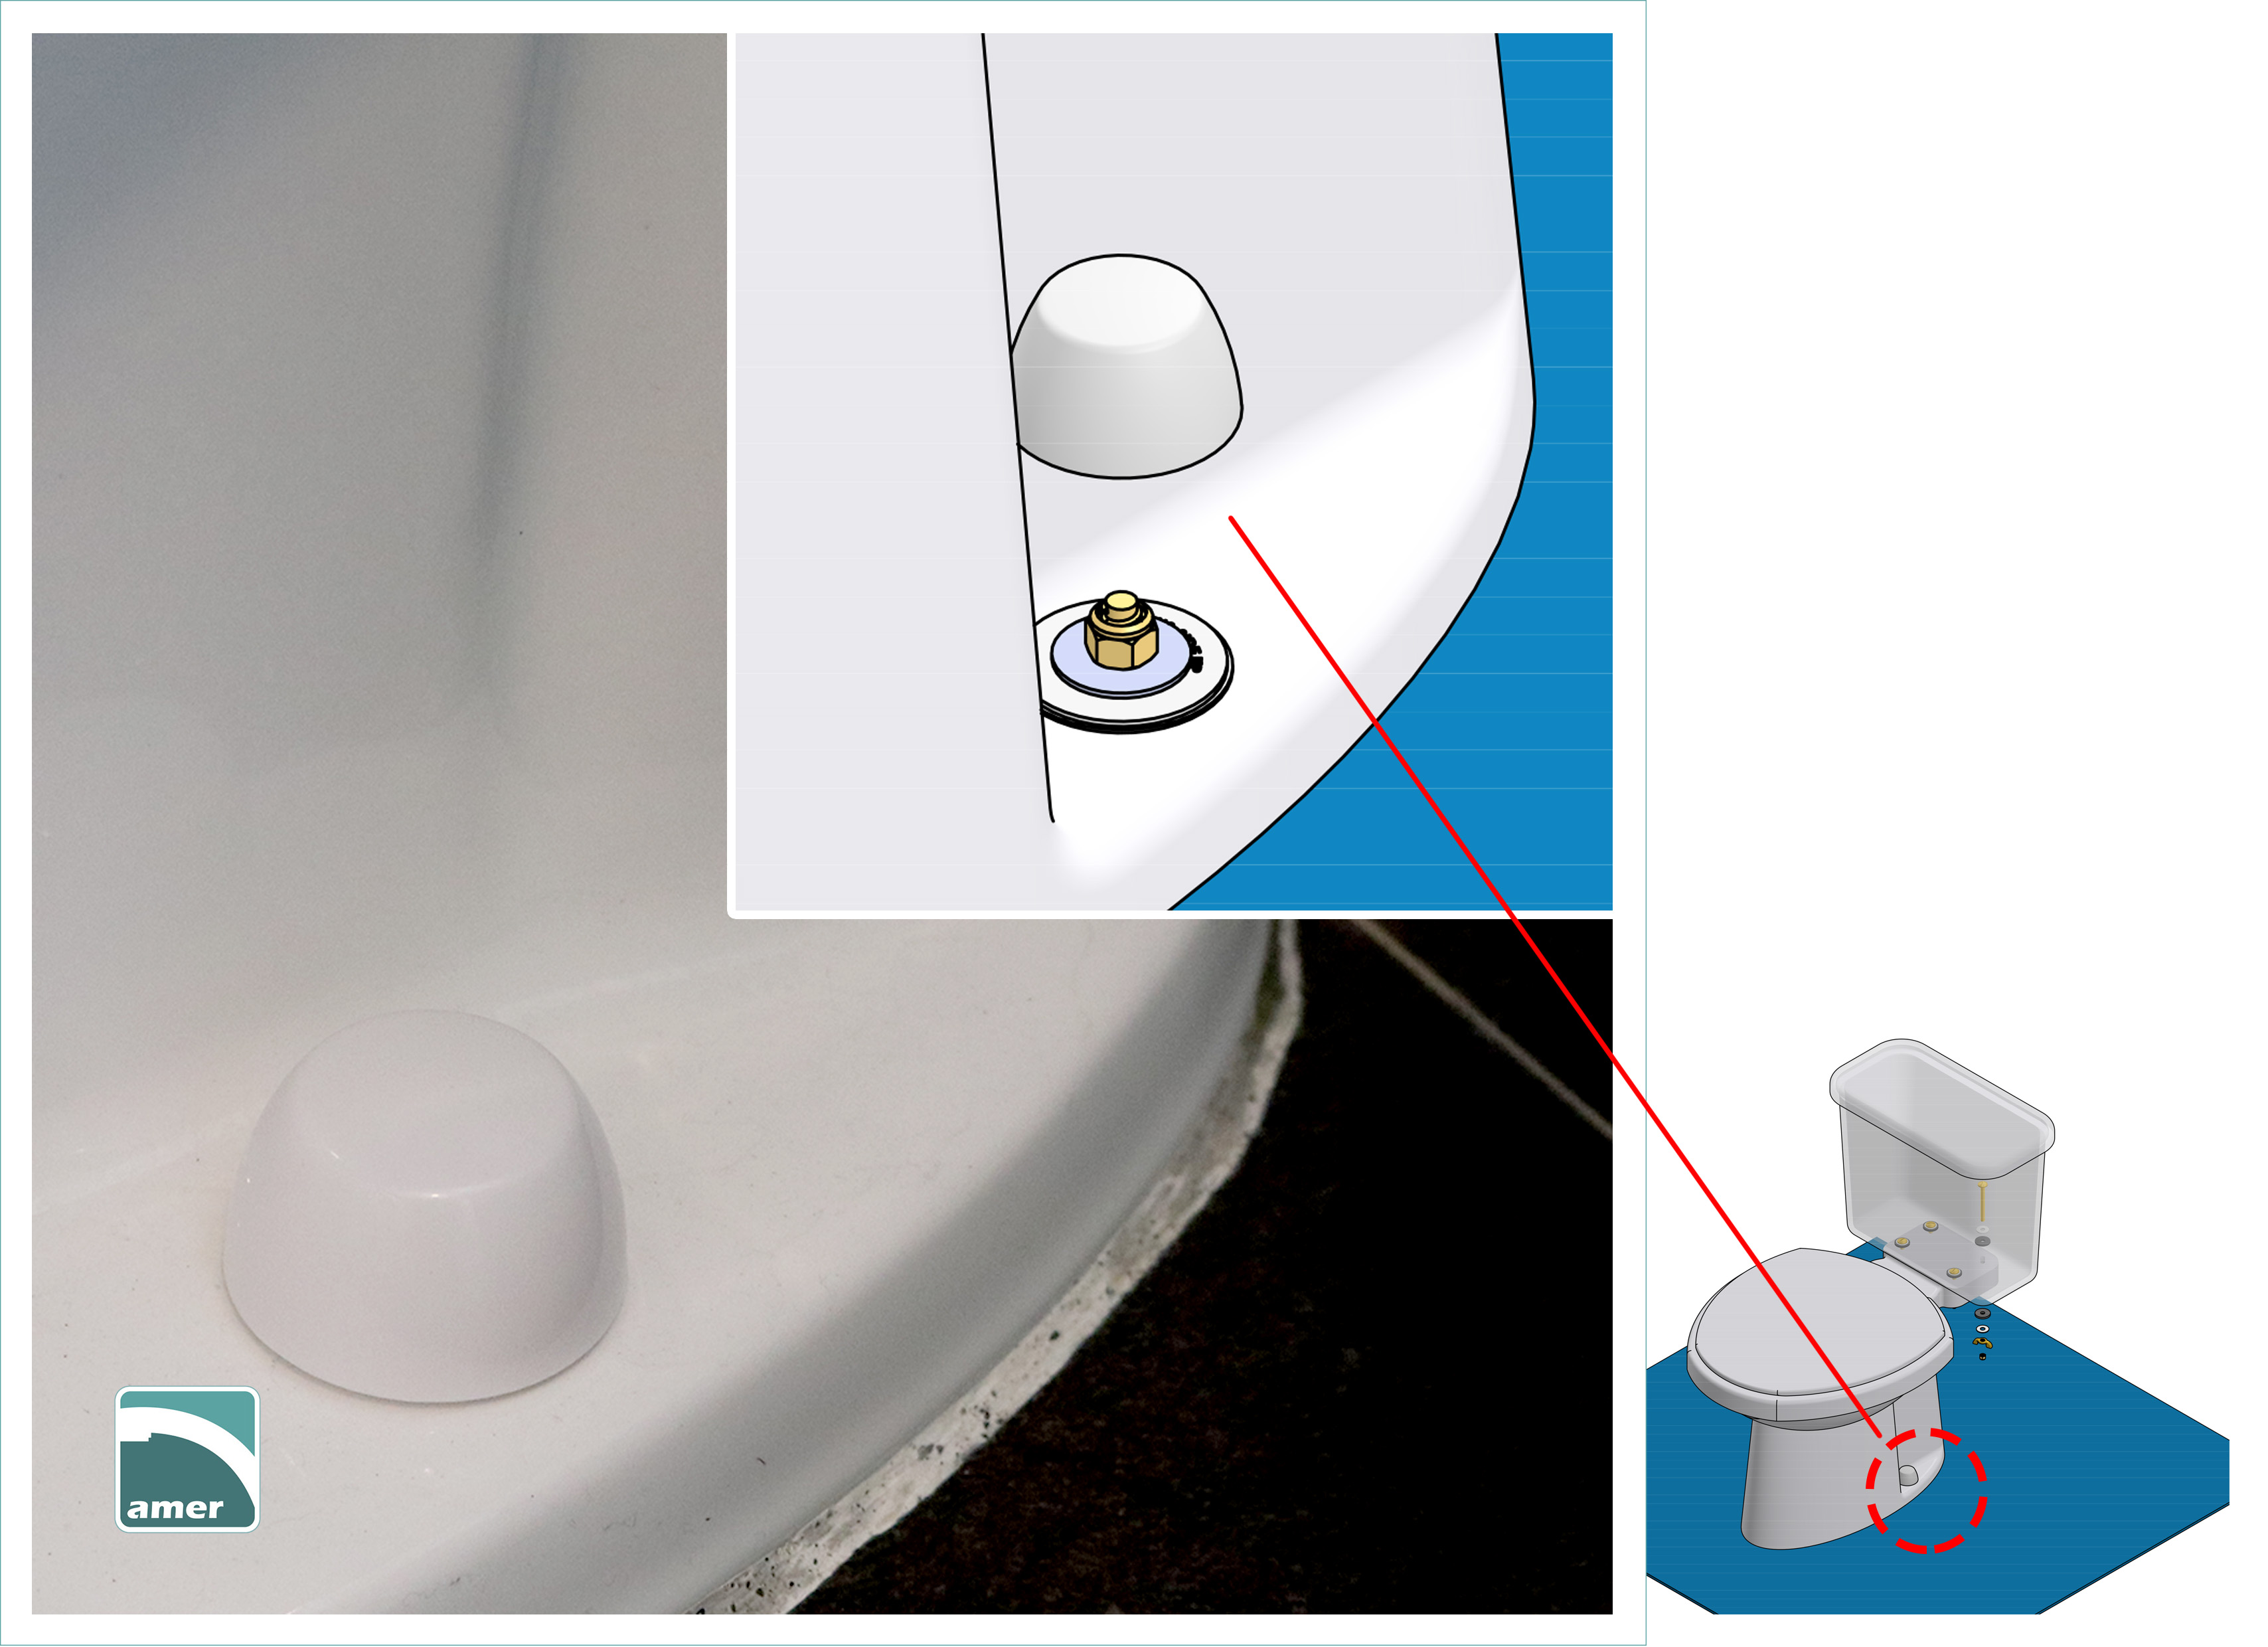 Step 5: Stuff the drain opening Find a piece of rag and stuff it into the PVC pipe so that you can prevent rubble or hardware parts from falling in. At the same time, this also prevents the odor from the sewage flooding your bathroom. Scrap off the remaining wax around the drain opening and wipe away the remaining.  Step 6: Inspect/replace the old flange Inspect the condition of the old flange. If it is cracked, replace it with a new one or use a flange repair kit as you wish. There are usually 4 screws fastening the flange to the floor. Unscrew them with a screwdriver (use an automatic one). Insert and slide the closet bolt to the right position on the flange. Use (1) Nut and washer (2) Captive washer (3)Speed nut to fix the bolt on the right position. Then, place the new wax ring on the flange. 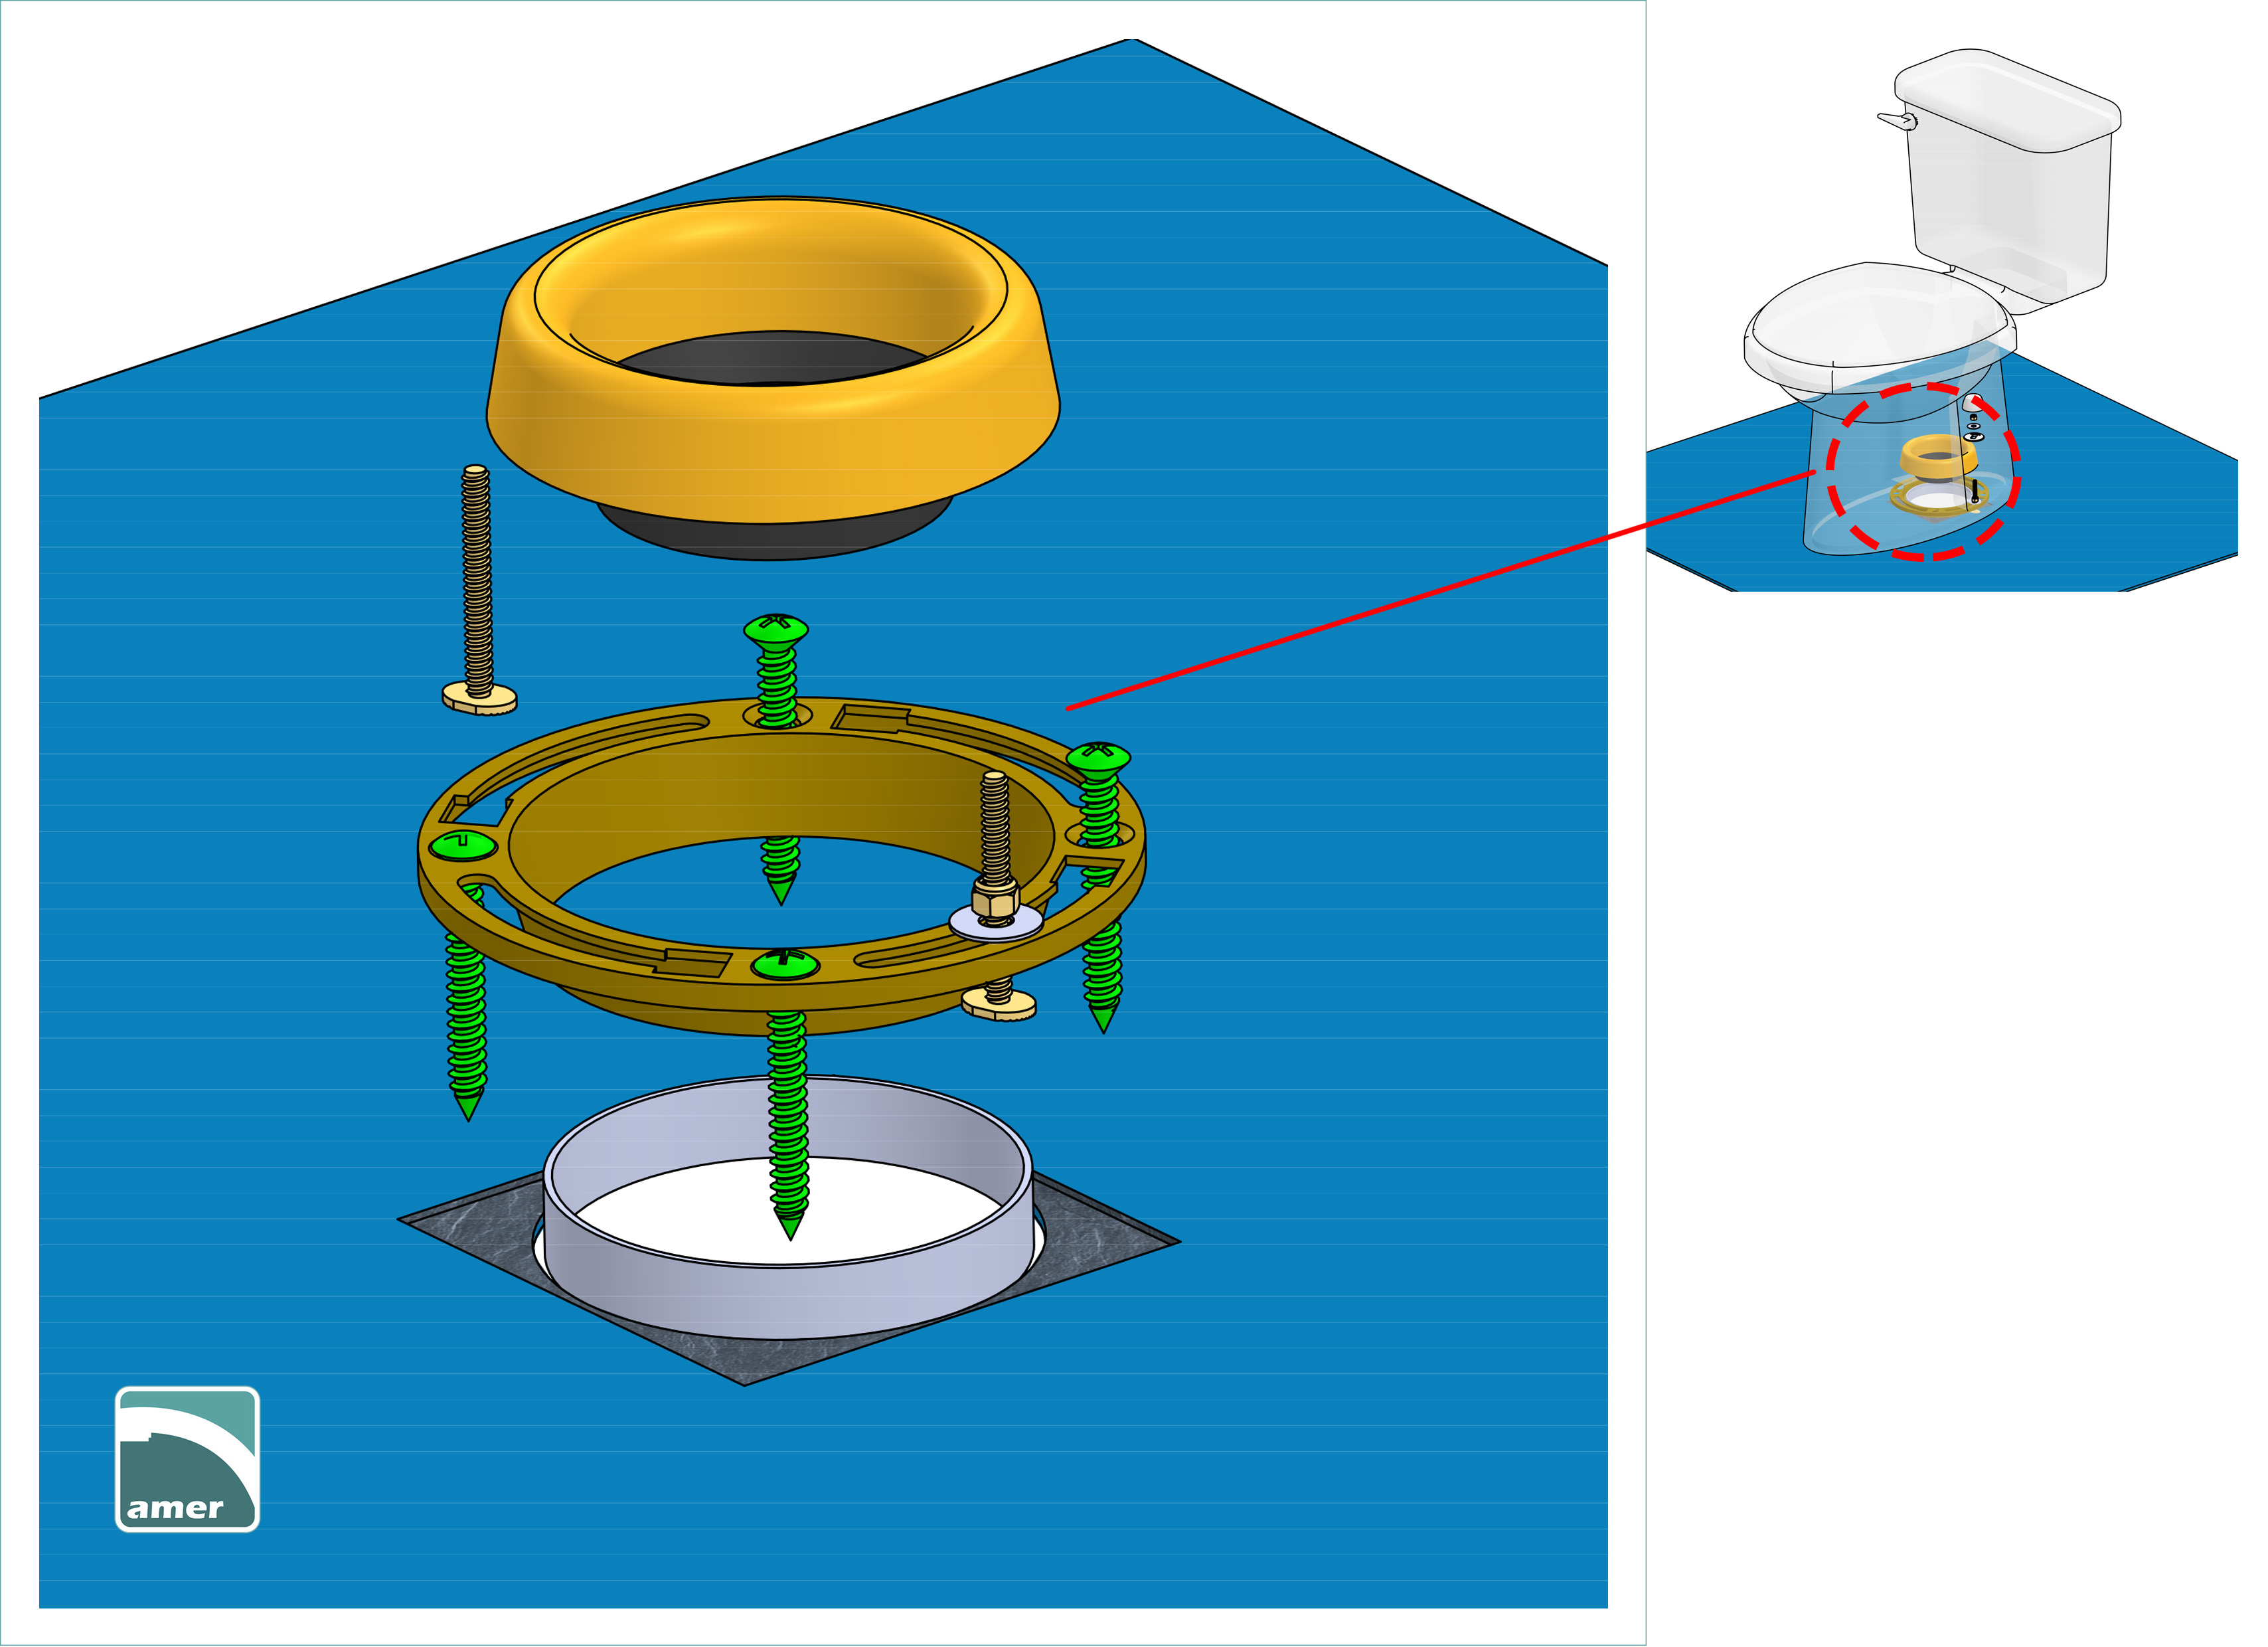 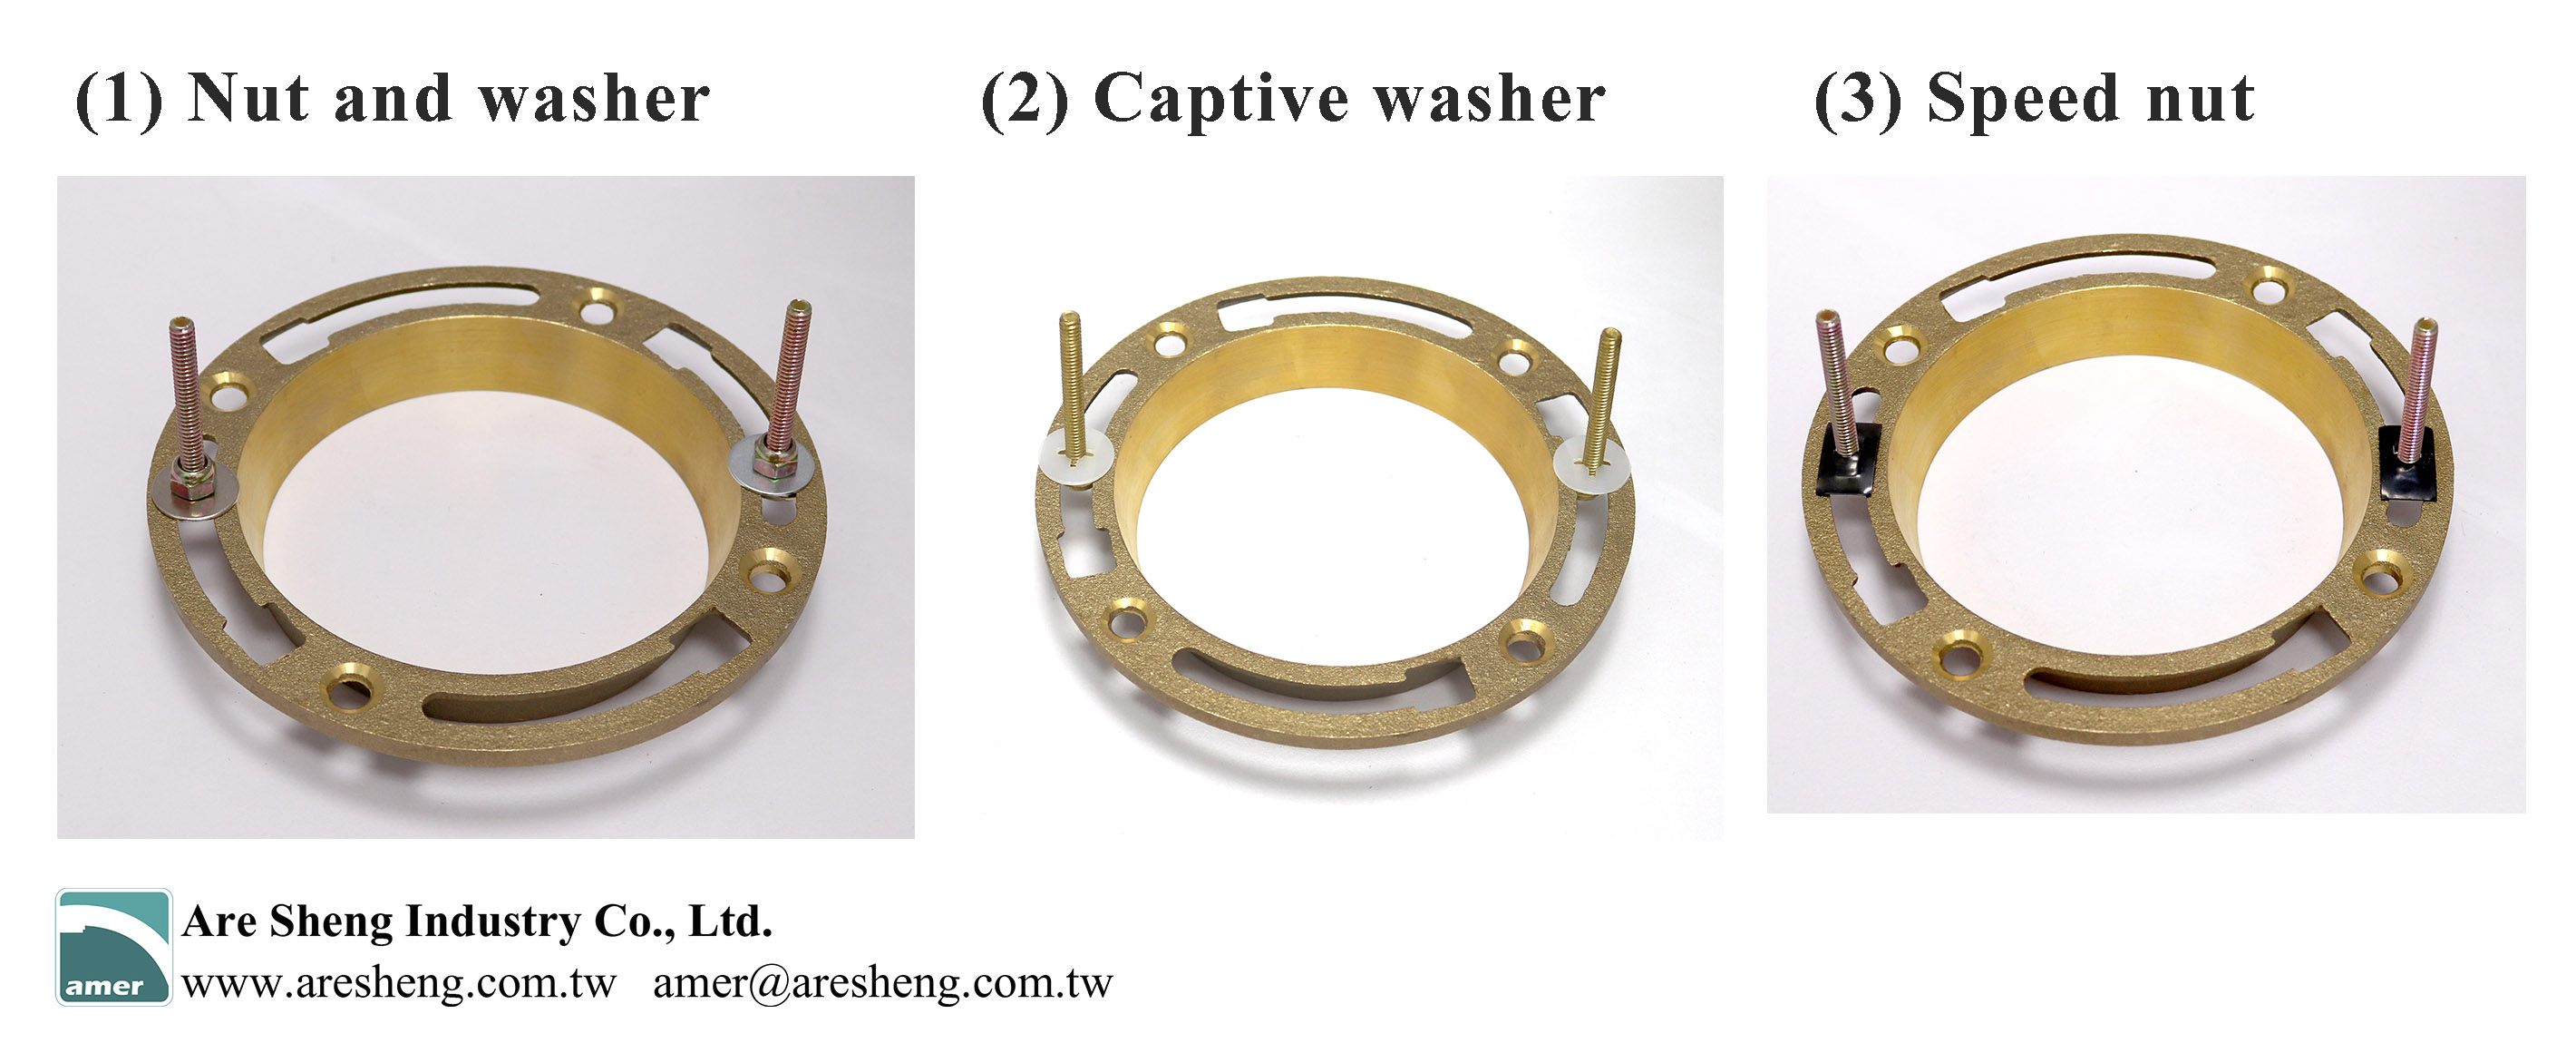 Step 7: Install the toilet bowl This is the most frustrating part in the installation process. Align the hole in the toilet base with the bolt and put it on. *If you are concerned about crushing the wax ring when missing the tip of the bolt, you can attach the wax ring to the bottom of the toilet before placing the bowl to the flange. 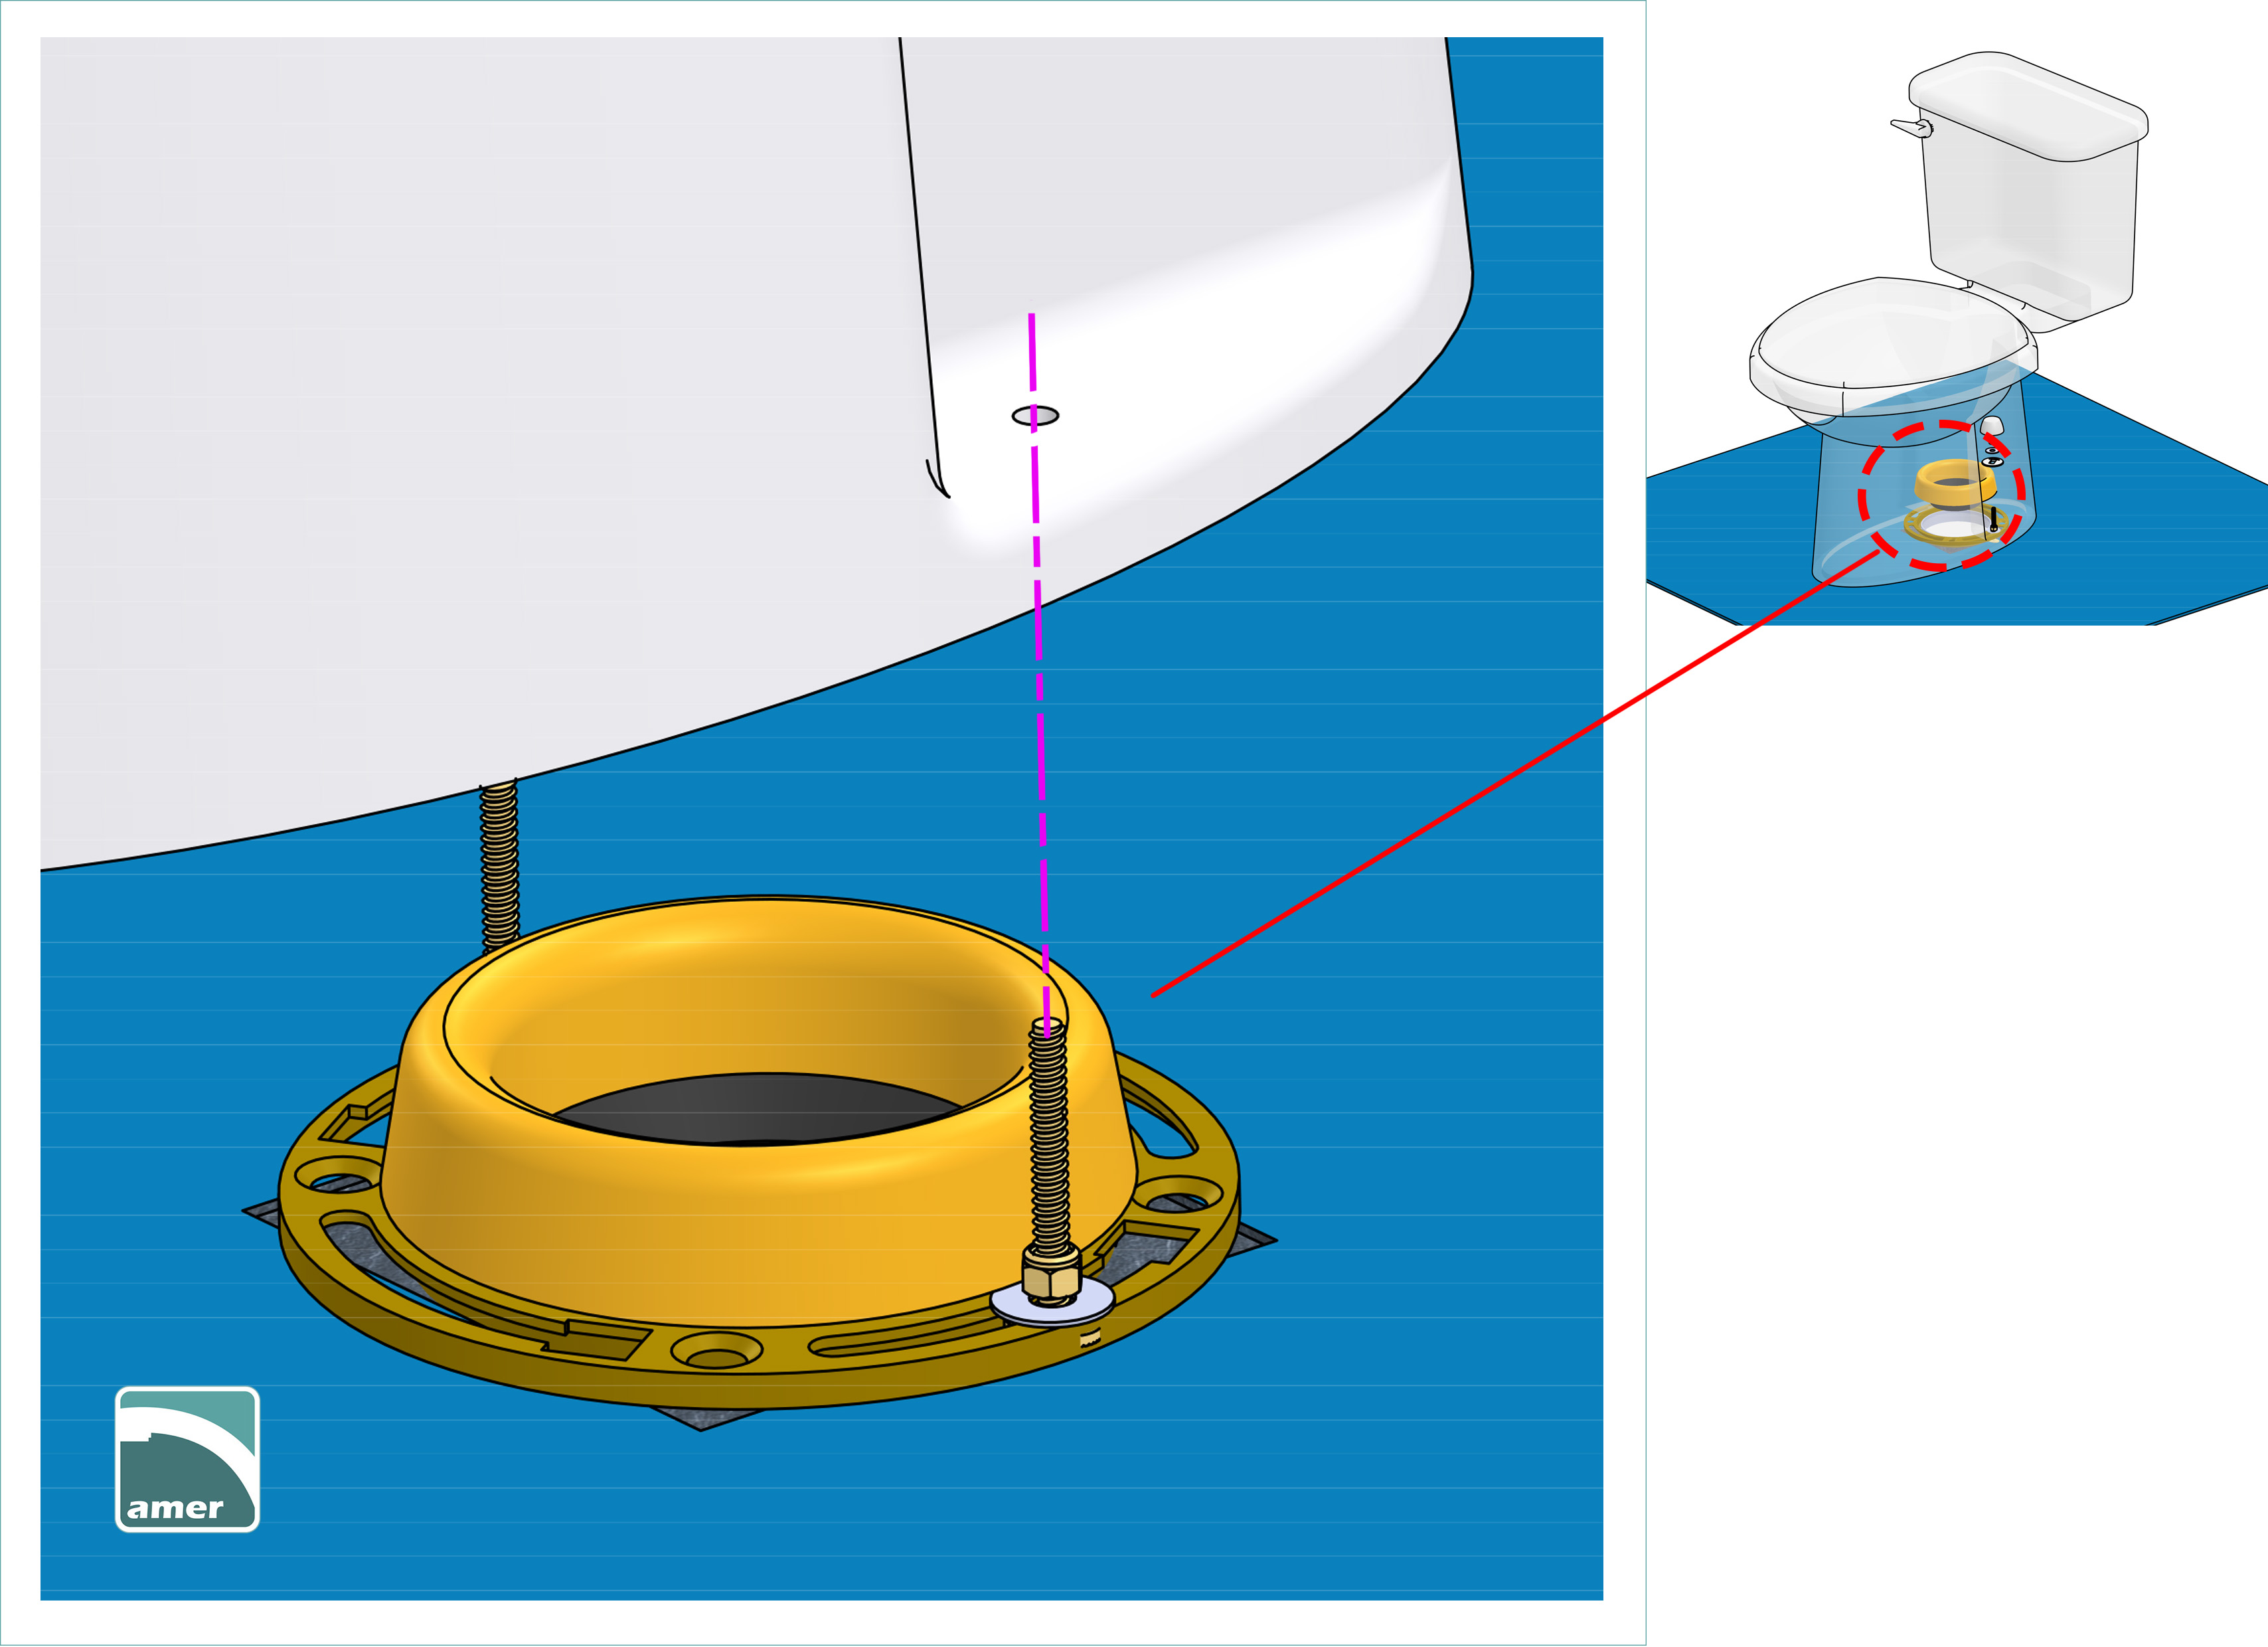 Step 8: Install the toilet cap Below is the sequence of installing the parts of the closet bolt. First is the bottom of the cap. Note that the side marked “this side up” should face up. Then, slide the metal washer on the bolt and tighten the nut on it. *Do not over-tighten to bolt to crack the porcelain bowl. Grab a hacksaw to cut off the excess bolt. Press the cap on. 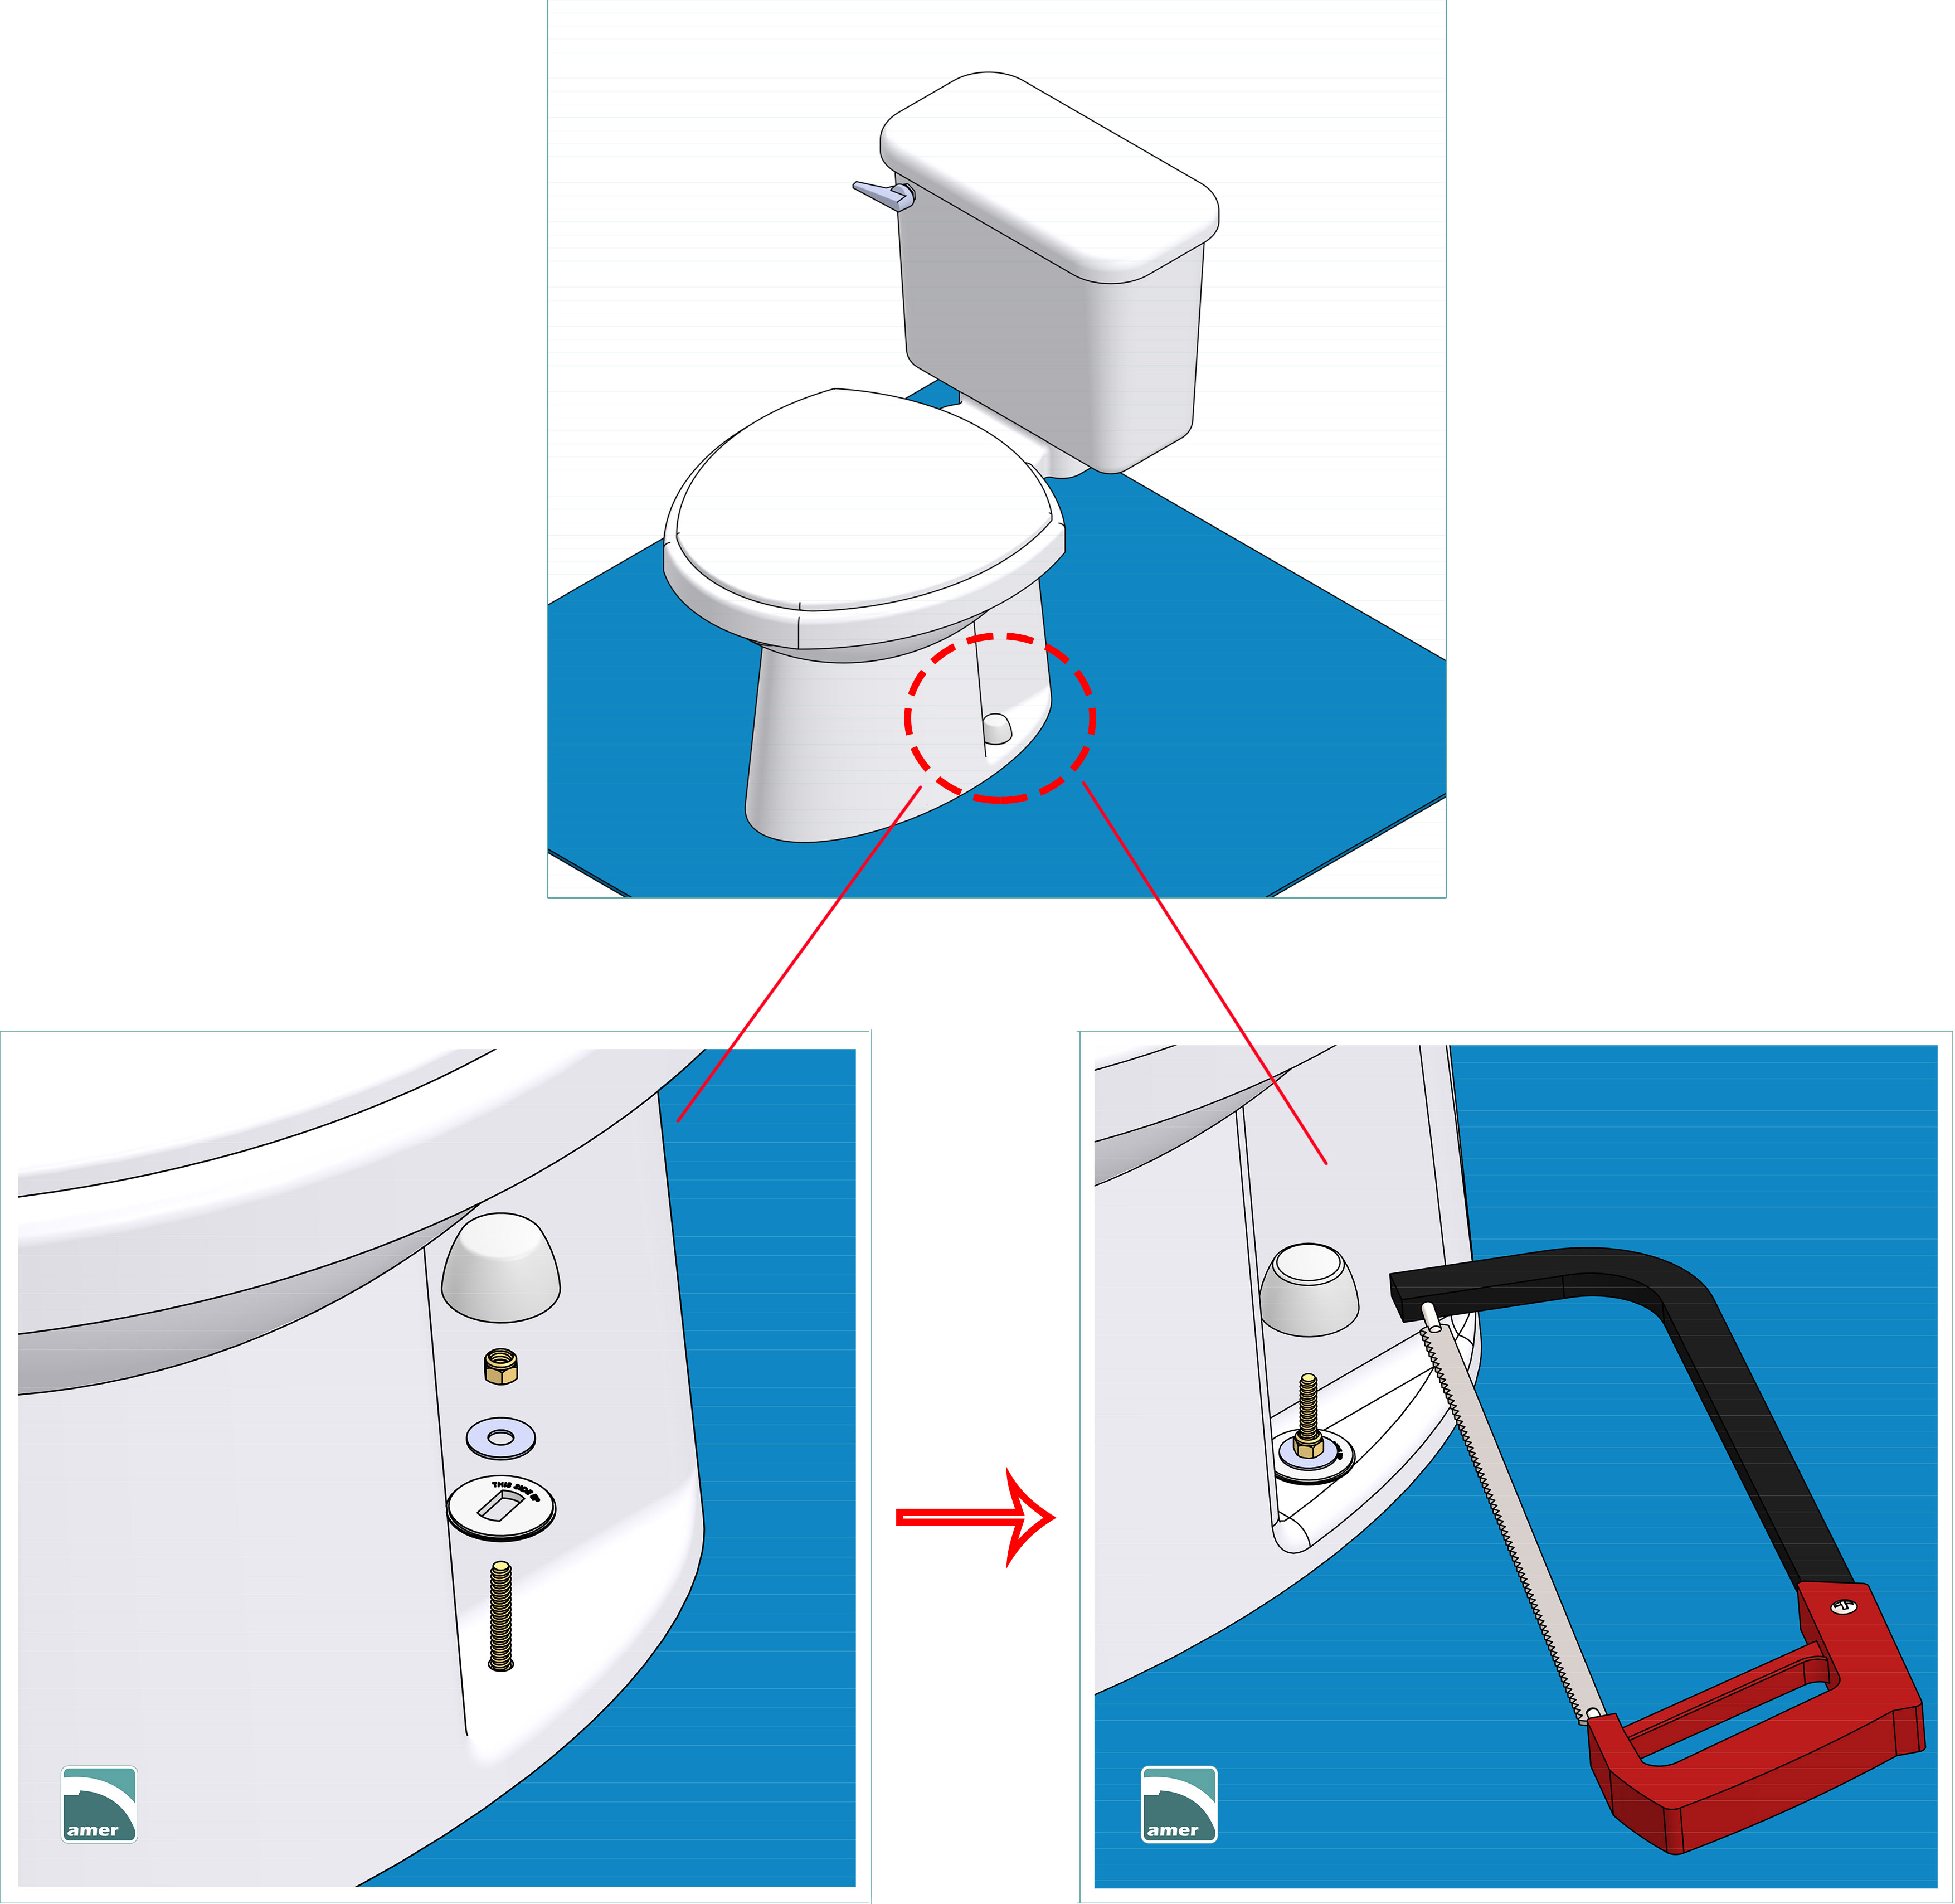 Step 9: Place the tank on the bowl The picture below illustrates the way to install the tank bolt. First, insert the metal washer and rubber washer to the bolt. Then, insert the bolt through the tank to the base of the bowl. Put the rubber and metal washer at the base. At last, fasten either the butterfly nut firmly by hand Or the hex nut by wrench. Not to over-tighten to avoid cracking the porcelain bowl. 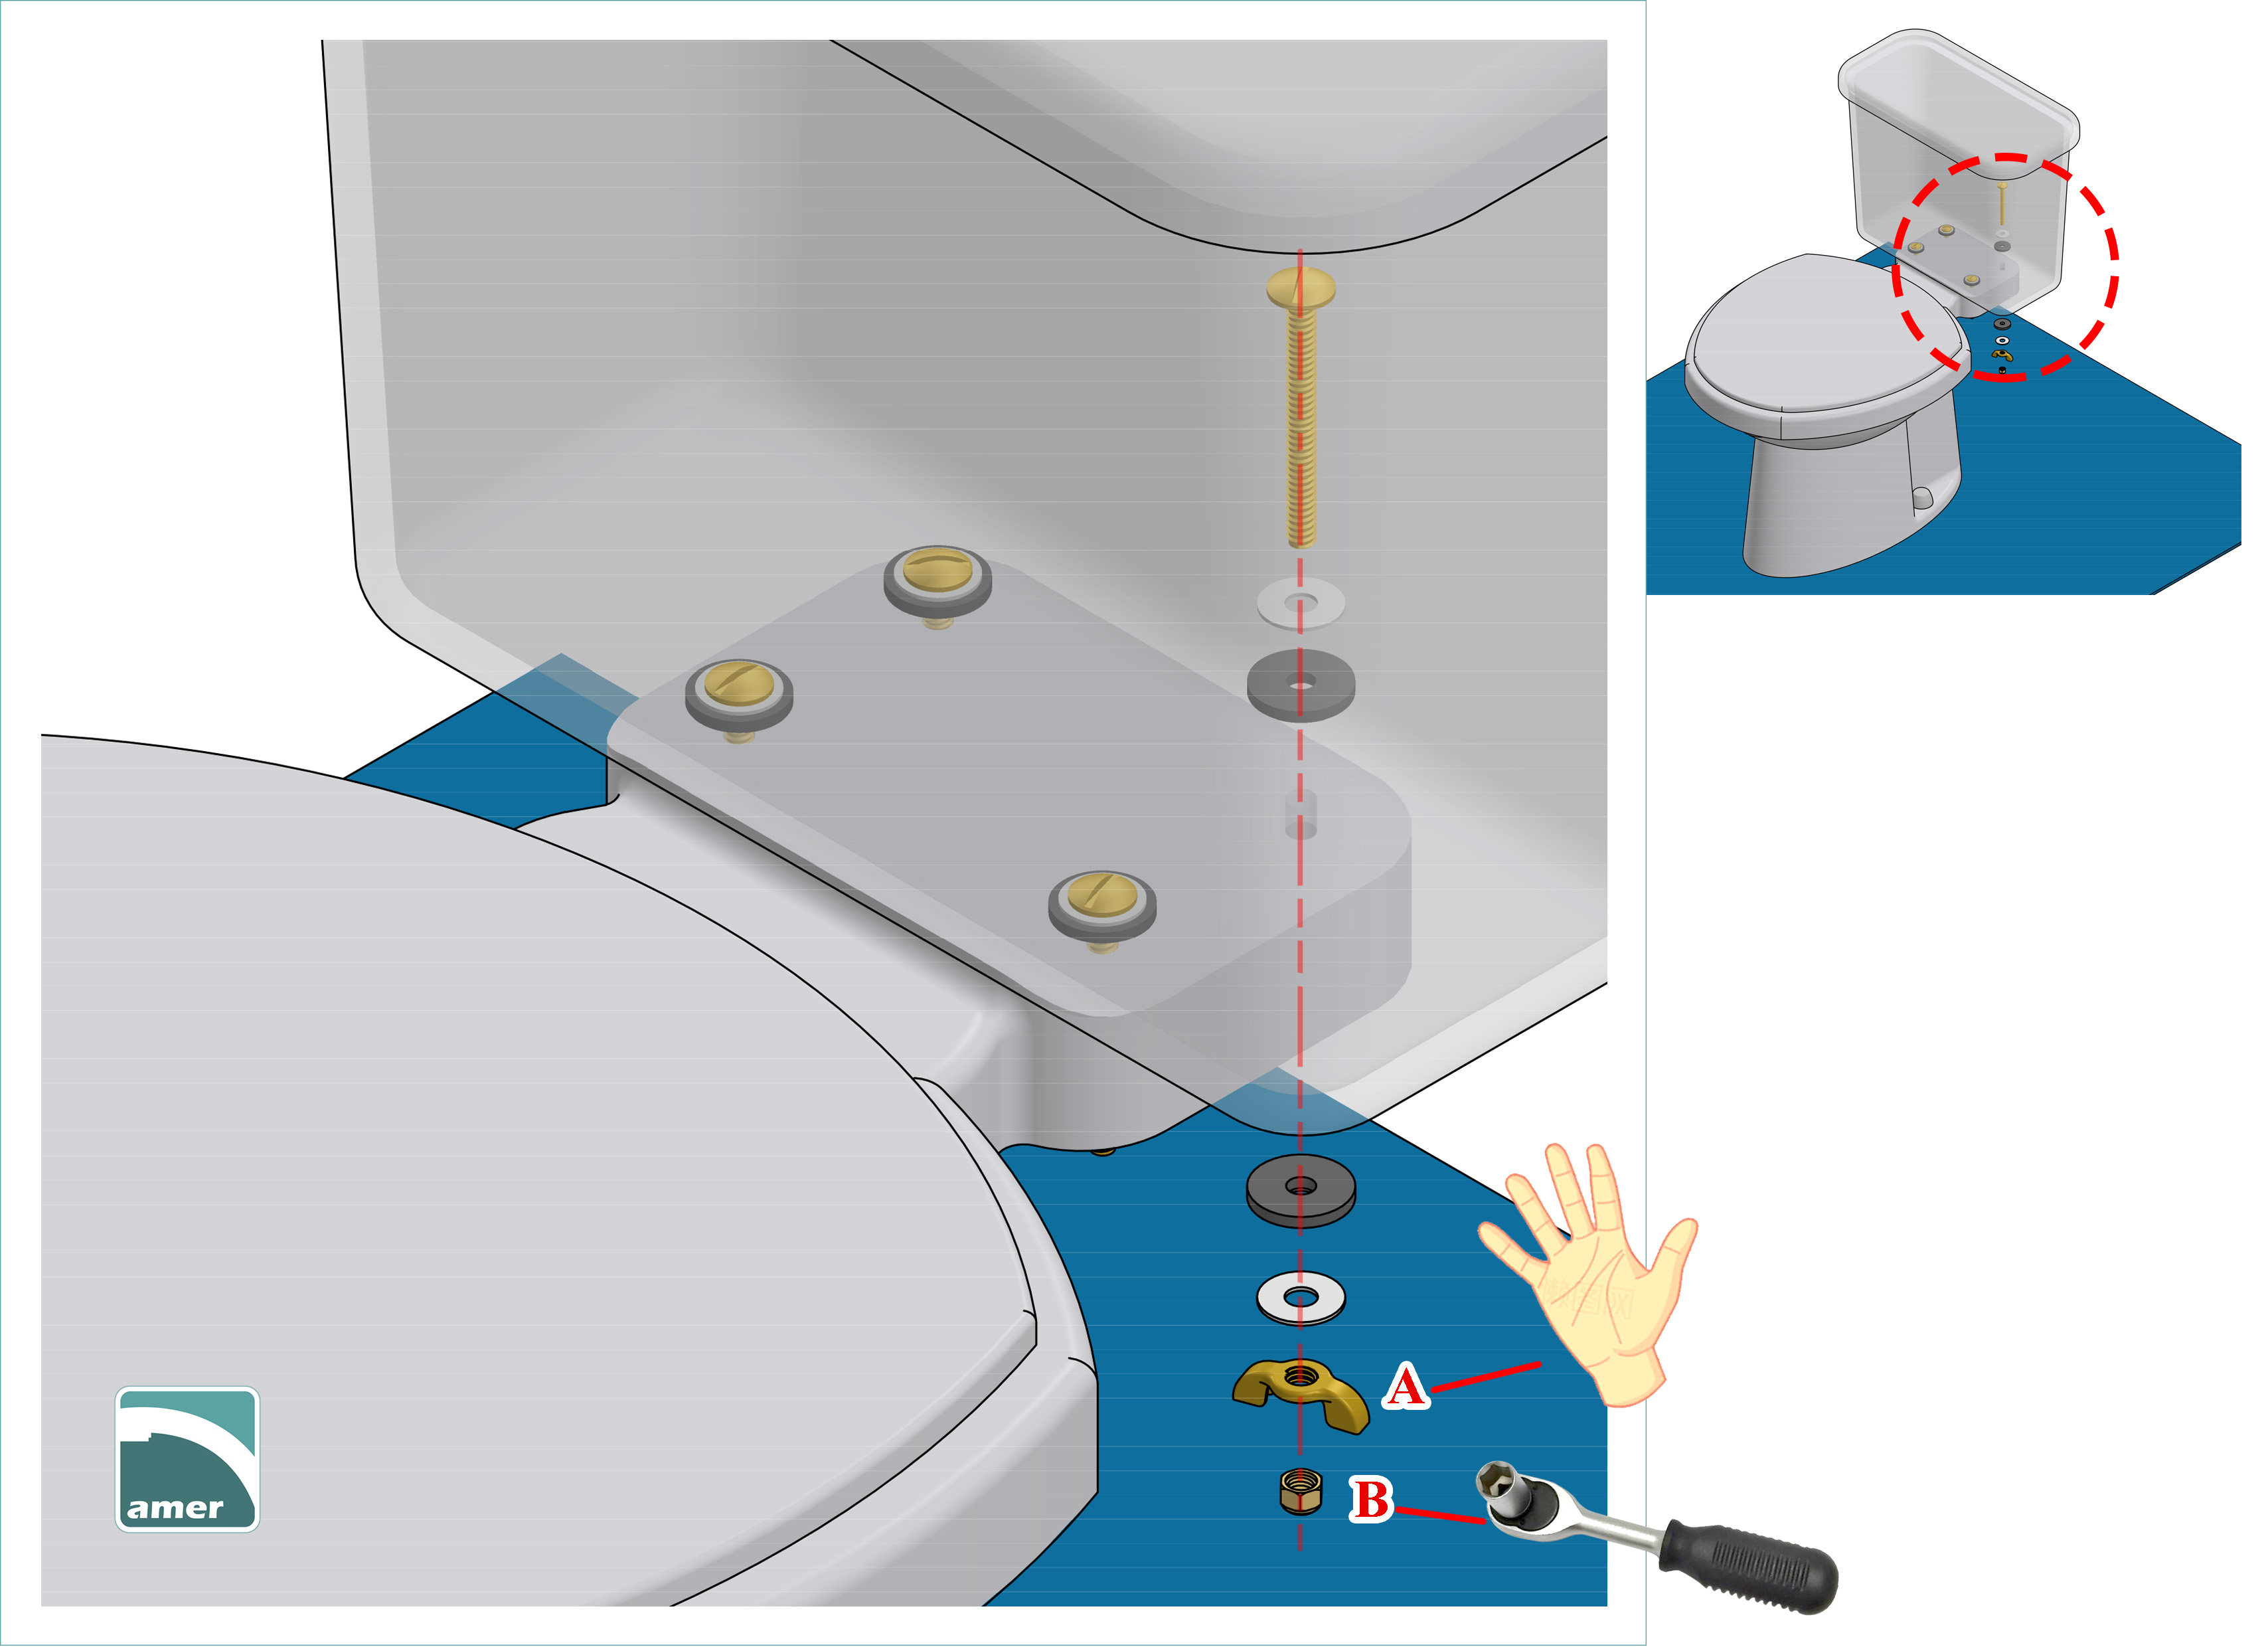
|